Brother International BES Embroidery Software 2 Instruction Manual - English - Page 126
Moving a Segment to the Start or, End of the Design
 |
View all Brother International BES Embroidery Software 2 manuals
Add to My Manuals
Save this manual to your list of manuals |
Page 126 highlights
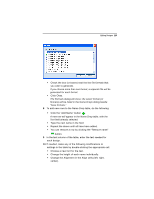
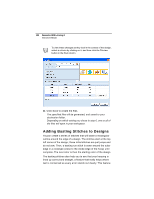
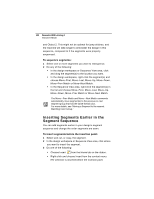
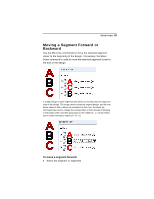
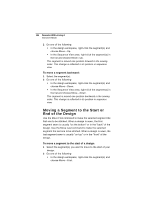
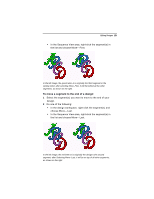
124 Pacesetter BES Lettering 2 Instruction Manual 2 Do one of the following: In the design workspace, right-click the segment(s) and choose Move-Up. In the Sequence View area, right-click the segment(s) in the list and choose Move-Up. The segment is moved one position forward in the sewing order. This change is reflected in its position in sequence view. To move a segment backward: 1 Select the segment(s). 2 Do one of the following: In the design workspace, right-click the segment(s) and choose Move-Down. In the Sequence View area, right-click the segment(s) in the list and choose Move-Down. The segment is moved one position backward in the sewing order. This change is reflected in its position in sequence view. Moving a Segment to the Start or End of the Design Use the Move First command to make the selected segment the first one to be stitched. When a design is sewn, the first segment sewn is usually "on the bottom" or in the "back" of the design. Use the Move Last command to make the selected segment the last one to be stitched. When a design is sewn, the last segment sewn is usually "on top" or in the "front" of the design. To move a segment to the start of a design: 1 Select the segment(s) you want to move to the start of your design. 2 Do one of the following: In the design workspace, right-click the segment(s) and choose Move-First.
-
 1
1 -
2
-
3
-
4
-
5
-
6
-
7
-
8
-
9
-
10
-
11
-
12
-
13
-
14
-
15
-
16
-
17
-
18
-
19
-
20
-
21
-
22
-
23
-
24
-
25
-
26
-
27
-
28
-
29
-
30
-
31
-
32
-
33
-
34
-
35
-
36
-
37
-
38
-
39
-
40
-
41
-
42
-
43
-
44
-
45
-
46
-
47
-
48
-
49
-
50
-
51
-
52
-
53
-
54
-
55
-
56
-
57
-
58
-
59
-
60
-
61
-
62
-
63
-
64
-
65
-
66
-
67
-
68
-
69
-
70
-
71
-
72
-
73
-
74
-
75
-
76
-
77
-
78
-
79
-
80
-
81
-
82
-
83
-
84
-
85
-
86
-
87
-
88
-
89
-
90
-
91
-
92
-
93
-
94
-
95
-
96
-
97
-
98
-
99
-
100
-
101
-
102
-
103
-
104
-
105
-
106
-
107
-
108
-
109
-
110
-
111
-
112
-
113
-
114
-
115
-
116
-
117
-
118
-
119
-
120
-
 121
121 -
 122
122 -
 123
123 -
 124
124 -
 125
125 -
 126
126 -
 127
127 -
 128
128 -
 129
129 -
 130
130 -
 131
131 -
132
-
133
-
134
-
135
-
136
-
137
-
138
-
139
-
140
-
141
-
142
-
143
-
144
-
145
-
146
-
147
-
148
-
149
-
150
 |
 |