Brother International BES Embroidery Software 2 Instruction Manual - English - Page 83
Carved Fill Properties
 |
View all Brother International BES Embroidery Software 2 manuals
Add to My Manuals
Save this manual to your list of manuals |
Page 83 highlights
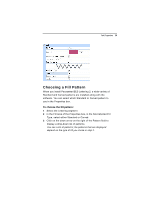
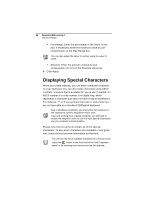
Text Properties 81 In the Fill area, the image beneath the Density setting will change as you adjust the setting. These are not precise images; rather, they are intended to provide you with visual cues to what you are doing as you change the settings. A general rule is to go for full-fabric coverage, but add extra stabilizer if you want to support a high-density fill on a lowdensity fabric. If the letters in the text segment are large (i.e., above the maximum recommended height for the font) it is better to use a choose a fill, rather than satin, for the lettering. Fill stitches are the type you would normally find filling an area in an embroidery design. With Fill stitches, each line across is made up of two or more individual stitches. Carved Fill Properties In addition to the density and stitch-length settings described above there are a few extra fill settings that apply only to the Carved fills. You can adjust these Carved pattern settings in the Properties box. The settings allow you to change a fill pattern's characteristics such as the size and angle of the fill pattern. The following figures show some different effects you can create using the Carved Fill settings. Original (scale at 100%) Emboss Scale at 50% To change the Emboss Scale of a Carved pattern: 1 Select a Carved fill segment
-
 1
1 -
2
-
3
-
4
-
5
-
6
-
7
-
8
-
9
-
10
-
11
-
12
-
13
-
14
-
15
-
16
-
17
-
18
-
19
-
20
-
21
-
22
-
23
-
24
-
25
-
26
-
27
-
28
-
29
-
30
-
31
-
32
-
33
-
34
-
35
-
36
-
37
-
38
-
39
-
40
-
41
-
42
-
43
-
44
-
45
-
46
-
47
-
48
-
49
-
50
-
51
-
52
-
53
-
54
-
55
-
56
-
57
-
58
-
59
-
60
-
61
-
62
-
63
-
64
-
65
-
66
-
67
-
68
-
69
-
70
-
71
-
72
-
73
-
74
-
75
-
76
-
77
-
 78
78 -
 79
79 -
 80
80 -
 81
81 -
 82
82 -
 83
83 -
 84
84 -
 85
85 -
 86
86 -
 87
87 -
 88
88 -
89
-
90
-
91
-
92
-
93
-
94
-
95
-
96
-
97
-
98
-
99
-
100
-
101
-
102
-
103
-
104
-
105
-
106
-
107
-
108
-
109
-
110
-
111
-
112
-
113
-
114
-
115
-
116
-
117
-
118
-
119
-
120
-
121
-
122
-
123
-
124
-
125
-
126
-
127
-
128
-
129
-
130
-
131
-
132
-
133
-
134
-
135
-
136
-
137
-
138
-
139
-
140
-
141
-
142
-
143
-
144
-
145
-
146
-
147
-
148
-
149
-
150
 |
 |