Brother International BES Embroidery Software 2 Instruction Manual - English - Page 80
Adjusting Fill Settings
 |
View all Brother International BES Embroidery Software 2 manuals
Add to My Manuals
Save this manual to your list of manuals |
Page 80 highlights
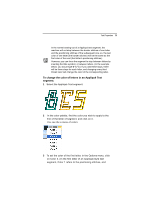
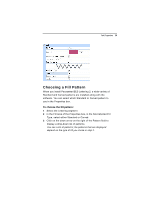
78 Pacesetter BES Lettering 2 Instruction Manual The fabric image you apply in the Properties box will also be visible in the print-out of the design. To import an image for an Appliqué background: 1 Select the Appliqué Style segment. 2 Open the properties box and select the Appliqué tab. 3 Click the button next to the Appliqué Fabric list. The Import Fabric dialog will open. You can scan your own images of fabric swatches for use in your design projects. For best results, scan them with a resolution of 300 dpi. A 1 in. × 1 in. piece of fabric should be sufficient for your sample. 4 Browse to the location of the image you wish to use as a fabric. 5 Select this image and click Open. The image appears within the Appliqué border, and it is added to your Appliqué Fabric list. The fabric image you import will also be visible in the print-out of the design. Adjusting Fill Settings In the properties panel, you can customize the parameters used by Pacesetter BES Lettering 2 when it generates the fill stitching for the segment. You have the option to add a pattern type and change the text object's density settings.
-
 1
1 -
2
-
3
-
4
-
5
-
6
-
7
-
8
-
9
-
10
-
11
-
12
-
13
-
14
-
15
-
16
-
17
-
18
-
19
-
20
-
21
-
22
-
23
-
24
-
25
-
26
-
27
-
28
-
29
-
30
-
31
-
32
-
33
-
34
-
35
-
36
-
37
-
38
-
39
-
40
-
41
-
42
-
43
-
44
-
45
-
46
-
47
-
48
-
49
-
50
-
51
-
52
-
53
-
54
-
55
-
56
-
57
-
58
-
59
-
60
-
61
-
62
-
63
-
64
-
65
-
66
-
67
-
68
-
69
-
70
-
71
-
72
-
73
-
74
-
 75
75 -
 76
76 -
 77
77 -
 78
78 -
 79
79 -
 80
80 -
 81
81 -
 82
82 -
 83
83 -
 84
84 -
 85
85 -
86
-
87
-
88
-
89
-
90
-
91
-
92
-
93
-
94
-
95
-
96
-
97
-
98
-
99
-
100
-
101
-
102
-
103
-
104
-
105
-
106
-
107
-
108
-
109
-
110
-
111
-
112
-
113
-
114
-
115
-
116
-
117
-
118
-
119
-
120
-
121
-
122
-
123
-
124
-
125
-
126
-
127
-
128
-
129
-
130
-
131
-
132
-
133
-
134
-
135
-
136
-
137
-
138
-
139
-
140
-
141
-
142
-
143
-
144
-
145
-
146
-
147
-
148
-
149
-
150
 |
 |