Brother International HL-6180DW Network User's Guide - English - Page 108
Network printing installation for Infrastructure mode when using Vertical Pairing (Windows® 7)
 |
View all Brother International HL-6180DW manuals
Add to My Manuals
Save this manual to your list of manuals |
Page 108 highlights
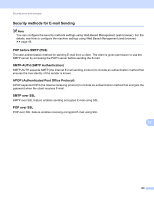
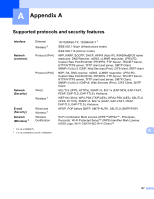
Additional network settings from Windows® Network printing installation for Infrastructure mode when using Vertical Pairing (Windows® 7) 11 Windows® Vertical Pairing is a technology to allow your Vertical Pairing supported wireless machine to connect to your Infrastructure network using the PIN Method of WPS and the Web Services feature. This also enables the printer driver installation from the printer icon that is in the Add a device screen. If you are in Infrastructure mode, you can connect your machine to the wireless network and then install the printer driver using this feature. Follow the steps below: Note • If you have set your machine's Web Services feature to Off, you must set it back to On. The default setting of the Web Services for the Brother machine is On. You can change the Web Services setting by using Web Based Management (web browser) or BRAdmin Professional 3. • Make sure your WLAN access point/router includes the Windows® 7 compatibility logo. If you are not sure about the compatibility logo, contact your access point/router manufacturer. • Make sure your computer includes the Windows® 7 compatibility logo. If you are not sure about the compatibility logo, contact your computer manufacturer. • If you are configuring your wireless network using an external wireless NIC (Network Interface Card), make sure the wireless NIC includes the Windows® 7 compatibility logo. For more information, contact your wireless NIC manufacturer. • To use a Windows® 7 computer as a Registrar, you need to register it to your network in advance. See the instruction supplied with your WLAN access point/router. a Turn on your machine. 11 b Set your machine in WPS mode (PIN Method). For how to configure your machine to use the PIN Method See Configuration using the PIN Method of WPS (Wi-Fi Protected Setup) uu page 29. c Click the button and then Devices and Printers. d Choose Add a device on the Devices and Printers dialog. e Choose your machine and input the PIN which your machine has indicated. f Choose the Infrastructure network that you want to connect to, and then click Next. g When your machine appears in the Devices and Printers dialog, the wireless configuration and the printer driver installation are successfully completed. 102
-
 1
1 -
2
-
3
-
4
-
5
-
6
-
7
-
8
-
9
-
10
-
11
-
12
-
13
-
14
-
15
-
16
-
17
-
18
-
19
-
20
-
21
-
22
-
23
-
24
-
25
-
26
-
27
-
28
-
29
-
30
-
31
-
32
-
33
-
34
-
35
-
36
-
37
-
38
-
39
-
40
-
41
-
42
-
43
-
44
-
45
-
46
-
47
-
48
-
49
-
50
-
51
-
52
-
53
-
54
-
55
-
56
-
57
-
58
-
59
-
60
-
61
-
62
-
63
-
64
-
65
-
66
-
67
-
68
-
69
-
70
-
71
-
72
-
73
-
74
-
75
-
76
-
77
-
78
-
79
-
80
-
81
-
82
-
83
-
84
-
85
-
86
-
87
-
88
-
89
-
90
-
91
-
92
-
93
-
94
-
95
-
96
-
97
-
98
-
99
-
100
-
101
-
102
-
 103
103 -
 104
104 -
 105
105 -
 106
106 -
 107
107 -
 108
108 -
 109
109 -
 110
110 -
 111
111 -
 112
112 -
 113
113 -
114
-
115
-
116
-
117
-
118
-
119
-
120
 |
 |