Brother International HL-7050N Users Manual - English
Brother International HL-7050N Manual
 |
UPC - 012502603375
View all Brother International HL-7050N manuals
Add to My Manuals
Save this manual to your list of manuals |
Brother International HL-7050N manual content summary:
- Brother International HL-7050N | Users Manual - English - Page 1
Brother Laser Printer HL-7050 series User's Guide For visually-impaired users Please see the two HTML You must set up the hardware and install the driver before you can use the printer. Please use the Quick Setup Guide to set up the printer. You can find a printed copy in the box or view it on the - Brother International HL-7050N | Users Manual - English - Page 2
Laser printer HL-7050 series User's Guide Definitions of warnings, cautions and notes We use the following terms throughout this User's Guide. WARNING You must follow these warnings to prevent possible personal injury. You must follow these instructions to make sure you use the printer properly and - Brother International HL-7050N | Users Manual - English - Page 3
safely WARNING There are high voltage electrodes inside the printer. Before you clean the printer, clear a paper jam or replace parts, make sure you have turned off the power switch and unplugged the printer from the AC power outlet. WARNING Do not handle the plug with wet hands - it might give - Brother International HL-7050N | Users Manual - English - Page 4
injuries, at least two people should lift the printer, holding the handles on both the right and left sides of the printer, and the front of the printer as shown in the illustration below. WARNING Do not stand on the printer or the optional Stabilizer unit. WARNING Be careful not to trip on the - Brother International HL-7050N | Users Manual - English - Page 5
resource for all your Printer needs. You can download the latest software and utilities, read FAQs and troubleshooting tips, and go to the 'Solutions' section to learn how to get the most from your Brother product. http://solutions.brother.com You can check here for the Brother driver updates. iv - Brother International HL-7050N | Users Manual - English - Page 6
Printer Customer Support Brother International Corporation 15 Musick Irvine CA 92618 In Canada Brother International Corporation (Canada), Ltd. - Marketing Dept. 1, rue Hôtel de Ville Dollard-des-Ormeaux, PQ, Canada H9B 3H6 Service below and follow the recorded instructions to receive a fax about - Brother International HL-7050N | Users Manual - English - Page 7
-0911 USA Telephone: (908) 704-1700 declares, that the products Product name: Laser Printer Model number: HL-7050 and HL-7050N Product options: Lower Tray Unit LT-7000, Duplex Unit DX-7000, Network Card NC-4100h, Mailbox Unit MX-7000, MX7010 complies with Part 15 of the FCC Rules. Operation - Brother International HL-7050N | Users Manual - English - Page 8
ICES-003. Cet appareil numérique de la classe B est conforme à la norme NMB-003 du Canada. Radio interference (220-240 volt model only) This printer follows EN55022 (CISPR Publication 22)/Class B. Before you use this product, make sure that you use a double-shielded interface cable with twisted-pair - Brother International HL-7050N | Users Manual - English - Page 9
NO6 Gold Garden Ind. Nanling Buji, Longgang, Shenzhen, China Plant Brother Industries Ltd., Kariya-shi, Aichi-ken 448-0803 Japan Herewith declare that: Product description Product Name : Laser Printer : HL-7050, HL-7050N are in conformity with provisions of the Directives applied : Low Voltage - Brother International HL-7050N | Users Manual - English - Page 10
States. One of the following labels on the back of the printer indicates compliance with the FDA regulations and must be attached to laser products marketed in the United States. MANUFACTURED: Brother Industries, Ltd., 15-1 Naeshiro-cho Mizuho-ku Nagoya, 467-8561 Japan This product complies with - Brother International HL-7050N | Users Manual - English - Page 11
where it is needed. CLASS 1LASERP RODUCT APPAREIL Å LASER DE CLASSE 1 LASER KLASSE 1 PRODUKT This printer has a Class 3B laser diode which produces invisible laser radiation in the scanner unit. You should not open the scanner unit under any circumstances. Use of controls or adjustments or - Brother International HL-7050N | Users Manual - English - Page 12
safe. For your safety, if in any doubt about the effective grounding of the power, call a qualified electrician. Disconnect device You must install this printer near a power outlet that is easily accessible. In case of an emergency, you must disconnect the power cord from the power outlet to shut - Brother International HL-7050N | Users Manual - English - Page 13
in line with the following code : Green and Yellow: Earth Blue: Neutral Brown: Live The colours of the wires in the mains lead of this printer may not match the coloured markings identifying the terminals in your plug. If you need to fit a different plug, you should do the following. Remove - Brother International HL-7050N | Users Manual - English - Page 14
Brother Industries, Ltd. Apple, the Apple Logo, and Macintosh are registered trademarks in the United MS-DOS, Windows and Windows NT are Guide are registered trademarks of their respective companies. Compilation and Publication Notice Under the supervision of Brother Industries Ltd., this manual - Brother International HL-7050N | Users Manual - English - Page 15
(Face-up printing 1-40 Manual feed 1-41 Driver and software 2-1 Printer driver 2-1 Features in the PCL printer driver (For Windows®) .... 2-2 Basic tab 2-2 Advanced tab 2-3 Device Options 2-6 Accessories tab 2-9 Support tab 2-10 Features in the PS printer driver (For Windows®) .... 2-11 - Brother International HL-7050N | Users Manual - English - Page 16
to 9.2 / Mac® OS X 10.1) ........ 2-15 Page setup 2-15 Layout 2-16 Specific options 2-16 Software for networks 2-17 (Windows® only 2-17 Software installation for Windows 2-19 Software installation for Macintosh 2-20 Apple LaserWriter 8 driver 2-20 PostScript Printer Description files (PPDs - Brother International HL-7050N | Users Manual - English - Page 17
LT-7000 4-3 Duplex unit (DX-7000 4-4 Guidelines for printing on both sides of the paper ..... 4-4 Paper orientation for printing on both sides of the paper 4-5 Mailbox unit 4-6 Network option NC-4100h (For HL-7050 only 4-8 Installing the Network board 4-8 CompactFlash card 4-11 Installing the - Brother International HL-7050N | Users Manual - English - Page 18
service messages 6-5 Troubleshooting paper handling 6-6 Paper jams and how to clear them 6-8 JAM A1 (paper jam in the multi-purpose tray) ......... 6-10 JAM A2 / A3 / A4 / A5 (Paper jam inside the Paper tray 6-11 JAM B (paper jam inside the printer 6-14 JAM C (paper jam where the paper - Brother International HL-7050N | Users Manual - English - Page 19
GL Mode A-34 Symbol sets supported by the printer's intellifont compatible typefaces A-39 Symbol sets supported by the printer's TrueType™ and Type 1 Font Compatible, and original typefaces A-41 Quick reference for commands A-43 Bar code control A-43 Print bar codes or expanded characters A-43 - Brother International HL-7050N | Users Manual - English - Page 20
1 About this printer 1 What is in the box? When you unpack the printer, check to see that you have all of the following parts. 1 6 2 5 3 4 Figure 1-1 1 Drum Unit Assembly (Drum Unit with Toner Cartridge) 2 AC Power Cord 3 Paper Tray 4 Quick Setup Guide 5 CD-ROM 6 Printer ABOUT THIS PRINTER 1 - 1 - Brother International HL-7050N | Users Manual - English - Page 21
the interface you are going to use. ■ Most parallel cables support bi-directional communication, but some might have an incompatible pin assignment The power cord length may differ slightly depending on the country where you bought the printer. ■ If you use a USB cable, make sure it is a high-speed - Brother International HL-7050N | Users Manual - English - Page 22
ROM? (For Windows®) 2 3 1 4 1 Install Software You can install the printer driver and the following items: For All Users (For more information, see Chapter 2) ■Printer Driver For Administrators ■ Web BRAdmin ■ BRAdmin Professional ■ Driver Deployment Wizard ■ Network Print Software ■ Storage Manager - Brother International HL-7050N | Users Manual - English - Page 23
at the printer User's Guide, Network User's Guide and other documents. 3 Brother Solutions Center An introduction to our website. You can easily access it and receive the latest drivers and information for this printer. 4 Maintenance Tutorial See the maintenance videos for this printer. We recommend - Brother International HL-7050N | Users Manual - English - Page 24
4 1 BR-Script PPD Installer Printer driver (For more information, see Chapter 2) This printer supports Mac© OS versions 8.6 - 9.2 and Mac© OS X 10.1 or later. 2 User's Guides Look at the printer User's Guide, Network User's Guide and other documents. 3 Brother Solutions Center An introduction to our - Brother International HL-7050N | Users Manual - English - Page 25
General view 2 3 1 4 5 6 7 1 Control Panel Figure 1-2 2 Face-down Output Tray 3 Support Flap 4 Top Cover 5 Multi-purpose Tray 6 Multi-purpose Extension Support 7 Paper Tray (Tray 1) 1 - 6 ABOUT THIS PRINTER - Brother International HL-7050N | Users Manual - English - Page 26
1 2 3 4 5 6 7 8 9 1 Face-up Output Tray Figure 1-3 2 Parallel Interface Connector 3 USB Connector 4 Serial Interface Connector 5 Network Board Slot 6 Card Slot (For optional CompactFlashTM card) 7 Duplex Unit Connector 8 AC Power Connector 9 Power Switch ABOUT THIS PRINTER 1 - 7 - Brother International HL-7050N | Users Manual - English - Page 27
the following before you use the printer. Power supply Use the printer within the recommended power range: AC power: ±10% of the rated voltage Frequency: , copier, shredder and so on. If you cannot avoid using the printer with these appliances, we recommend that you use a voltage transformer or - Brother International HL-7050N | Users Manual - English - Page 28
Environment Only use the printer within the following ranges of temperature and humidity: Possible operation range Temperature: 10°C to 32.5°C (50°F to 90.5°F) Humidity: 20% to 80% (without condensation) Recommended operation range Temperature: 17.5°C to 25°C (63.5°F to 77°F) Humidity: 30% to 70% ( - Brother International HL-7050N | Users Manual - English - Page 29
printer properly. The recommended (or minimum) space requirements are as follows. No Options Install Optional Duplex Unit, Lower Tray and Mailbox. 100 mm 3.94 inches 500 mm 19.7 in. 400 mm 15.8 in. 600 mm 23.6 in. 100 mm 3.94 in. 600 mm 23.6 in. 150 mm 5.9 in. Figure 1-4 Figure 1-5 1 - 10 - Brother International HL-7050N | Users Manual - English - Page 30
window, use a blind or a heavy curtain to protect the printer from direct sunlight. ■ Do not install the printer near other electronic equipment. ■ Do not drop, bang or shake the printer. Do not put the printer under Power Supply in this User's Guide. ■ Put the printer on a flat, horizontal surface. - Brother International HL-7050N | Users Manual - English - Page 31
g/m2 to 200 g/m2 (32 to 53 lb) Overhead projector film 60 g/m2 to 70 g/m2 (16 to 19 lb) When you print on thick paper, labels or card stock, we recommend that you select the media type from the printer driver according to the paper weight as shown in the table above. 1 - 12 ABOUT THIS - Brother International HL-7050N | Users Manual - English - Page 32
Labels i A4 or Letter Plain paper Envelope i Envelope Card stock i Thick paper or Thicker paper Thin paper i i i i i Thin paper When looking at this page on the CD-ROM, you can jump to the page for each printing method by clicking the i in the table. ABOUT THIS PRINTER 1 - 13 - Brother International HL-7050N | Users Manual - English - Page 33
), B5 (ISO), Executive, A5 500 sheets (80 g/m2 or 20 lb) 100 sheets (80 g/m2 or 20 lb) Transparency:10 sheets Envelope: 10 sheets Label stock: 10 sheets 500 sheets (80 g/m2 or 20 lb) Paper size Number of Sheets DX A4, Letter, Legal, B5 (JIS), B5 (ISO), Executive MX A4, Letter, B5 (JIS - Brother International HL-7050N | Users Manual - English - Page 34
You must use the face-up output tray for certain print media. Media type Plain paper Recycled paper Bond paper Thick paper Thicker paper Transparency Labels Envelope Card stock Thin paper Face-down i i i i i i i Face-up i i i i i i i i i i When looking at this page on the CD-ROM, you can jump to - Brother International HL-7050N | Users Manual - English - Page 35
in the printer driver in Chapter 2. ■ Plain paper ■ Thick paper ■ Thicker paper ■ Bond paper ■ Transparency ■ Envelope ■ Thin paper Recommended paper Plain Paper Recycled Paper Transparency Label Xerox Premier 80 g/m2 Xerox 4200DP 20 lb Xerox Recycled Supreme 80 g/m2 3M CG3300 Avery laser label - Brother International HL-7050N | Users Manual - English - Page 36
Printable area When using PCL emulation, the edges of the paper that cannot be printed on are shown below. Portrait 1 2 4 3 Figure 1-6 A4 1 4.2 mm (0.17 in) 2 6.01 mm (0.24 in) 3 4.2 mm (0.17 in) 4 4.2 mm (0.17 in) 6.01 mm (0.24 in) 4.2 mm (0.17 in) 6.01 mm (0.24 in) ABOUT THIS PRINTER 1 - 17 - Brother International HL-7050N | Users Manual - English - Page 37
) 5.0 mm (0.19 in) 4.2 mm (0.17 in) 5.0 mm (0.19 in) DL 4.2 mm (0.17 in) 5.0 mm (0.19 in) 4.2 mm (0.17 in) 5.0 mm (0.19 in) 1 - 18 ABOUT THIS PRINTER - Brother International HL-7050N | Users Manual - English - Page 38
Printing methods Printing from the paper tray (Face-down printing) 1 Pull the paper tray out of the printer. 2 While pressing the [blue] paper-guide release lever, slide the paper guides to fit the paper size. Check that the guides are firmly in the slots. Press the blue lever and slide the paper - Brother International HL-7050N | Users Manual - English - Page 39
, press the [blue] universal guide release button and pull out the rear of the paper tray. Figure 1-9 3 Put paper in the paper tray. Check that the paper is flat and below the maximum paper mark ( ). Up to Maximum Paper Mark ( ) Figure 1-10 4 Put the paper tray back in the printer. 1 - 20 ABOUT THIS - Brother International HL-7050N | Users Manual - English - Page 40
5 Change the following settings in the printer driver. Select the Paper Size, Media Type and so on. Select Tray 1. Select Tray 1. Select the Paper Size. ABOUT THIS PRINTER 1 - 21 - Brother International HL-7050N | Users Manual - English - Page 41
of pages are going through at the same time when you print on small or thick paper, change the paper thickness switches at the bottom of the paper tray as follows. Figure 1-11 The switches shown in this figure are in the preset position (default setting). A6 A4 100 g/m2 (27 lb) Letter 105 g/m2 - Brother International HL-7050N | Users Manual - English - Page 42
Tray ID setting (If the lower tray unit is installed) If somebody moves the tray into another tray position and you print the data without knowing this has been done, the driver finds the tray and prints according to this setting. Blue Tray ID Figure 1-12 ABOUT THIS PRINTER 1 - 23 - Brother International HL-7050N | Users Manual - English - Page 43
size in its Print menu, you can use the control panel Menu buttons to go to the PAPER menu to change the paper size. For more information, see Chapter 3. 1 Open the multi-purpose tray and lower it gently. Figure 1-13 2 Pull out the multi-purpose support flap. Figure 1-14 1 - 24 ABOUT THIS PRINTER - Brother International HL-7050N | Users Manual - English - Page 44
, resulting in a skewed printout or a paper jam. 4 While pressing the [blue] paper-guide release lever, slide the paper guide to fit the paper size. Press the blue lever and slide the paper guide. Figure 1-16 When you print on special paper such as envelopes, thick paper, labels, and so on, open the - Brother International HL-7050N | Users Manual - English - Page 45
feed paper into the printer. ■ The print surface must be face up. ■ Put the leading edge of the paper in first and push it gently into the tray. ■ The top of the paper stack must be under the maximum paper marks that are on both sides of the tray. The stack should be no more than 10 - Brother International HL-7050N | Users Manual - English - Page 46
Select MP Tray. Select the Paper Size. ABOUT THIS PRINTER 1 - 27 - Brother International HL-7050N | Users Manual - English - Page 47
by a laser printer ■ that are pre-printed on the inside ■ that cannot be arranged when put in a pile ■ that are made of paper that weighs more than the paper weight specifications for the printer ■ that have been badly made, with edges that are not straight or consistently square or ■ with windows - Brother International HL-7050N | Users Manual - English - Page 48
the stack to avoid paper jams and misfeeds. Figure 1-18 ■ Do not load different types of paper at the same time in the paper tray because it may cause paper jams or misfeeds. ■ Do not print envelopes using duplex printing. ■ For proper printing, you must choose the same paper size from your software - Brother International HL-7050N | Users Manual - English - Page 49
2 Pull out the multi-purpose support flap. Figure 1-20 3 Open the face-up output tray, and then pull out the face-up output tray support if necessary. Figure 1-21 1 - 30 ABOUT THIS PRINTER - Brother International HL-7050N | Users Manual - English - Page 50
of the printer open the face-up output tray and push down the blue tabs at the left-hand and right-hand sides (as shown in the figure below). When you have finished printing your envelopes, close the face-up output tray to reset the blue tabs automatically. To reset the blue tabs manually, push - Brother International HL-7050N | Users Manual - English - Page 51
and slide the paper-width guide to fit the envelope size. Figure 1-24 When you put paper in the multi-purpose tray, please remember the following: ■ The print surface must be face up. ■ Put the leading edge of the paper in first and push it gently into the tray. ■ The top of the paper stack must - Brother International HL-7050N | Users Manual - English - Page 52
6 Change the following settings in the printer driver. Select the envelope size, Orientation, and so on. Select Envelopes. Select MP Tray. Select MP Tray. Select the envelope size. Select Envelopes. ABOUT THIS PRINTER 1 - 33 - Brother International HL-7050N | Users Manual - English - Page 53
from a supplier who understands that you will be using the envelopes in a laser printer. Before you print a lot of envelopes, test one to make sure that the print results are what you want. Brother will not recommend a particular envelope because envelope manufacturers may change the envelope - Brother International HL-7050N | Users Manual - English - Page 54
glue that is used might damage the printer. ■ Do not load different types of paper at the same time in the paper tray because it may cause paper jams or misfeeds. ■ For proper printing, you must choose the same paper size from your software application as the paper in the tray. ■ If your application - Brother International HL-7050N | Users Manual - English - Page 55
1 Open the multi-purpose tray and lower it gently. Figure 1-27 2 Pull out the multi-purpose support flap. Figure 1-28 1 - 36 ABOUT THIS PRINTER - Brother International HL-7050N | Users Manual - English - Page 56
3 Open the face-up output tray. Figure 1-29 Pull out the face-up output tray support. Figure 1-30 4 When you load paper in the multi-purpose tray, make sure it touches the back of the tray and remains below the paper guide ( ). Up to ( ) Figure 1-31 ABOUT THIS PRINTER 1 - 37 - Brother International HL-7050N | Users Manual - English - Page 57
. If it is not, the paper may not be fed correctly, resulting in a skewed printout or a paper jam. 5 While pressing the [blue] paper-guide release lever, slide the paper guide to fit the paper size. Figure 1-32 WARNING Do not touch transparencies that have just been printed because they will be very - Brother International HL-7050N | Users Manual - English - Page 58
6 Select the following setting in the printer driver. Select the Paper Size, Media Type, and so on. Select MP Tray. Select the Paper Size. Select MP Tray Select the Media Type. ABOUT THIS PRINTER 1 - 39 - Brother International HL-7050N | Users Manual - English - Page 59
be bent, such as thick paper, labels, card stock or envelopes. 1 Open the face-up output tray. Figure 1-33 2 Pull out the face-up output tray support. Figure 1-34 3 Put the paper in the paper tray or the multi-purpose tray. 4 After all the printed pages come out of the printer, remove them and close - Brother International HL-7050N | Users Manual - English - Page 60
menu using the control panel Menu buttons, the printer will only load paper from the multi-purpose tray. When you feed paper manually, please remember the following: ■ If your application software allows you to select manual feed in the Print menu, you can select it through the software. Since the - Brother International HL-7050N | Users Manual - English - Page 61
. You can also download the latest printer driver from the Brother Solutions Center at http://solutions.brother.com Windows® 95/98/Me Windows® 2000 Windows NT® 4.0 Windows® XP PCL Driver (Hewlett-Packard LaserJet compatible laser printer) i i i i BR-Script Driver (Postscript® 3 language emulation - Brother International HL-7050N | Users Manual - English - Page 62
on your Operating System. Basic tab If you are using Windows NT® 4.0, Windows® 2000 or XP, you can access the Basic tab by clicking Printing Preferences... in the General tab of the Brother HL-7050 series Properties screen. 1 2 Change the settings for Paper Size, Multiple Page, Orientation and so on - Brother International HL-7050N | Users Manual - English - Page 63
tab If you are using Windows NT® 4.0, Windows® 2000 or XP, you can access the Advanced tab by clicking Printing Preferences... in the General tab of the Brother HL-7050 series Properties screen. 2 1 34 56 Change the tab settings by clicking the following icons: 1 Print Quality 2 Duplex / Booklet - Brother International HL-7050N | Users Manual - English - Page 64
can change the Resolution in the printer driver as follows: 300 dpi 600 dpi 1200dpi ■ Toner Save Mode You can save running costs by turning on the Toner Save Mode, which reduces the print density. ■ Print Setting (Windows® 95/98/98SE/Me only) With the Print Setting set to Manual, you can change the - Brother International HL-7050N | Users Manual - English - Page 65
page. ■ When you use text as a watermark, you can change the font, darkness and angle settings. Page Setting You can change the Scaling of the print image and select Mirror Print and Reverse Print options. 2 - 5 DRIVER AND SOFTWARE - Brother International HL-7050N | Users Manual - English - Page 66
set the following Printer Function modes in this tab: Jump to the page for each Printer Function by clicking the function name. Job Spooling (For more information, see Chapter 3) Quick Print Setup Sleep Time Status Monitor Macro Page Protection Print Date & Time HRC TrueType Mode DRIVER AND SOFTWARE - Brother International HL-7050N | Users Manual - English - Page 67
can turn the Quick Print Setup function ON or OFF. A small selection window appears on your computer, this will then let you make changes to the settings of the following functions: ■ Multiple Page ■ Duplex ■ Toner Save Mode ■ Paper Source ■ Media Type Sleep Time When the printer does not receive - Brother International HL-7050N | Users Manual - English - Page 68
you to change the HRC setting on your Brother HL-7050 series printer. HRC is a special function that offers improved print quality of characters and graphics that conventional laser printers cannot attain with resolutions of 300 or 600 dpi. - Printer Default: The setting will match that of the - Brother International HL-7050N | Users Manual - English - Page 69
be sent to your printer in one of the following ways: Download as TrueType Download as Bit Image Print as Graphics Accessories tab When you install the optional units, you can add those options and select their settings in the Accessories tab as follows. 1 3 2 1 You can manually add and remove the - Brother International HL-7050N | Users Manual - English - Page 70
Windows® 2000 or XP, you can access the Support tab by clicking Printing Preferences... in the General tab of the Brother HL-7050 series Properties screen. ■ You can download the latest driver by accessing the Brother Solutions Center at http://solutions.brother.com ■ You can see the printer driver - Brother International HL-7050N | Users Manual - English - Page 71
Features in the PS printer driver (For Windows®) You can download the latest driver by accessing the Brother Solutions Center at http://solutions.brother.com For more information, please see the online Help in the printer driver. The screens in this section are from Windows® XP. The screens on your - Brother International HL-7050N | Users Manual - English - Page 72
Windows® 2000 or XP, you can access the Layout tab by clicking Printing Preferences... in the General tab of the Brother HL-7050 BR-Script3 Properties screen. You can change the Layout setting by selecting the setting in the Orientation, Print on Both Sides, Page Order and Page Per Sheet. DRIVER - Brother International HL-7050N | Users Manual - English - Page 73
Paper / Quality tab Select the paper source. Advanced Options If you are using Windows NT® 4.0, Windows® 2000 or XP, you can access the Brother HL-7050 BR-Script3 Advanced Options tab by clicking Advanced... button in the Layout tab or the Paper / Quality tab. 1 2 2 - 13 DRIVER AND SOFTWARE - Brother International HL-7050N | Users Manual - English - Page 74
3 You can change settings by selecting the setting in the Printer Features list: Media Type Output Bin Collate APT Job spooling (You will need to set the RAM Disk size first. For more information, see Chapter 3.) Password Job Name HRC Toner Save Sleep Time BR-Script Level DRIVER AND SOFTWARE 2 - 14 - Brother International HL-7050N | Users Manual - English - Page 75
Features in the PS Printer driver (For Mac® OS 8.6 to 9.2 / Mac® OS X 10.1) You can download the latest driver by accessing the Brother Solutions Center at http://solutions.brother.com The screens in this section are from Laser Writer 8 of Mac® OS 9.0. The screens on your PC will vary depending on - Brother International HL-7050N | Users Manual - English - Page 76
Layout Set the layout, Pages per sheet and so on. Specific options Set the Media Type, Resolution, secure printing, and so on. DRIVER AND SOFTWARE 2 - 16 - Brother International HL-7050N | Users Manual - English - Page 77
, such as our network ready printers and multifunction centers. BRAdmin Professional can also manage other manufacturers' products that support SNMP (Simple Network Management Protocol). Driver Deployment Wizard This installer includes the Windows® PCL driver and Brother network port driver (LPR and - Brother International HL-7050N | Users Manual - English - Page 78
LAN/WAN Brother network connected devices. Windows NT® 4.0 Workstation Windows NT® 4.0 Server Web BRAdmin and Internet Information Server 5.0 is supported on the following operating systems: Windows® 2000 Professional Windows® 2000 Server Windows® 2000 Advanced Server Windows® XP Professional3 DRIVER - Brother International HL-7050N | Users Manual - English - Page 79
Software installation for Windows® You can install the Software from the CD-ROM that we have supplied as follows: 1 and type \START.EXE (for example: D:\START.EXE). 2 Select your language, and then follow the instructions on the screen. The printer driver will complete the installation. 2 - 19 - Brother International HL-7050N | Users Manual - English - Page 80
Software installation for Macintosh® This printer supports Mac® OS version 8.6 to 9.2 and Mac® OS X 10.1 or later. Apple LaserWriter 8 driver The Apple LaserWriter Driver may have been installed with your system. If it is not, it is available at http://www.apple.com LaserWriter 8 versions 8.6 and - Brother International HL-7050N | Users Manual - English - Page 81
. The printer can choose from the following combinations: EPSON (default) HP can select the emulation mode manually by using the control panel mode priority because the printer cannot tell the network server. If it does not work properly, select the emulation mode manually using either the printer - Brother International HL-7050N | Users Manual - English - Page 82
connect the interface cable to the printer if your computer has the network board (Brother NC-4100h) has been installed, use the control panel to select NETWORK. When necessary, use the control panel in the INTERFACE menu to select the interface or the serial communications parameters manually - Brother International HL-7050N | Users Manual - English - Page 83
few seconds to work. If you want to speed up printing, select the required interface manually in the SELECT menu by using the control panel in the recommend that you select that interface as the default setting in the INTERFACE menu. The printer allocates the entire input buffer to that interface when - Brother International HL-7050N | Users Manual - English - Page 84
these factory settings, you can tailor the printer to your particular needs by changing the 'user settings.' See List of factory settings in Chapter 3. You can reset the changed user settings to the factory settings in the RESET menu. For more information, see Chapter 3. DRIVER AND SOFTWARE 2 - 24 - Brother International HL-7050N | Users Manual - English - Page 85
3 Control panel 3 Control panel Figure 3-1 3 - 1 CONTROL PANEL - Brother International HL-7050N | Users Manual - English - Page 86
and change various printer settings with seven buttons (Go, Job Cancel, Reprint, +, -, Set, Back). Button Go Job Cancel Reprint + - Set Back Operation Exit from the control panel menu, reprint settings and error messages. Pause and continue printing. Stop and cancel the printing job in progress - Brother International HL-7050N | Users Manual - English - Page 87
control panel only changes when the error is cleared. You can pause printing with the Go button. Pressing the Go button again restarts the print job and clears the pause. During a pause, the printer is off-line. If the printer is in PAUSE mode and you do not want to print the remaining data, you can - Brother International HL-7050N | Users Manual - English - Page 88
of data with the Job Cancel button. The display shows JOB CANCELLING until the job is cancelled. After cancelling the job, the printer returns to the READY state. When the printer is not receiving data or printing, the display shows NO DATA!!! and you cannot cancel the job. CONTROL PANEL 3 - 4 - Brother International HL-7050N | Users Manual - English - Page 89
anyone who is on the network or at the printer control panel. You can use the Reprint button when the printer is in READY or PAUSE state. If you want to print PROOF, PUBLIC or SECURE data, we recommend that you install the optional hard disk drive (HDD) or CompactFlash card. If you do not - Brother International HL-7050N | Users Manual - English - Page 90
enough memory to spool the print job data, it will only print the last page. ■ Pressing the - or + button makes the number of reprint copies decrease or increase. You can select between 1 and 999 COPIES. ■ For more information about the settings in the printer driver, see Job Spooling in Chapter - Brother International HL-7050N | Users Manual - English - Page 91
REPRINT function ON by using the control panel buttons to go to the SETUP menu. If you print using the driver we have supplied with the printer, the settings for Job Spooling in the printer driver will take priority over the settings made on the control panel. For more information, see Job Spooling - Brother International HL-7050N | Users Manual - English - Page 92
more information about the settings in the printer driver, see Job Spooling in Chapter 2. Printing PUBLIC data You can use this function to reprint documents that are stored in a PUBLIC area of the printer memory. Documents here will not be protected by a password and anyone can access them using - Brother International HL-7050N | Users Manual - English - Page 93
password will be able to print the document. The printer will not print the document when you send it for printing. To print the document you must use the control panel of the printer (with the password) or connect to the printer the printer driver, see Job Spooling in Chapter 2. 3 - 9 CONTROL PANEL - Brother International HL-7050N | Users Manual - English - Page 94
USER XXXXXX JOB XXXXXX JOB XXXXXXX PASS NO.=0000 --REPRINT-- COPIES= 1 PRINTING Press + or -. Press the Set button. Press the + or - button the Set button to set the job. Type your password. Press the Set button to set the password The printer will exit this menu after a time-out period. - Brother International HL-7050N | Users Manual - English - Page 95
When there is no reprint data in memory If the printer does not have reprint data in the memory and you press the Reprint button, the LCD shows NO DATA STORED. To cancel the reprint job - Brother International HL-7050N | Users Manual - English - Page 96
), it goes off-line and the LCD displays the menu. To move through menus on the LCD If you press the + or - button when the printer is the on-line (READY), it goes off-line and the LCD displays the current mode. You can go to other menus by pressing the - Brother International HL-7050N | Users Manual - English - Page 97
Set button If you press the Set button when the printer is the on-line (READY), it goes off-line and the LCD goes to the menu. Pressing the Set button allows you to choose the - Brother International HL-7050N | Users Manual - English - Page 98
Back button If you press the Back button when the printer is on-line (READY), it goes off-line and unchanged. When you press the Set button to choose a setting, an asterisk appears briefly at the end of the display. Since the asterisk shows what you have chosen, you can easily see the current - Brother International HL-7050N | Users Manual - English - Page 99
Light-emitting diode (LED) The LED is a light that shows the printer status. Data - Orange LED LED indication On Blinking Off Meaning Data is in the printer memory. Receiving or processing data. No data left in the memory. 3 - 15 CONTROL PANEL - Brother International HL-7050N | Users Manual - English - Page 100
show the emulation you have chosen. If there are any problems, the display shows the appropriate error message, maintenance message or call service message so you will know that you need to take action. For more information about these messages, see Troubleshooting in Chapter 6. CONTROL PANEL 3 - 16 - Brother International HL-7050N | Users Manual - English - Page 101
Back light Light OFF Green (General) Red (Error) Orange (Setting) Meaning The printer is off-line or in sleep status. Ready to print Printing Warming Up There is a problem with the printer. Choosing a menu Setting Reprint times Pause 3 - 17 CONTROL PANEL - Brother International HL-7050N | Users Manual - English - Page 102
LCD message You can choose the message that is displayed on the second line of the LCD as shown below. Select NONE, PAGE COUNTER or JOB NAME in the lower LCD setting of the SETUP menu. READY READY JOB NAME READY PAGE = XXXX CONTROL PANEL 3 - 18 - Brother International HL-7050N | Users Manual - English - Page 103
with reduced resolution. PRESS SET TO PRINT Press the Set button to start printing. RESET TO FACTORY The printer setting returns to the factory SETTING settings. FAX SENDING FAX RECEIVING Sending fax data (Please see http://solutions.brother.com for information about fax mode.) Receiving - Brother International HL-7050N | Users Manual - English - Page 104
performed for 30 seconds, the LCD automatically returns to READY. ■ When you press the Set button to choose a setting, an asterisk appears at the end of the display for a short time. After that, the display returns to the previous menu level. ■ After changing the status or a setting, pressing the - Brother International HL-7050N | Users Manual - English - Page 105
button to move to the next menu level. PAPER SOURCE Press the + or - button. PAPER MP FIRST Press the Set button. MP FIRST =ON * Press the + button. MP FIRST =OFF Press Set button. An asterisk * briefly appears at the end of the display. The default setting is indicated by an * MP FIRST - Brother International HL-7050N | Users Manual - English - Page 106
23. ■ PAPER For more information, see page 3-24. ■ QUALITY For more information, see page 3-24. ■ SETUP For more information, see page 3-25. ■ PRINT MENU For more information, see page 3-27. ■ NETWORK For more information, see page 3-31. ■ INTERFACE For more information, see page 3-32. ■ RESET MENU - Brother International HL-7050N | Users Manual - English - Page 107
date (only Network users). RAM SIZE=###MB Shows the size of memory in this printer. MAINTENANCE PAGE COUNTER =###### Shows the current total printed pages. DRUM COUNT =###### Shows the pages printed with drum unit. REMAIN DRUM =###### Shows the pages left to print with drum unit. REMAIN PF - Brother International HL-7050N | Users Manual - English - Page 108
you want to feed paper manually. =OFF/ON(LONG BIND)/ON(SHORT BIND) Select whether you want to automatically print on both sides of the paper. =STANDARD/MAILBOX1-10/MX STACK/ MX SORT Select where you want the printed pages to go. QUALITY Display Shows RESOLUTION HRC TONER SAVE DENSITY Description - Brother International HL-7050N | Users Manual - English - Page 109
10=2.0. The factory setting is Level 1. OFF NORMAL There will be three sets of five Buzzes when an error occurs. SPECIAL Buzzes five times consecutively until the error /STOP CONT: Continue printing even if there is a TONER LOW error. STOP: Stop printing if there is a TONER LOW error. =OFF/ON - Brother International HL-7050N | Users Manual - English - Page 110
Display Shows KEEP PCL JAM RECOVERY RAMDISK SIZE DELETE STORAGE TIME STYLE DATE & TIME Description =OFF/ON =OFF/ON =0/1/2/...MB RESTART PRINTER? Delete the data in CompactFlash card or HDD. Subsetting Description SECURE FILE Select the user name, job name and password. PUBLIC FILE Select - Brother International HL-7050N | Users Manual - English - Page 111
PAPER/BOND PAPER/ENVELOPES/THIN PAPER PAPER Set the paper size to LETTER, LEGAL, A4, EXECUTIVE, COM-10, DL, JIS B5, B5, A5, B6, A6, MONARCH, C5 and A4 LONG. COPIES You can check the total number of printed pages. Shows the number of printed pages (1 to 999). ORIENTATION This printer can print - Brother International HL-7050N | Users Manual - English - Page 112
/OFF Select whether a line feed and carriage return will happen when the printer position reaches the bottom margin. =## Set the left margin at column 0 to 70 columns at 10 cpi. =## Set the right margin at column 10 to 80 columns at 10 cpi. =#.## Set the top margin at a distance from the top edge of - Brother International HL-7050N | Users Manual - English - Page 113
MARGIN LINES IBM PROPRINTER FONT NO. FONT PITCH CHARACTER SET TABLE PRINT AUTO LF AUTO CR AUTO MASK LEFT MARGIN RIGHT MARGIN Description = to 70 columns at 10 cpi. Set the right margin at column 10 to 80 columns at 10 cpi. Set the top margin at a distance from the top edge of the paper - 0, 0.33 - Brother International HL-7050N | Users Manual - English - Page 114
BOTTOM MARGIN HP-GL LINES CHAR SET(STD) CHAR SET(ALT) PEN # SIZE PEN # GRAY BR-SCRIPT3 ERROR PRINT Description Set the top margin at a distance from the top edge of the paper - 0, 0.33, 0.5, 1.0, 1.5 or 2.0. The factory setting is 0.33. Set the bottom margin at a distance from the bottom edge - Brother International HL-7050N | Users Manual - English - Page 115
(only on a Network) Display Shows TCP/IP NETWARE APPLETALK NETBEUI DLC/LLC BANYAN LAT NETBIOS/IP APIPA ENET Description Subsetting Description TCP/IP ENABLE =ON/OFF IP ADDRESS= - Brother International HL-7050N | Users Manual - English - Page 116
USB/NETWORK = 1:99 (sec) You need to set the time-out period for the auto interface selection. = Level1:15 RESTART PRINTER? data length can be set to 7 or 8 bits. =NONE/ODD/EVEN STOP BIT *1 The data error check can be set to NONE, ODD or EVEN. =1 BITS/2 BITS XON/XOFF *1 The data separator - Brother International HL-7050N | Users Manual - English - Page 117
/OFF =OFF/ON =0/1/2/3/4 =AUTO/OFF/90% =1:##MBYTE =ON/OFF =OFF/6H/12H/24H/2D/4D/7D RESET MENU Display Shows RESET PRINTER FACTORY RESET Description Resets the printer and restores all printer settings (including command settings) to settings you have previously made with the control panel buttons - Brother International HL-7050N | Users Manual - English - Page 118
appears. Press the Set button. * Press the + button. Press the Set button. * Press the Set button. Press the Set button. DATE & TIME 2000/04/25 10:22 CONTROL PANEL 3 - 34 - Brother International HL-7050N | Users Manual - English - Page 119
MENU-INFORMATION Press the + or - button until the NETWORK mode appears (and to display each setting shown below). --MENU-NETWORK Press the Set button. NETWORK TCP/IP Press the Set button. TCP/IP TCP ADDRESS= An asterisk appears at the end of the 123.45.67.89 * display. 3 - 35 CONTROL PANEL - Brother International HL-7050N | Users Manual - English - Page 120
laser printer. Many software applications support this type of laser printer. Using this mode will allow your printer to operate at its best with those applications. BR-Script 3 Mode BR-Script is an original Brother Incorporated. PostScript Language Reference Manual. Menlo Park: Addison-Wesley - Brother International HL-7050N | Users Manual - English - Page 121
the HP-GL language of the Hewlett-Packard plotter model HP-7475A. Many graphics and CAD applications support this type of plotter. Use this mode so your printer will work when printing from those types of applications. EPSON FX-850 and IBM Proprinter XL Mode The EPSON FX-850 and IBM Proprinter - Brother International HL-7050N | Users Manual - English - Page 122
reset the print server to its factory settings (resetting all information such as the password and IP address information), hold down the Network Test button on the Network board (NC-4100h) for more than 5 seconds. Display Shows PAPER QUALITY SETUP Submenu SOURCE PRIORITY MP FIRST MP SIZE MANUAL - Brother International HL-7050N | Users Manual - English - Page 123
Display Shows SETUP (continued) PRINT MENU Submenu TONER LOW AUTO CONTINUE LOCK PANEL REPRINT PAGE PROTECTION EMULATION KEEP PCL JAM RECOVERY RAMDISK SIZE TIME STYLE MEDIA TYPE PAPER COPIES ORIENTATION PRINT POSITION AUTO FF TIME FF SUPPRESS HP LASERJET Factory setting CONTINUE =OFF =OFF =ON =AUTO - Brother International HL-7050N | Users Manual - English - Page 124
BOTTOM MARGIN=#### LINES=#### FONT NO.=59 FONT PITCH=10.00/12.00 SYMBOLSET=PC8 AUTO LF=OFF AUTO CR=OFF LEFT MARGIN=#### RIGHT MARGIN=#### TOP MARGIN=#### BOTTOM MARGIN=#### LINES=#### CHAR SET(STD)=#### CHAR SET(ALT)=#### PEN # SIZE PEN # GRAY ERROR PRINT=OFF TCP/IP ENABLE=ON IP ADDRESS=192.0.0.192 - Brother International HL-7050N | Users Manual - English - Page 125
Display Shows NETWORK (continued) Submenu TCP/IP (continued) NETWARE INTERFACE APPLETALK NETBEUI DLC/LLC BANYAN LAT NETBIOS/IP APIPA ENET SELECT AUTO IF TIME INPUT BUFFER PARALLEL RS- - Brother International HL-7050N | Users Manual - English - Page 126
For visually-impaired users Braille symbols The control panel buttons are marked with Braille characters for visually-impaired users as shown in the table. Button Go Abbreviations Go Braille* Job Cancel Can Reprint Rep + Plu - Min Set Set Back Bac *Braille indicates the first 2 or 3 - Brother International HL-7050N | Users Manual - English - Page 127
forward or backward through the menus. ■ When you move to another menu level. ■ When an error occur. ■ When you set any optional menu setting. ■ When the printer becomes online. ■ When the printer becomes READY status after a warming up condition. ■ When you enter wrong information. You can change - Brother International HL-7050N | Users Manual - English - Page 128
. You can increase the capabilities of the printer with these items. Options Lower tray unit (Three paper trays) LT-7000 Duplex unit DX-7000 Mailbox unit MX-7000 series Network board (For HL-7050 only) NC-4100h see 4-3 see 4-4 see 4-6 CompactFlash card DIMM memory HDD HD-EX see 4-8 Ir - Brother International HL-7050N | Users Manual - English - Page 129
Small pad for lower tray unit and stabilizer (SB-4000) When you have the following printer options, you must install the small pads or the optional stabilizer. Non-mailbox unit 1 Lower tray 2 Lower trays 3 Lower trays Mailbox unit (5 bins) Mailbox unit (10 bins) 4 - 2 OPTIONS - Brother International HL-7050N | Users Manual - English - Page 130
to buy an optional lower-tray unit, call the dealer you bought the printer from. MP tray (100 sheets) Paper tray (500 sheets) Lower-tray unit (500 sheets x 3 trays) Expands up to a total of 2100 sheets Figure 4-1 To install the lower-tray unit, please see the User's Guide that we have supplied with - Brother International HL-7050N | Users Manual - English - Page 131
about the control panel, see PAPER menu in Chapter 3. To install the duplex unit, please see the User's Guide that we have supplied with the Duplex unit. Figure 4-2 Guidelines for printing on both sides of the paper ■ If the paper is thin, it may wrinkle. ■ If paper is curled, straighten it, and - Brother International HL-7050N | Users Manual - English - Page 132
on both sides of the paper The printer prints the second page first. If you print 10 pages onto 5 piece of paper, it will print page 2 then page 1 on the first piece of paper. It will print page 4 then page 3 on the second piece of paper. It will print page 6 then page 5 on the third piece of - Brother International HL-7050N | Users Manual - English - Page 133
an optional device that can be installed on the HL-7050 laser printer to allow you to direct your printouts to any bin that you want. Figure 4-3 To install the Mailbox unit, please see the User's Guide that we have supplied with the Mailbox. Mailbox This setting allows you to direct your printouts - Brother International HL-7050N | Users Manual - English - Page 134
it to the bin that you want. You will not have to sort the copies after printing them. Stacker You can print large print jobs when no one is in the office. You can print 100 sheets of plain paper to each bin of the mailbox. When you remove bins 2, 4, 7 and 9, the total output increases - Brother International HL-7050N | Users Manual - English - Page 135
Professional for the administrator and Brother network printing software, are included on the CD-ROM supplied with the HL-7050 printer. For setup, see the Network User's Guide. Installing the Network board 1 Turn off the printer power switch, and then unplug the printer. 2 Open the side cover - Brother International HL-7050N | Users Manual - English - Page 136
3 Loosen the three screws, and then remove the metal plate by lifting up slightly. Figure 4-5 4 Unscrew the two screws, and then remove the Network cover plate. Figure 4-6 OPTIONS 4 - 9 - Brother International HL-7050N | Users Manual - English - Page 137
7 Close the side cover. Figure 4-8 8 Connect one end of the Ethernet Cable to the Network port of the printer. 9 Plug the printer back in, and then turn on the power switch. 10 For details about how to use the Network board, please see the Network User's Guide on the CD-ROM that we have supplied - Brother International HL-7050N | Users Manual - English - Page 138
CompactFlash card This printer has a slot for an optional CompactFlash card, which is a memory card. If you install an optional CompactFlash memory card, you can save macros, the print log and fonts on it. This card lets you select the Reprint functions through the network. You can install the - Brother International HL-7050N | Users Manual - English - Page 139
Follow these steps to install or remove a card: 1 Turn off the printer power switch, and then unplug the printer. 2 Insert a CompactFlash card into the slot with the label facing to the left. Make sure you put it in properly. Figure 4-9 Before you remove the card, turn the power switch OFF, and then - Brother International HL-7050N | Users Manual - English - Page 140
RAM expansion The HL-7050 and HL-7050N printer have 32 MB of standard memory and two slots for optional memory expansion. You can expand the memory up to 288 MB by installing dual in-line memory modules (DIMMs). (The standard memory varies depending on the printer model and country.) You can - Brother International HL-7050N | Users Manual - English - Page 141
DIMM memory When you install extra memory, follow these steps: 1 Turn off the printer power switch, and then unplug the printer. Disconnect the interface cable from the printer. Make sure you turn the power to the printer OFF before you install or remove the DIMM. 2 Remove the side cover. Figure - Brother International HL-7050N | Users Manual - English - Page 142
3 Loosen the three screws, and then remove the metal plate by lifting it up slightly. Figure 4-11 4 Unpack the DIMM and hold it by its edges. 5 Hold the DIMM with your fingers on the side edges and your thumb on the back edge. Line up the notches on the DIMM with the DIMM slot. (Check that the locks - Brother International HL-7050N | Users Manual - English - Page 143
the interface cable to your printer. Plug the printer back in, and then turn on the printer power switch. 10 To check whether the DIMM has been installed properly, you can print the Print Settings listing that shows the current memory size. To print the Print Settings listing, see Chapter 3. 4 - 16 - Brother International HL-7050N | Users Manual - English - Page 144
network using a Webbrowser. See the sections on printing PROOF, PUBLIC and SECURE data in Chapter 3. Make sure that the box contains the following items: ■ Hard disk ■ Two hard disk cables ■ Four shoulder screws ■ Four screws (4) ■ Quick Setup Guide Figure 4-15 Use the longer cable for this printer - Brother International HL-7050N | Users Manual - English - Page 145
3 Loosen the three screws, and then remove the metal plate by lifting it up slightly. Figure 4-17 4 Put the four shoulder screws, supplied with the HDD unit, into the bottom of the HDD. Figure 4-18 4 - 18 OPTIONS - Brother International HL-7050N | Users Manual - English - Page 146
plate by putting the four screws into the four holes of the metal plate so that the HDD pins point to the back of the printer. Then secure the plate with the four screws. Figure 4-20 OPTIONS 4 - 19 - Brother International HL-7050N | Users Manual - English - Page 147
Connect the flat cable to the main controller board. Figure 4-21 8 Secure the metal plate with the three screws. Figure 4-22 9 Put the side cover back on. 10 Reconnect the interface cable to your printer. Plug the printer back in, and then turn on the printer power switch. 11 Format the HDD from the - Brother International HL-7050N | Users Manual - English - Page 148
Ir-DA interface (IR-1000) IR-1000 connects to any printer and prints data without using connecting cables. ■ Supports IrDA1.1 infrared communication standard. ■ Fully compatible with Windows® 95/98/Me, Windows NT® 4.0 and Windows® 2000 infrared printer device. ■ Transmits and receives data at up to - Brother International HL-7050N | Users Manual - English - Page 149
Optional font package (BS-3000) The optional font package (BS-3000) is the CD-ROM you need for installing the 136 PS3 Agfa and TrueType Fonts. Optional barcode fonts package (BT-1000) The optional Barcode fonts package (BT-1000) is the CD-ROM you need for installing the Barcode fonts. 4 - 22 OPTIONS - Brother International HL-7050N | Users Manual - English - Page 150
in this chapter. TONER LIFE END See the TONER LIFE END explanation in this chapter. CHANGE DRUM SOON See the CHANGE DRUM SOON explanation in this chapter. Accessories Toner Cartridge Drum Unit See Replacing the toner cartridge in this chapter See Replacing the drum unit in this chapter - Brother International HL-7050N | Users Manual - English - Page 151
of the toner cartridge have physically reached the end of their life. For both conditions the printer will stop printing, until a new toner cartridge has been put into the printer. TONER LIFE END can only be cleared, by putting a new toner cartridge into the drum unit. 5 - 2 ROUTINE MAINTENANCE - Brother International HL-7050N | Users Manual - English - Page 152
toner cartridge To make sure you get high quality print, make sure you use quality toner cartridges. When you want to buy toner cartridges, call the dealer you bought the printer from. 1 Open the top cover of the printer. Figure 5-1 2 Push down the blue lock lever and take out the toner cartridge - Brother International HL-7050N | Users Manual - English - Page 153
hands and gently rock it from side to side several times to spread the toner evenly inside the cartridge. Figure 5-5 4 Pull off the yellow plastic protective cover. Figure 5-6 ■ Put the toner cartridge in the printer immediately after you remove the protective cover. ■ Do not touch the shaded parts - Brother International HL-7050N | Users Manual - English - Page 154
5 Put the new toner cartridge firmly into the printer. If you put it in properly, the blue lock lever will lift automatically. Figure 5-8 6 Close the top cover of the printer. 7 If the LCD shows CARTRIDGE ERROR, take out the toner cartridge and then put it back into the printer again. ROUTINE - Brother International HL-7050N | Users Manual - English - Page 155
, see Cleaning in this chapter. This printer can print up to 40,000 pages *1 with one drum unit. ■ There are many factors that determine the actual drum life, such as temperature, humidity, type of paper, type of toner used, the number of pages per print job and so on. Under ideal conditions - Brother International HL-7050N | Users Manual - English - Page 156
1 Open the top cover of the printer. Figure 5-9 2 Pull out the drum unit assembly (drum unit with the toner cartridge). Figure 5-10 ■ We recommend that you place the drum unit assembly on a piece of disposable paper or cloth in case you accidentally spill or scatter toner. ■ To prevent damage to the - Brother International HL-7050N | Users Manual - English - Page 157
3 Push down the blue lock lever and take the toner cartridge out of the drum unit assembly. Figure 5-12 ■ Handle the toner cartridge carefully. If toner scatters on your hands or clothes, wipe or wash it off with cold water immediately. ■ Do not touch the shaded parts shown in Figure 5-13. - Brother International HL-7050N | Users Manual - English - Page 158
Unpack the new drum unit. ■ Wait to unpack a drum unit until immediately before you put it in the printer. Exposure to direct sunlight or room light may damage the drum unit. ■ Do not touch the shaded parts shown in Figure 5-14. Figure 5-14 5 Put the toner cartridge in the new drum unit. If you put - Brother International HL-7050N | Users Manual - English - Page 159
of the printer when you replace the drum unit. See Cleaning in this chapter. 7 Reset the page counter following the instructions we have supplied with the new drum unit. ■ If you replace only the toner cartridge, do not reset the page counter. 8 Close the top cover of the printer. 5 - 10 ROUTINE - Brother International HL-7050N | Users Manual - English - Page 160
parts regularly to maintain print quality. When it is time to replace these parts, the following messages will appear on the LCD. REPLACE PF KIT See Maintenance Messages in this chapter. REPLACE FUSER See Maintenance Messages in this chapter. REPLACE LASER See Maintenance Messages in this - Brother International HL-7050N | Users Manual - English - Page 161
. When you replace the drum unit, make sure you clean the inside of the printer. If printed pages are stained with toner, clean the inside of the printer with a dry soft cloth. Cleaning the outside of the printer Clean the outside of the printer as follows: 1 Turn off the printer power switch, and - Brother International HL-7050N | Users Manual - English - Page 162
soft cloth to remove dust. Figure 5-17 5 Remove anything that is stuck inside the paper tray. Figure 5-18 6 Put the paper tray back in the printer, and then close the multi-purpose tray. 7 Plug the printer power cord back in, and then turn the printer power switch back on. ROUTINE MAINTENANCE 5 - 13 - Brother International HL-7050N | Users Manual - English - Page 163
. ■ Never touch the hot fuser. ■ Be careful not to inhale the toner. Fuser is HOT! Figure 5-19 Clean the inside of the printer as follows: 1 Turn off the printer power switch, and then unplug the printer power cord. 2 Open the top cover. 3 Take out the drum unit assembly. 5 - 14 ROUTINE MAINTENANCE - Brother International HL-7050N | Users Manual - English - Page 164
cover of the printer, never touch the fuser and fixing roller. Fuser is HOT! Inside the printer Open the face-up output tray Figure 5-20 4 Wipe off toner and paper dust from the metal plate in the printer with a dry, soft cloth. Metal plate Figure 5-21 5 Wipe the scanner window with a dry, soft - Brother International HL-7050N | Users Manual - English - Page 165
6 Put the drum unit assembly in the printer. 7 Close the top cover. 8 Plug the printer power cord back in, and then turn the printer power switch back on. 5 - 16 ROUTINE MAINTENANCE - Brother International HL-7050N | Users Manual - English - Page 166
experiencing print quality problems, please clean the corona wire as follows: 1 Turn off the printer power switch, and then unplug the printer power cord. 2 Open the top cover. 3 Take out the drum unit assembly (drum unit with the toner cartridge). ■ We recommend that you put the drum unit Assembly - Brother International HL-7050N | Users Manual - English - Page 167
Make sure to return the tab to the Home position. If you do not, printed pages will have a black vertical stripe. 5 Put the drum unit assembly back in the printer. 6 Close the top cover. 7 Plug the printer power cord back in, and then turn the printer power switch back on. 5 - 18 ROUTINE MAINTENANCE - Brother International HL-7050N | Users Manual - English - Page 168
best print quality. LCD Message Item REPLACE PF KIT MP Paper feeding kit REPLACE PF KIT 1 Paper feeding kit REPLACE PF KIT 2 Paper feeding kit REPLACE PF KIT 3 Paper feeding kit REPLACE PF KIT 4 Paper feeding kit REPLACE FUSER Fixing unit REPLACE LASER Scanner unit Approximate Life - Brother International HL-7050N | Users Manual - English - Page 169
tray Optional Lower tray Optional Duplex unit for Duplex printing Optional Mailbox unit TRAY 1 MP TRAY TRAY 2, TRAY3, TRAY 4 DX MX Error messages Error Message TONER LIFE END CARTRIDGE ERROR NO PAPER XXX NO TRAY XXX COVER OPEN FACEUP OPEN FACEUP CLOSE JAM XXX STACKER FULL SIZE MISMATCH TOO - Brother International HL-7050N | Users Manual - English - Page 170
Message MEDIATYPE ERROR MANUAL FEED SIZE ERROR XXX NO TRAY ID XXX SIZE ERROR DX SIZE ERROR MX NO DX UNIT DX LEVER ERROR NO MX UNIT DIMM ERROR CARD ERROR HDD ERROR CARD REMOVAL LINE ERROR BUFFER ERROR STORAGE FULL Action Specify the correct type of media. Put the same size of paper in the multi - Brother International HL-7050N | Users Manual - English - Page 171
Error Message DOWNLOAD FULL FONT FULL MEMORY FULL IGNORE DATA ACCESSORY ERROR OPTION MISMATCH CLEAN DRUM UNIT Action Add more memory. See Installing extra DIMM memory in Chapter 4. Add more memory. See Installing extra DIMM memory in Chapter 4. Add more memory. See - Brother International HL-7050N | Users Manual - English - Page 172
DRUM SOON TONER LOW TONER LIFE END REPLACE PF KIT MP REPLACE PF KIT1 REPLACE PF KIT2 REPLACE PF KIT3 REPLACE PF KIT4 REPLACE FUSER REPLACE LASER Action The drum unit is almost at the end of life. Prepare a new drum unit. See CHANGE DRUM SOON message in Chapter 5. Purchase a new toner cartridge - Brother International HL-7050N | Users Manual - English - Page 173
Call service messages Call service message ERROR ### Action Turn off the printer. Wait a few seconds, then turn it on again. If this does not clear the problem, call your dealer or a Brother-authorized service representative. 6 - 5 TROUBLESHOOTING - Brother International HL-7050N | Users Manual - English - Page 174
use? in Chapter 1. Problem The printer does not load paper. The printer does not load paper from the multi-purpose tray. The printer does not load envelopes. Envelope is creased after it is printed. There is a paper jam. The printer feeds multiple pages. The printer does not print to the face-down - Brother International HL-7050N | Users Manual - English - Page 175
Problem The printed pages are curled, so the face-down output tray cannot hold the maximum number of sheets. The printer does not print. When printing on normal paper, it creases. Recommendation ■ Turn over the paper in the paper tray. ■ Change the printer driver setting in Media Type to a thicker - Brother International HL-7050N | Users Manual - English - Page 176
TRAY1) Paper jam in the lower tray (TRAY 2) Paper jam in the lower tray (TRAY 3) Paper jam in the lower tray (TRAY 4) Paper jam inside the printer Paper jam where the paper comes out Paper jam in the face-up output tray Paper jam in the Duplex unit Paper jam in the Mailbox unit TROUBLESHOOTING 6 - 8 - Brother International HL-7050N | Users Manual - English - Page 177
the face-up output tray or where the paper comes out of the printer. Check where the jam is and follow the instructions below to remove the jammed paper. If the error message still appears on the LCD after you remove the jammed paper, there may be more paper jammed somewhere else. Please check the - Brother International HL-7050N | Users Manual - English - Page 178
stack, then put it back in the multi-purpose tray. Figure 6-3 3 When loading paper in the multi-purpose tray, make sure it touches the back of the tray and stays below the maximum paper mark ( ). 4 Open the top cover of the printer and close it, or press Go to start printing. TROUBLESHOOTING 6 - 10 - Brother International HL-7050N | Users Manual - English - Page 179
A4 / A5 (Paper jam inside the Paper tray) The LCD names for the paper trays are as follows. Tray Name Upper paper tray Tray 1 Optional Lower tray Tray 2 Tray 3 Tray 4 LCD Panel Desctiption A2 A3 A4 A5 JAM A2 JAM A3 JAM A4 JAM A5 Figure 6-4 Tray 1 Tray 2 Tray 3 Tray 4 6 - 11 TROUBLESHOOTING - Brother International HL-7050N | Users Manual - English - Page 180
paper tray out of the printer. 2 Pull out the jammed paper. Figure 6-5 ■ If you cannot pull out a small piece of jammed paper, you can remove it by turning the dial to the lower position, as shown below. Figure 6-6 3 Load paper below the maximum paper mark ( ). While pressing the [blue] paper-guide - Brother International HL-7050N | Users Manual - English - Page 181
4 Put the paper tray back in the printer. 5 Open the top cover of the printer, and then close it to resume printing. Do not pull out the upper paper tray while paper is feeding from a lower paper tray because this will cause a paper jam. 6 - 13 TROUBLESHOOTING - Brother International HL-7050N | Users Manual - English - Page 182
JAM B (paper jam inside the printer) JAM B If a paper jam occurs inside the printer, follow these steps: 1 Open the top cover of the printer. 2 Take out the drum unit assembly (drum unit with the toner cartridge). WARNING ■ After you have just used the printer, some parts inside the printer are - Brother International HL-7050N | Users Manual - English - Page 183
of jammed paper if there is any inside the drum unit. Figure 6-9 ■ Handle the toner cartridge carefully. If toner scatters on your hands or clothes, wipe or wash it off with cold water immediately. ■ Do not touch the shaded parts shown in Figure 6-10 and 6-11. Figure 6-10 6 - 15 TROUBLESHOOTING - Brother International HL-7050N | Users Manual - English - Page 184
5 Put the drum unit assembly back in the printer (press firmly). 6 Close the top cover of the printer. TROUBLESHOOTING 6 - 16 - Brother International HL-7050N | Users Manual - English - Page 185
face-up output tray, remove the jammed paper as follows: 1 Use both hands to slowly pull the jammed paper from the paper exit. Figure 6-12 If a Duplex unit is on the printer, take it off the printer. After you pull out the jammed paper, put the Duplex unit back on the printer. 6 - 17 TROUBLESHOOTING - Brother International HL-7050N | Users Manual - English - Page 186
2 Open the face-up output tray. Figure 6-13 3 Use both hands to slowly pull out the jammed paper. Figure 6-14 4 Close the face-up output tray. 5 Open the top cover of the printer, and then close it to resume printing. TROUBLESHOOTING 6 - 18 - Brother International HL-7050N | Users Manual - English - Page 187
JAM D (paper jam in the Duplex unit) JAM D 1 Use both hands to slowly pull the jammed paper from the paper exit of the Duplex unit. Figure 6-15 2 Use both hands to gently open the Duplex unit cover. 6 - 19 TROUBLESHOOTING - Brother International HL-7050N | Users Manual - English - Page 188
unit out of the printer. Figure 6-16 Look inside the printer's slot for the Duplex unit to make sure that the jammed paper is not in there. When you pull out the Duplex unit, be sure to hold it firmly with both hands (the shaded part in the illustration is heavier). Figure 6-17 TROUBLESHOOTING - Brother International HL-7050N | Users Manual - English - Page 189
4 Pull out the jammed paper from inside the Duplex unit. Figure 6-18 5 Put the Duplex unit back in the printer. Figure 6-19 6 Gently close the Duplex unit cover. 6 - 21 TROUBLESHOOTING - Brother International HL-7050N | Users Manual - English - Page 190
) JAM E If there is a paper jam in the Mailbox unit, follow these steps: 1 Open the back cover of the Mailbox unit. Figure 6-20 2 Pull out the jammed paper. Figure 6-21 3 Close the back cover of the mailbox. 4 Open the top cover of the printer, and then close it to restart printing. TROUBLESHOOTING - Brother International HL-7050N | Users Manual - English - Page 191
the problem. See What kind of paper can I use? in Chapter 1. ■ The toner cartridge may be damaged. Put in a new toner cartridge. See Replacing the toner cartridge in Chapter 5. ■ The drum unit may be damaged. Put in a new drum unit. See Replacing the drum unit in Chapter 5. 6 - 23 TROUBLESHOOTING - Brother International HL-7050N | Users Manual - English - Page 192
as high humidity can cause hollow print. See Positioning the printer in Chapter 1. ■ Make sure the paper or other print media is loaded properly in the paper tray and that the guides are not too tight or too loose against the paper stack. ■ Set the paper guides correctly. Make sure that the tips - Brother International HL-7050N | Users Manual - English - Page 193
page Printed pages have toner stains stripes down the page. 108 mm (4.25 in.) 108 mm (4.25 in.) ■ The toner cartridge may be damaged. Put in a new toner cartridge. See Replacing the toner cartridge in Chapter 5. ■ You may clear the problem by cleaning the primary corona wire inside the drum unit by - Brother International HL-7050N | Users Manual - English - Page 194
toner marks across the page Recommendation ■ You may clear the problem by wiping the scanner window with a soft cloth. See Cleaning the inside of the printer or the Maintenance Tutorial video on the supplied CD-ROM. ■ The drum unit may be damaged. Put in a new drum unit. See Replacing the drum unit - Brother International HL-7050N | Users Manual - English - Page 195
Options tab in the printer driver. ■ Press the Go button to print the data that is left in the printer. ■ If the Go button does not clear the error, reduce the complexity of your document or reduce the print resolution. ■ Change the following settings in the supplied Windows® driver, and then try - Brother International HL-7050N | Users Manual - English - Page 196
Other problems Problem Recommendation The printer cannot print at all. Your PC shows the following error message: 'There was an error writing to LPT1: (or BRUSB) for the printer.' ■ Check that the printer cable is not damaged or broken. ■ If you have an interface-switching device, make sure that - Brother International HL-7050N | Users Manual - English - Page 197
the HDD. Recommendation Make sure that: ■ the cable is connected properly ■ the HDD is fitted properly ■ the HDD is formatted properly. Turn off the printer. Wait a few seconds, then turn it on again. If this error message appears again, replace the HDD with a new one. 6 - 29 TROUBLESHOOTING - Brother International HL-7050N | Users Manual - English - Page 198
appears on the LCD, please do the following: 1. Reset the printer. [Press - twice, then press Set twice and finally press Go.] 2. Turn off ERROR PRINT in BR-SCRIPT3 mode. [Press + five times, then press Set and then -, now press Set twice, select ERROR PRINT = OFF and press Set and finally press Go - Brother International HL-7050N | Users Manual - English - Page 199
6 - 31 TROUBLESHOOTING - Brother International HL-7050N | Users Manual - English - Page 200
Appendix Printer specifications Printing Print method Laser Resolution Print speed Warm up First print Electrophotography by semiconductor laser-beam scanning Wave length: 780 nm Pulse duration: 17 ns Output: 15 mW max. Windows® 95/98/Me, Windows NT® 4.0, Windows® 2000 and Windows® XP 1200 - Brother International HL-7050N | Users Manual - English - Page 201
Resident printer fonts ■ Toner in a single cartridge Life Expectancy - Up to 12,000 single-sided pages (A4 or letter-size paper with the print density set at level 0 and about 5% coverage). ■ Drum unit Life Expectancy - Up to 40,000 single-sided pages (A4 or letter-size paper with the print density - Brother International HL-7050N | Users Manual - English - Page 202
parallel, RS-232C serial and Universal Serial Bus. HL-7050: 32 MB (expandable to 288 MB with two DIMMs) HL-7050N: 32 MB (expandable to 288 MB with two DIMMs) The factory installed standard memory varies depending on the printer model and country. Seven buttons, one LED, and one LCD that is - Brother International HL-7050N | Users Manual - English - Page 203
x 3 trays Duplex unit for duplex printing (DX-7000) Mailbox unit for output source (MX-7000 series) Stabilizer for safety after installing multiple optional devices on the printer (SB-4000) Ethernet 10BaseT/100BaseTX Print server (NC-4100h) (For HL-7050 only) Hard Disk Drive CompactFlash Card A - 4 - Brother International HL-7050N | Users Manual - English - Page 204
Hz Printing: 690 W or less*1 (when printing on plain paper) Printing: Lwad = about 67 dB (A) (see note below) Stand-by: Lwad = about 48 dB (A) (You might want to install printers with a sound power level of Lwad 63 dB (A) or more in a separate room or cubicle.) Operating: Storage: 10 - Brother International HL-7050N | Users Manual - English - Page 205
Labels i A4 or Letter Plain paper Envelope i Envelope Card stock i Thick paper or thicker paper Thin paper i i i i i When you print on thick paper, labels and card stock, we recommend that you select the media type setting in the printer driver according to the paper weight. A - 6 - Brother International HL-7050N | Users Manual - English - Page 206
), B5 (ISO), Executive, A5 500 sheets (80 g/m2 or 20 lb) 100 sheets (80 g/m2 or 20 lb) Transparencies: 10 sheets Envelopes: 10 sheets Label stock: 10 sheets 500 sheets (80 g/m2 or 20 lb) Paper size Number of sheets DX A4, Letter, Legal, B5 (JIS), Executive MX A4, Letter, B5 (JIS), B5 (ISO - Brother International HL-7050N | Users Manual - English - Page 207
CD-ROM, you can jump to the page for each printing method by clicking the i in the table. Media type Plain paper Recycled paper Bond paper Thick paper Thicker paper Transparency Labels Envelope Card stock Thin paper Face-down i i i i i i i Face-up i i i i i i i i i i Notes 60 g/m2 to 105 g/m2 - Brother International HL-7050N | Users Manual - English - Page 208
settings You can select the following media types in the driver settings. Please see, Features in the printer driver in Chapter 2. ■ Plain paper: ■ Thick paper: ■ Thicker paper: ■ Bond paper: ■ Transparency: ■ Envelope ■ Thin paper 60 g/m2 to 105 g/m2 (16 lb to 28 lb) 105 g/m2 to 150 g/m2 (28 - Brother International HL-7050N | Users Manual - English - Page 209
and 12 bitmapped fonts This printer has the following scalable fonts ■ Utah Condensed, Oblique, Bold, BoldOblique Microsoft® Windows® 95/98/Me, Windows® 2000 and Windows NT®TrueType compatible fonts: ■ BR Symbol ■ Roman, Italic, Bold, BoldItalic ■ Portugal Roman, Italic, Bold, BoldItalic A - 10 - Brother International HL-7050N | Users Manual - English - Page 210
Brother Original Fonts: ■ Bermuda Script ■ Germany ■ San Diego ■ US Roman Bitmapped fonts (portrait and landscape): ■ LetterGothic16.66 Medium, Italic, Bold, BoldItalic ■ OCR-A ■ OCR-B A - 11 - Brother International HL-7050N | Users Manual - English - Page 211
66 scalable fonts BR-Script 3 Mode Scalable fonts ■ Atlanta Book, BookOblique, Demi, DemiOblique ■ Alaska, Extrabold ■ Antique Oakland, Oblique, Bold ■ Bermuda Script ■ BR Dingbats ■ BR Symbol ■ Brougham, Oblique, Bold, BoldOblique ■ Brussels Light, LightItalic, Demi, DemiItalic ■ Calgary - Brother International HL-7050N | Users Manual - English - Page 212
character sets For the HP LaserJet, EPSON FX-850, and IBM Proprinter XL emulation modes, you can select the symbol and character sets in the PRINT MENU. See About emulation modes in Chapter 3. If you have chosen the HP-GL emulation menu, you can choose the standard or alternate character set - Brother International HL-7050N | Users Manual - English - Page 213
HP LaserJet Mode A - 14 - Brother International HL-7050N | Users Manual - English - Page 214
A - 15 - Brother International HL-7050N | Users Manual - English - Page 215
A - 16 - Brother International HL-7050N | Users Manual - English - Page 216
A - 17 - Brother International HL-7050N | Users Manual - English - Page 217
A - 18 - Brother International HL-7050N | Users Manual - English - Page 218
A - 19 - Brother International HL-7050N | Users Manual - English - Page 219
A - 20 - Brother International HL-7050N | Users Manual - English - Page 220
The following table shows characters that are only available in the matching character set. The numbers at the top of the table are hexadecimal code values so that characters will be replaced with the Roman 8 character set. For other characters, see the Roman 8 character set. A - 21 - Brother International HL-7050N | Users Manual - English - Page 221
A - 22 - Brother International HL-7050N | Users Manual - English - Page 222
A - 23 - Brother International HL-7050N | Users Manual - English - Page 223
A - 24 - Brother International HL-7050N | Users Manual - English - Page 224
A - 25 - Brother International HL-7050N | Users Manual - English - Page 225
A - 26 - Brother International HL-7050N | Users Manual - English - Page 226
A - 27 - Brother International HL-7050N | Users Manual - English - Page 227
A - 28 - Brother International HL-7050N | Users Manual - English - Page 228
EPSON Mode The following table shows characters that are only available in the matching character set. The numbers at the top of the table are hexadecimal code values so that characters will be replaced with the US ASCII character set. For other characters, see the US ASCII character set. A - 29 - Brother International HL-7050N | Users Manual - English - Page 229
A - 30 - Brother International HL-7050N | Users Manual - English - Page 230
A - 31 - Brother International HL-7050N | Users Manual - English - Page 231
IBM Mode A - 32 - Brother International HL-7050N | Users Manual - English - Page 232
A - 33 - Brother International HL-7050N | Users Manual - English - Page 233
HP-GL Mode A - 34 - Brother International HL-7050N | Users Manual - English - Page 234
A - 35 - Brother International HL-7050N | Users Manual - English - Page 235
A - 36 - Brother International HL-7050N | Users Manual - English - Page 236
A - 37 - Brother International HL-7050N | Users Manual - English - Page 237
A - 38 - Brother International HL-7050N | Users Manual - English - Page 238
A - 39 Symbol sets supported by the printer's intellifont compatible typefaces PCL Symbol Set ISO 4 United Kingdom* 1F ISO 69 French* 1G ISO 21 German* 1S HP Spanish* 1U Legal 2K ISO 57 Chinese* 2N ISO 8859-2 Latin 2 2S ISO 17 Spanish* 2U ISO 2 International* 3S ISO 10 Swedish* - Brother International HL-7050N | Users Manual - English - Page 239
9T 9U 10J 10U 11U 12J 12U 13J 14J 15U 17U 19L 19U 26U 19M 579L 0O 1O ISO 85 Spanish* Desk Top Math-8 Roman-8 Windows 3.1 Latin 2 PC-1004 (OS/2) PC Turkish Windows 3.0 Latin 1 PS Text PC-8 PC-8 D/N MC Text PC-850 Ventura International Ventura US Pi Font PC-852 - Brother International HL-7050N | Users Manual - English - Page 240
supported by the printer's 11 Swedish* 0U ISO 6 ASCII* 1D ISO 61 Norwegian 2* 1E ISO 4 United Kingdom* 1F ISO 69 French* 1G ISO 21 German* 1S HP Spanish* 1U 5S ISO 84 Portuguese* 5T Windows 3.1 Latin 5 6J Microsoft Publishing 6M Ventura Math 6N ISO 8859-10 Latin 6 6S ISO 85 - Brother International HL-7050N | Users Manual - English - Page 241
9E 9J 9T 9U 10J 10U 11U 12J 12U 13J 14J 15U 17U 19L 19U 26U 19M 579L 0O 1O PCL Symbol Set Symbol Set Windows 3.1 Latin 2 PC-1004 (OS/2) PC Turkish Windows 3.0 Latin 1 PS Text PC-8 PC-8 D/N MC Text PC-850 Ventura International Ventura US Pi Font PC-852 - Brother International HL-7050N | Users Manual - English - Page 242
Quick reference for commands Bar code control The printer can print bar codes in the HP LaserJet, EPSON FX-850, and IBM Proprinter XL emulation modes. Print bar codes or expanded characters Code ESC i Dec 27 105 Hex 1B 69 Format: ESC i n ... n \ Creates bar codes or expanded characters according to - Brother International HL-7050N | Users Manual - English - Page 243
' or 'T12 n = 't13' or 'T13 n = 't14' or 'T14 n = 't130' or 'T130 n = 't131' or 'T131 n = 't132' or 'T132 n = 't133' or 'T133 n = 't134' or 'T134 CODE 39 (default) Interleaved 2 of 5 FIM (US-Post Net) Post Net (US-Post Net) EAN 8, EAN 13, or UPC A UPC E Codabar Code 128 set A Code 128 set B Code - Brother International HL-7050N | Users Manual - English - Page 244
n = 's0' or 'S0 n = 's1' or 'S1 n = 's3' or 'S3 3: 1 (default) 2: 1 2.5: 1 This parameter selects the bar code style as above. When the EAN 8, EAN 13, UPC-A, Code Bar Code n = 'mnnn' or 'Mnnn' (nnn = 0 ~ 32767) This parameter shows the bar code width. The unit of 'nnn' is a percentage. A - 45 - Brother International HL-7050N | Users Manual - English - Page 245
printer prints the human readable line below the bar code. Human readable characters are always printed with OCR-B font of 10 next section.) The factory setting of the quiet-zone width is 1 inch. Bar code, expanded character unit, line block drawing and box drawing n = 'u0' or 'U0 n = 'u1' or 'U1 - Brother International HL-7050N | Users Manual - English - Page 246
Bar code & expanded character offset in Y-axis n = 'ynnn' or 'Ynnn' This parameter shows the downward offset from the current print position in the 'u'- or 'U'-specified unit. Bar code, expanded character, line block drawing and box drawing height n = 'hnnn', 'Hnnn', 'dnnn', or 'Dnnn' (1) EAN13 - Brother International HL-7050N | Users Manual - English - Page 247
cause a data error. The number of characters for bar codes is not limited. The bar code data automatically starts and ends with an asterisk 'T3' Characters 'A' to 'D' are valid and one digit of data can be printed. Upper-case and lower-case alphabet characters can be accepted. ■ When Post Net - Brother International HL-7050N | Users Manual - English - Page 248
data error that results in the bar code data being printed as normal print data. If the check digit is not correct, the printer calculates Eight digits (standard format) The first character must be '0' and the data must end with a check digit. Total eight digits = '0' plus 6 digits plus 1 check - Brother International HL-7050N | Users Manual - English - Page 249
v) 'V' or 'v' is a terminator. Expanded character data start n = 'l' or 'L' Data that follows 'l' or 'L' is read as expanded character data (or labeling data). Expanded character data must end with the ' \ ' code (5CH), which also - Brother International HL-7050N | Users Manual - English - Page 250
?\"; 'Code 128 set C LPRINT CHR$(27);"it14r1o0x00y160b";CHR$(1);CHR$(2);"?\"; 'ISBN(EAN) LPRINTCHR$(27);"it130r1o0x00y180b123456789012?+12345\"; 'EAN 128 set A LPRINT CHR$(27);"it132r1o0x00y210b1234567890?\"; LPRINT CHR$(12) END A - 51 - Brother International HL-7050N | Users Manual - English - Page 251
for Windows users 1-3 CompactFlash memory card 4-11 control panel 1-6 D data lamp 3-15 date and time setting ........ 3-34 delete storage 3-26 Device Options 2-6 DOS 6-29 drum unit 5-1 duplex 2-4 duplex printing 2-4 duplex unit 4-4 E environment 1-9 EPSON FX-850 mode ...... 3-37 Error - Brother International HL-7050N | Users Manual - English - Page 252
tray 1-6 N NC-4100h 4-8 Network board 4-8 Network menu ..........3-31, 3-40 Network software 2-17 O option 4-1 P paper 3-38 paper jam 6-8 paper menu 3-22 paper size A-7 paper tray 1-6 PCL6 2-1 power supply 1-8 PPD (Post Script printer description 2-20 Print menu ...... 3-27, 3-39 - Brother International HL-7050N | Users Manual - English - Page 253
W watermark 2-5 I - 3 INDEX
-
 1
1 -
 2
2 -
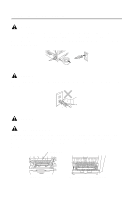 3
3 -
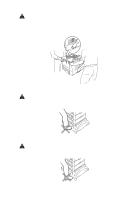 4
4 -
 5
5 -
 6
6 -
 7
7 -
8
-
9
-
10
-
11
-
12
-
13
-
14
-
15
-
16
-
17
-
18
-
19
-
20
-
21
-
22
-
23
-
24
-
25
-
26
-
27
-
28
-
29
-
30
-
31
-
32
-
33
-
34
-
35
-
36
-
37
-
38
-
39
-
40
-
41
-
42
-
43
-
44
-
45
-
46
-
47
-
48
-
49
-
50
-
51
-
52
-
53
-
54
-
55
-
56
-
57
-
58
-
59
-
60
-
61
-
62
-
63
-
64
-
65
-
66
-
67
-
68
-
69
-
70
-
71
-
72
-
73
-
74
-
75
-
76
-
77
-
78
-
79
-
80
-
81
-
82
-
83
-
84
-
85
-
86
-
87
-
88
-
89
-
90
-
91
-
92
-
93
-
94
-
95
-
96
-
97
-
98
-
99
-
100
-
101
-
102
-
103
-
104
-
105
-
106
-
107
-
108
-
109
-
110
-
111
-
112
-
113
-
114
-
115
-
116
-
117
-
118
-
119
-
120
-
121
-
122
-
123
-
124
-
125
-
126
-
127
-
128
-
129
-
130
-
131
-
132
-
133
-
134
-
135
-
136
-
137
-
138
-
139
-
140
-
141
-
142
-
143
-
144
-
145
-
146
-
147
-
148
-
149
-
150
-
151
-
152
-
153
-
154
-
155
-
156
-
157
-
158
-
159
-
160
-
161
-
162
-
163
-
164
-
165
-
166
-
167
-
168
-
169
-
170
-
171
-
172
-
173
-
174
-
175
-
176
-
177
-
178
-
179
-
180
-
181
-
182
-
183
-
184
-
185
-
186
-
187
-
188
-
189
-
190
-
191
-
192
-
193
-
194
-
195
-
196
-
197
-
198
-
199
-
200
-
201
-
202
-
203
-
204
-
205
-
206
-
207
-
208
-
209
-
210
-
211
-
212
-
213
-
214
-
215
-
216
-
217
-
218
-
219
-
220
-
221
-
222
-
223
-
224
-
225
-
226
-
227
-
228
-
229
-
230
-
231
-
232
-
233
-
234
-
235
-
236
-
237
-
238
-
239
-
240
-
241
-
242
-
243
-
244
-
245
-
246
-
247
-
248
-
249
-
250
-
251
-
252
-
253
 |
 |
Brother Laser Printer
HL-7050 series
User's Guide
Version 2
For visually-impaired users
Please see the two HTML files, index_win.html and
index_mac.html, on the supplied CD-ROM. You can
read them with Screen Reader ‘text-to-speech’
software.
For information on the use of the Braille control panel
with buzzer function, see
Chapter 3
.
You must set up the hardware and install the driver before you can use the printer.
Please use the Quick Setup Guide to set up the printer. You can find a printed
copy in the box or view it on the CD-ROM we have supplied.
Please read this Guide thoroughly before you use the printer. Keep the CD-ROM
in a convenient place so you can use it quickly if you need to.
Please visit our website at
where you can get
answers to Frequently Asked Questions (FAQs), Product Support and Technical
Questions, and the latest Driver Updates and Utilities.