Brother International HL-7050N Users Manual - English - Page 169
Troubleshooting, LCD messages, Error messages
 |
UPC - 012502603375
View all Brother International HL-7050N manuals
Add to My Manuals
Save this manual to your list of manuals |
Page 169 highlights
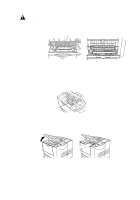
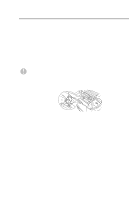
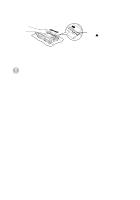
6 Troubleshooting 6 LCD messages The LCD names for the paper trays are as follows. Upper paper tray Multi-purpose tray Optional Lower tray Optional Duplex unit for Duplex printing Optional Mailbox unit TRAY 1 MP TRAY TRAY 2, TRAY3, TRAY 4 DX MX Error messages Error Message TONER LIFE END CARTRIDGE ERROR NO PAPER XXX NO TRAY XXX COVER OPEN FACEUP OPEN FACEUP CLOSE JAM XXX STACKER FULL SIZE MISMATCH TOO MANY TRAYS Action Replace the toner cartridge with a new one. See Replacing the toner cartridge in Chapter 5. Take out the toner cartridge and put it back into the printer again. See Replacing the toner cartridge in Chapter 5. Put paper in the empty tray. Put the paper tray in the printer. Close the top cover of the printer. Close the Duplex cover. Close the back cover of the mailbox. Close the face-up output tray. Open the face-up output tray. Push down the two blue levers, and then press Go. Carefully pull out the jammed paper from the indicated area as shown in Paper jams and how to clear them. Take some paper out of the output tray. Put the same size paper in the paper tray or multipurpose tray that is selected in the printer driver, and then press Go. You can only have up to three lower trays. Remove any extra lower trays. TROUBLESHOOTING 6 - 1
-
 1
1 -
2
-
3
-
4
-
5
-
6
-
7
-
8
-
9
-
10
-
11
-
12
-
13
-
14
-
15
-
16
-
17
-
18
-
19
-
20
-
21
-
22
-
23
-
24
-
25
-
26
-
27
-
28
-
29
-
30
-
31
-
32
-
33
-
34
-
35
-
36
-
37
-
38
-
39
-
40
-
41
-
42
-
43
-
44
-
45
-
46
-
47
-
48
-
49
-
50
-
51
-
52
-
53
-
54
-
55
-
56
-
57
-
58
-
59
-
60
-
61
-
62
-
63
-
64
-
65
-
66
-
67
-
68
-
69
-
70
-
71
-
72
-
73
-
74
-
75
-
76
-
77
-
78
-
79
-
80
-
81
-
82
-
83
-
84
-
85
-
86
-
87
-
88
-
89
-
90
-
91
-
92
-
93
-
94
-
95
-
96
-
97
-
98
-
99
-
100
-
101
-
102
-
103
-
104
-
105
-
106
-
107
-
108
-
109
-
110
-
111
-
112
-
113
-
114
-
115
-
116
-
117
-
118
-
119
-
120
-
121
-
122
-
123
-
124
-
125
-
126
-
127
-
128
-
129
-
130
-
131
-
132
-
133
-
134
-
135
-
136
-
137
-
138
-
139
-
140
-
141
-
142
-
143
-
144
-
145
-
146
-
147
-
148
-
149
-
150
-
151
-
152
-
153
-
154
-
155
-
156
-
157
-
158
-
159
-
160
-
161
-
162
-
163
-
 164
164 -
 165
165 -
 166
166 -
 167
167 -
 168
168 -
 169
169 -
 170
170 -
 171
171 -
 172
172 -
 173
173 -
 174
174 -
175
-
176
-
177
-
178
-
179
-
180
-
181
-
182
-
183
-
184
-
185
-
186
-
187
-
188
-
189
-
190
-
191
-
192
-
193
-
194
-
195
-
196
-
197
-
198
-
199
-
200
-
201
-
202
-
203
-
204
-
205
-
206
-
207
-
208
-
209
-
210
-
211
-
212
-
213
-
214
-
215
-
216
-
217
-
218
-
219
-
220
-
221
-
222
-
223
-
224
-
225
-
226
-
227
-
228
-
229
-
230
-
231
-
232
-
233
-
234
-
235
-
236
-
237
-
238
-
239
-
240
-
241
-
242
-
243
-
244
-
245
-
246
-
247
-
248
-
249
-
250
-
251
-
252
-
253
 |
 |
