Brother International HL-7050N Users Manual - English - Page 143
Plug the printer back in, and then turn on the printer power
 |
UPC - 012502603375
View all Brother International HL-7050N manuals
Add to My Manuals
Save this manual to your list of manuals |
Page 143 highlights
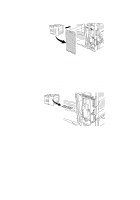
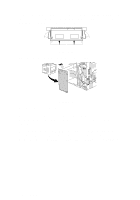
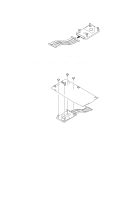
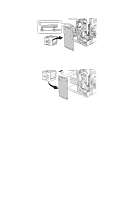
6 Press the DIMM straight into the slot (press firmly). Make sure the locks on each side of the DIMM click into place. (To remove a DIMM, you must release the locks.) Figure 4-13 7 Secure the metal plate with the three screws. Figure 4-14 8 Put the side cover back on. 9 Reconnect the interface cable to your printer. Plug the printer back in, and then turn on the printer power switch. 10 To check whether the DIMM has been installed properly, you can print the Print Settings listing that shows the current memory size. To print the Print Settings listing, see Chapter 3. 4 - 16 OPTIONS
-
 1
1 -
2
-
3
-
4
-
5
-
6
-
7
-
8
-
9
-
10
-
11
-
12
-
13
-
14
-
15
-
16
-
17
-
18
-
19
-
20
-
21
-
22
-
23
-
24
-
25
-
26
-
27
-
28
-
29
-
30
-
31
-
32
-
33
-
34
-
35
-
36
-
37
-
38
-
39
-
40
-
41
-
42
-
43
-
44
-
45
-
46
-
47
-
48
-
49
-
50
-
51
-
52
-
53
-
54
-
55
-
56
-
57
-
58
-
59
-
60
-
61
-
62
-
63
-
64
-
65
-
66
-
67
-
68
-
69
-
70
-
71
-
72
-
73
-
74
-
75
-
76
-
77
-
78
-
79
-
80
-
81
-
82
-
83
-
84
-
85
-
86
-
87
-
88
-
89
-
90
-
91
-
92
-
93
-
94
-
95
-
96
-
97
-
98
-
99
-
100
-
101
-
102
-
103
-
104
-
105
-
106
-
107
-
108
-
109
-
110
-
111
-
112
-
113
-
114
-
115
-
116
-
117
-
118
-
119
-
120
-
121
-
122
-
123
-
124
-
125
-
126
-
127
-
128
-
129
-
130
-
131
-
132
-
133
-
134
-
135
-
136
-
137
-
 138
138 -
 139
139 -
 140
140 -
 141
141 -
 142
142 -
 143
143 -
 144
144 -
 145
145 -
 146
146 -
 147
147 -
 148
148 -
149
-
150
-
151
-
152
-
153
-
154
-
155
-
156
-
157
-
158
-
159
-
160
-
161
-
162
-
163
-
164
-
165
-
166
-
167
-
168
-
169
-
170
-
171
-
172
-
173
-
174
-
175
-
176
-
177
-
178
-
179
-
180
-
181
-
182
-
183
-
184
-
185
-
186
-
187
-
188
-
189
-
190
-
191
-
192
-
193
-
194
-
195
-
196
-
197
-
198
-
199
-
200
-
201
-
202
-
203
-
204
-
205
-
206
-
207
-
208
-
209
-
210
-
211
-
212
-
213
-
214
-
215
-
216
-
217
-
218
-
219
-
220
-
221
-
222
-
223
-
224
-
225
-
226
-
227
-
228
-
229
-
230
-
231
-
232
-
233
-
234
-
235
-
236
-
237
-
238
-
239
-
240
-
241
-
242
-
243
-
244
-
245
-
246
-
247
-
248
-
249
-
250
-
251
-
252
-
253
 |
 |
4 - 16 OPTIONS
6
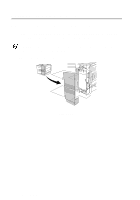
Press the DIMM straight into the slot (press firmly). Make sure
the locks on each side of the DIMM click into place.
(To remove
a DIMM, you must release the locks.)
Figure 4-13
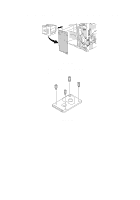
7
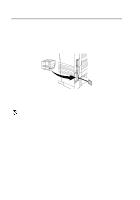
Secure the metal plate with the three screws.
Figure 4-14
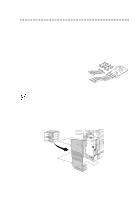
8
Put the side cover back on.
9
Reconnect the interface cable to your printer.
Plug the printer back in, and then turn on the printer power
switch.
10
To check whether the DIMM has been installed properly, you
can print the Print Settings listing that shows the current
memory size. To print the Print Settings listing, see
Chapter 3
.