Brother International PS-1000 Operation Manual - Page 11
Reverse, Sewing, Button, Lever
 |
View all Brother International PS-1000 manuals
Add to My Manuals
Save this manual to your list of manuals |
Page 11 highlights
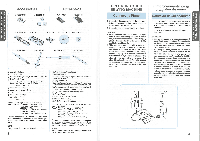
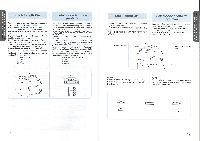
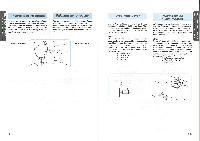
1:13S00 3G ImmoV141nS VOZONOO ONIM3S 1:IflOA ONIMONN KN • WING Y • U - SEWING M CHINE A Reverse Sewing Button To sew in reverse, push the Reverse Sewing Button in as far as possible and hold in that position while pressing lightly on the foot pedal. To sew forward, release the Reverse Sewing Button. The machine will then sew forward. Reverse sewing is used for back tacking and reinforcing seams. Pulsador de retroceso Para coser hacia atras, apriete a fondo el pulsador de retrocesoymantengalo en esa posicionmientras presiona ligeramente el pedal. Para volver a coser hacia adelante, suelte elpulsador. La costura hacia atras se usa para remates ypara reforzarlas costuras. (1) Reverse sewing button ® Pulsador de retroceso Drop Feed Lever Use the Drop Feed Lever to raise or lower the feed dogs according to the job that is being done. When monogramming, embroidering, darning or sewing on buttons, the feed dogs should be lowered. (The garment will not be fed.) NOTE: When raising or lowering the feed dogs, move the Drop Feed Lever as far as possible to the appropriate side. Since the feed dogs can not be lowered using the Drop Feed Lever immediately after they are raised, turn the balance wheel toward you once and after the feed dogs are raised, lower them using the Drop Feed Lever. C) Drop feed lever © Up position mark ® Down position ® Up position Palanca de los alimentadores Utilice la palanca delosalimentadorespara levantar obajarlos dientes delos alimentadores de conformidad con el trabajo a realizar. Para monogramas, bordados, zurcidos o para la costura de botones, los alimentadores deben ser bajados (para que el tejido no se alimente). NOTA: Al subir o bajar los alimentadores, conviene desplazar la palanca de los alimentadores lo mas posible hacia la posicion deseada. Dado que los alimentadores no pueden ser bajados con la palanca inmediatamente despues de su subida, gire primero la ruedecilla hacia usted y, cuando los alimentadores se encuentren subidos, bajelos con la palanca arriba inencionada. (i) Palanca de los alimentadores © Marca de la posicion a/ta ® Posicion baja Posicion alta O 13 14
-
 1
1 -
2
-
3
-
4
-
5
-
 6
6 -
 7
7 -
 8
8 -
 9
9 -
 10
10 -
 11
11 -
 12
12 -
 13
13 -
 14
14 -
 15
15 -
 16
16 -
17
-
18
-
19
-
20
-
21
-
22
-
23
-
24
-
25
-
26
-
27
-
28
-
29
-
30
-
31
-
32
-
33
-
34
-
35
 |
 |
