Brother International PS-1000 Operation Manual - Page 12
THREADING, MACHINE, Enhebrado, maquina
 |
View all Brother International PS-1000 manuals
Add to My Manuals
Save this manual to your list of manuals |
Page 12 highlights
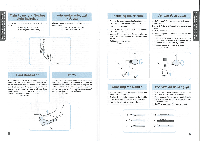
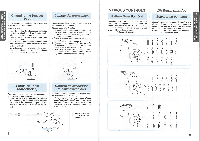
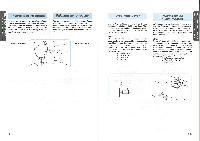
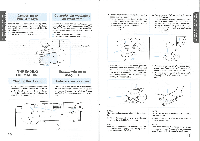
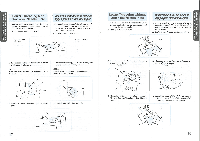
LI3S0.9 30 VNII1011141/]S VOZON00 3NIII3VIN ONIM3S 1:1110A ONIMONN Converting to Free-arm Style Free-arm sewing is convenient for sewing tubular and hard-to-reach areas on a garment. To change your machine to the free-arm style, simply lift out the extension table. Lift up on the extension table. Slide the extension table to the left. Coversion en modalidad de brazo libre La costura con brazo fibre es prectica para coser zonas tubulares y diffciles de acceso en los tejidos. Para transformar su maquina en esa modalidad, solo hace falta levantar el soporte de los accesorios y sacarlo. Levante el soporte de accesorios. Des'fcelo hacia la izquierda para sacarlo. ® Extension table Soporte de accesorios THREADING THE MACHINE Winding the Bobbin 1. Place a spool of thread onto the horizontal spool pin and firmly hold it with a spool holder so that the spool of thread will not turn. Pass the thread through the thread guide as shown following the dotted line on the machine. 1 Enhebrado de la maquina Bobinado de la canilla 1. Coloque un carrete de hilo en el eje horizontal previsto y mantengalo firmemente con un tope para que no de vueltas. Pase el hilo por la gufa, siguiendo la Linea de puntos marcada en la maquina. --O 0 )14 -- O a C 15 2. Pass the end of the thread through the hole on the bobbin from the inside. Place the bobbin onto the bobbin winder shaft and slide the bobbin winder shaft to the right. Turn the bobbin clockwise, by hand, until the spring on the shaft slides into the slit on the bobbin. 0 Spring O Slit 2. Pase elextremo delhiloporelorificio de la canilla a partir del nterior. Coloque la canilla en el eje de bobinado correspondiente y deslice dicho eje hacia la derecha. Gire la canilla en el sentido de las manecillas de unreloj, conla mano, hasta queelmuelleimpulsor deleje se deslice dentro de la ranura de la canilla. C) Muelle 0 Ranura (f) 3. While holding the end of the thread, gently depress the foot controller to wind the thread around the bobbin a few times. Then stop the machine. 4. Trim the excess thread above the bobbin. Continue winding the thread onto the bobbin by depressing the foot controller. 3. Sujetando el extremo del hilo, presione suavemente elpedalpara que elhilo de vueltas alrededor de la canilla. Luego pare la maquina. 4. Deshaga el exceso de hilo arriba de la canilla. Siga bobinando el hilo en la canilla presionando el pedal. NOTE: The machine stops automatically when the bobbin is full. 5. Cut the thread, push the shaft to the left and remove the full bobbin from the shaft. NOTE: After winding the bobbin, it is normal to hear the sound of the clutch engaging before sewing or turning the balance wheel by hand. NOTA: La maquina se para automaticamente cuando la canilla esta Ilena. 5. Corte el hilo, empuje el eje hacia la izquierda y retire la canilla Ilena. NOTA: Despues del bobinado de la canilla, es normal que se escuche el ruido de enganche del embrague antes de coser o girar la ruedecilla con la mano. 16 K N • • " SEWING M A 0 N. ZC A I . .4 O C.SE'
-
 1
1 -
2
-
3
-
4
-
5
-
6
-
 7
7 -
 8
8 -
 9
9 -
 10
10 -
 11
11 -
 12
12 -
 13
13 -
 14
14 -
 15
15 -
 16
16 -
 17
17 -
18
-
19
-
20
-
21
-
22
-
23
-
24
-
25
-
26
-
27
-
28
-
29
-
30
-
31
-
32
-
33
-
34
-
35
 |
 |
