Brother International PS-1000 Operation Manual - Page 16
Needle, Sewing, Costura, aguja, doble, Thread, Tension, TensiOn, hilos
 |
View all Brother International PS-1000 manuals
Add to My Manuals
Save this manual to your list of manuals |
Page 16 highlights
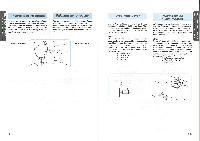
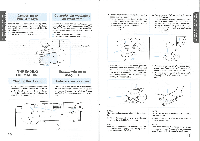
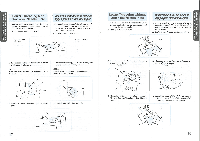
. 3s• O31 r , * rwnsrnz•N•3 - fl • A JNIM • Twin Needle Sewing Your sewing machine is designed for twin needle sewing, which allows you to sew with two top threads. You can use the same color or two different colors of thread for making decorative stitches. Any of the patterns, except the buttonhole pattern, can be sewn with the twin needle. When using the Straight Stitch, the Stitch Width Dial should be set so that the needle is in the center position (between 2 and 3). However, when other patterns are used, set the Stitch Width Dial between 0 and 3. See page 12 for details on adjusting the Stitch Width Dial. CAUTION: When sewing with the twin needle, be sure the Stitch Width Dial is not set above 3 since this may cause the needle to hit the needle plate and break. INSERTING THE TWIN NEEDLE Insert in the same way a single needle is inserted (refer to page 6). The flat side of the needle should face toward the back and the rounded side should face toward you. PLACING THE EXTRA SPOOL PIN Place the vertical spool pin in the hole found on top of the machine near the horizontal spool pin. Place the second spool of thread onto the vertical spool pin as shown in fig. A. TWIN NEEDLE THREADING Each needle should be threaded separately. 1. Threading the Right Needle Follow the same instructions for single needle threading using the thread from the spool on the extra spool pin. See page 19 for more details. 2. Threading the Left Needle Thread the left needle in the same manner that the right needle was threaded, but do not pass the thread through the thread guide above the needle before passing it through the eye of the left needle as shown below in fig. B. C) Right needle thread passes through this guide. C) Left needle thread passes in front of this guide. A Costura con aguja doble Su maquina de coser ha sido concebida para poder utilizar una aguja doble y permitir la costura con dos hilos superiores. Puede usar el mismo color de hilo o dos hilos de colores distintos para puntadas decorativas. La aguja doble permite coser cualquiera de los patrones, exceptuando elpara hacer ojales. Sin embargo, cuando selecciona la puntada recta, el selector de ancho de puntada debe estar ajustado de tal forma que la aguja se encuentre en la posici6n central (entre 2 y 3). Para los otros modelos de puntadas, dicho selectorpuede estarajustado entre 0 y 3. Vease la pagina 12 para mayores detalles sobre el ajuste del selector de ancho de puntada. ATENCION: Alcosercon una aguja doble, debe asegurarse que el selector de ancho de puntada no esta ajustado en un valor superior a 3 ya que en esas circunstancias, la aguja podn'a golpear la placa de agujas y romperse. Para introducir la aguja doble Introduzcala de la misma manera que una aguja simple (vease pagina 6). La parte plana de la aguja debe estar cara hacia atras mientras que la parte redonda esta cara a usted. Colocado el eje de carrete suplementario Coloque el eje de carrete vertical en el orificio previsto arriba de la maquina, cerca del eje horizontal. lnstale el segundo carrete de hilo en el eje vertical, tal como ilustrado en la fig. A. Enhebrado de la aguja doble Cada una de las agujas debe ser enhebrada por separado. 1. Enhebrado de la aguja derecha Observe las mismas instrucciones que para el enhebrado de una sola aguja, pero utilizando el hilo del carrete colocado en el porta carretes extra. (veasepagina 19para mayores detalles al respecto). 2. Enhebrado de la aguja izquierda Enhebre la aguja izquierda de la misma manera que la aguja derecha. Sin embargo, no hay que pasar el hilo por la gula que se situa arriba de la aguja. Conviene pasarlo directamente por el ojo de la aguja izquierda, talcomo ilustrado arriba en la fig. B. C) El hilo de la aguja derecha pasa por la gufa. Elhilo de la aguja izquierda pasa delante de la guia. B 23 Thread Tension Thread tension will affect the quality of your stitches. It may need to be adjusted when you change-fabric or thread type. NOTE: It is recommended that a test sample be made on a fabric scrap before sewing on your project. Possible misadjustments and their results. Upper tension is too tight. Locks appear on the surface of the fabric. Upper Tension Control Dial Decrease the tension by turning the dial to a lower number. TensiOn de los hilos La tension de los hilos afectara la calidad de las puntadas: puede requerir cierto ajuste cuando cambia de tejido o hilo. NOTA: Le recomendamos hacer una prueba en un pedazo de tela antes de empezar a coser en el tejido de trabajo. Ajustes erroneos posibles y sus resultados El hilo superior es demasiado tirante Aparecen bagas en la superficie del tejido. Disco de control de la tensi0n superior Disminuya la tension al poner el disco en un namero inferior. C) Reverse © Surface •• 0 1 2 C) Reyes C2) Derecho Upper tension is too loose. Locks appear on the reverse side of the fabric. Upper Tension Control Dial Increase the tension by turning the dial to a higher number. La tensi0n del hilo superior es insuficiente Aparecen bagas en el reties del tejido. Disco de control de la tension superior Aumente la tension al poner el disco en un namero superior. C) Reverse C) Surface 1 2 C) Reties © Derecho 24 KN • • - SEWING M ,
-
 1
1 -
2
-
3
-
4
-
5
-
6
-
7
-
8
-
9
-
10
-
 11
11 -
 12
12 -
 13
13 -
 14
14 -
 15
15 -
 16
16 -
 17
17 -
 18
18 -
 19
19 -
 20
20 -
 21
21 -
22
-
23
-
24
-
25
-
26
-
27
-
28
-
29
-
30
-
31
-
32
-
33
-
34
-
35
 |
 |
