Brother International PS-1000 Operation Manual - Page 7
Power, Sewing, Light, Switches, Controller, Interruptor, principal, Pedal, Replacing, Needle,
 |
View all Brother International PS-1000 manuals
Add to My Manuals
Save this manual to your list of manuals |
Page 7 highlights
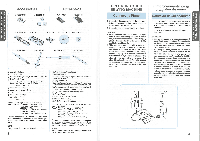
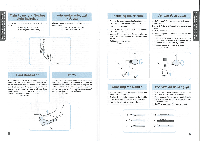
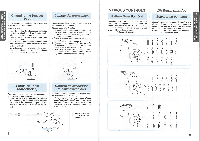
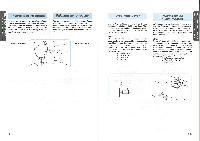
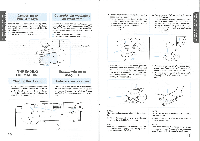
CONOZCA SU MAQUINA DE COSER • • • • - SEWING M i . i • rwnSr r Main Power and Sewing Light Switches This switch turns the main power and sewing light on or off. (7) Turn on (toward the "I" mark) Turn off (toward the "0" mark) Interruptor principal y de luz Este interruptor permite apagar y encender la mequina y la luz. 0 Encender (hacia la marca "I") C) Apagar (hacia la marca "O") Replacing the Needle 1. Remove the power supply plug from the outlet. 2. Raise the needle bar to its highest position: 3. Lower the presser foot. 4. Remove the needle by loosening the needle clamp with a coin. 5. Insert a different needle as far as possible up against the needle stopper with its flat side facing the back. 6. Tighten the needle clamp. CD Coin Cambio de la aguja 1. Retire el enchufe de alimentacion de la toma de corriente. 2. Levante la barra de la aguja a su posicion mas alta. 3. Baje elprensatelas. 4. Retire la aguja, aflojando el tornfflo con una moneda. 5. lntroduzca otra aguja, con la parte redonda cara a usted. Hay que meterla lo Ines adentro posible hasta que toque arriba con el pasador. 6. Vuelva a apretar el tomillo de la aguja. 0 Moneda , KN • .3S•33• Foot Controller When the foot controller is depressed lightly, the machine will run at a low speed. When the pressure on the foot controller is increased, the machine's speed will increase. When pressure on the foot controller is released, the machine will stop. Care should be taken that nothing is placed on the foot controller when the machine is not in use. C) Foot controller Pedal Alpresionarligeramente elpedal, la mequina funcionare a baja velocidad. Al aumentar la presion, se incrementa tambien la velocidad de la mequina. Al soltar el pedal, la mequina se para. Asegurese siempre de no poner ningan objeto sobre el pedal cuando la mequina no este utilizada. (I) Pedal 5 Checking the Needle 1. The sewing needle must always be straight and sharp for smooth sewing. 2. To check if the needle is bent, place the flat side of the needle down as shown in the illustration. 3. Replace the needle if it is bent or dull. Verificacion de la aguja 1. La aguja de costura siempre debe estar bien recta y afilada para una buena costura. 2. Para averiguar sila aguja no esta doblada, coloque la parte plana de la aguja hacia abajo como muestra el dibujo. 3. Cambie la aguja si esta doblada o gastada. O 0 x X 6
-
 1
1 -
 2
2 -
 3
3 -
 4
4 -
 5
5 -
 6
6 -
 7
7 -
 8
8 -
 9
9 -
 10
10 -
 11
11 -
 12
12 -
13
-
14
-
15
-
16
-
17
-
18
-
19
-
20
-
21
-
22
-
23
-
24
-
25
-
26
-
27
-
28
-
29
-
30
-
31
-
32
-
33
-
34
-
35
 |
 |
