Canon CanoScan N670U CanoScan N670U/N676U/N1240U ScanGear CS-U 6.2 for Win/Mac - Page 21
What is on the, Screen?, Zoom Tool Button, Auto Crop Button, Negative/Positive Button, Mirror Button
 |
View all Canon CanoScan N670U manuals
Add to My Manuals
Save this manual to your list of manuals |
Page 21 highlights
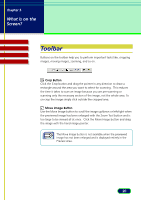
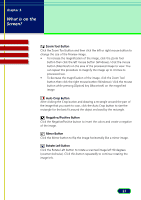
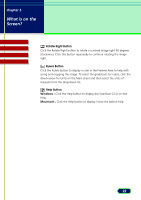
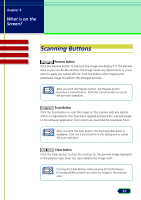
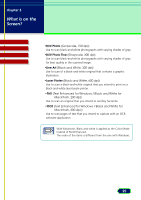
chapter 3 What is on the Screen? Contents Troubleshooting Glossary Index Zoom Tool Button Click the Zoom Tool button and then click the left or right mouse button to change the size of the Preview image. • To increase the magnification of the image, click the Zoom Tool button then click the left mouse button (Windows) / click the mouse button (Macintosh) on the area of the previewed image to view. You can repeat this procedure to magnify the image up to 4 times its previewed size. • To decrease the magnification of the image, click the Zoom Tool button then click the right mouse button (Windows) / click the mouse button while pressing [Option] key (Macintosh) on the magnified image. Auto Crop Button After clicking the Crop button and drawing a rectangle around the part of the image that you want to scan, click the Auto Crop button to size the rectangle for the best fit around the object enclosed by the rectangle. Negative/Positive Button Click the Negative/Positive button to invert the colors and create a negative of the image. Mirror Button Click the Mirror button to flip the image horizontally like a mirror image. Rotate Left Button Click the Rotate Left button to rotate a scanned image left 90 degrees (counterclockwise). Click this button repeatedly to continue rotating the image left. 21
-
 1
1 -
2
-
3
-
4
-
5
-
6
-
7
-
8
-
9
-
10
-
11
-
12
-
13
-
14
-
15
-
 16
16 -
 17
17 -
 18
18 -
 19
19 -
 20
20 -
 21
21 -
 22
22 -
 23
23 -
 24
24 -
 25
25 -
 26
26 -
27
-
28
-
29
-
30
-
31
-
32
-
33
-
34
-
35
-
36
-
37
-
38
-
39
-
40
-
41
-
42
-
43
-
44
-
45
-
46
-
47
-
48
-
49
-
50
-
51
-
52
-
53
-
54
-
55
-
56
-
57
-
58
-
59
-
60
-
61
-
62
-
63
-
64
-
65
-
66
-
67
-
68
-
69
-
70
-
71
-
72
-
73
-
74
-
75
-
76
-
77
-
78
-
79
-
80
-
81
-
82
-
83
-
84
-
85
-
86
-
87
-
88
-
89
-
90
-
91
-
92
-
93
-
94
-
95
-
96
-
97
-
98
-
99
-
100
-
101
-
102
-
103
-
104
-
105
-
106
-
107
-
108
-
109
 |
 |
