Canon CanoScan N670U CanoScan N670U/N676U/N1240U ScanGear CS-U 6.2 for Win/Mac - Page 32
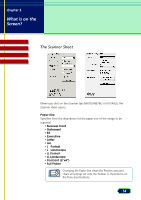
Width and Height, Units, Keep Proportions button, the Preview Area.
 |
View all Canon CanoScan N670U manuals
Add to My Manuals
Save this manual to your list of manuals |
Page 32 highlights
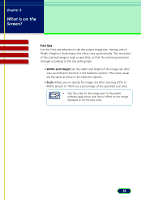
chapter 3 What is on the Screen? Contents Troubleshooting Glossary Index Selection Use the Selection options to set the exact size of the image input. To select the area to scan, use the Crop button or Auto Crop button or enter the desired dimensions in the text Note box. • Width and Height The width and height of the current selection, or if there is no selection, the maximum input size, measured from the upper left corner of the image in the Preview Area and based on the current paper size. To change the Width and Height settings, click the Crop button on the toolbar and select a section of the image in the preview area, or just type the desired dimensions into the Width and Height text boxes. • Units Click the down-arrow and select a unit to measure the scanning area. Changing the Units setting does not affect the image in the Preview Area. Keep Proportions button Click this button to maintain the Width and Height proportions. If you change Width or Height, the other setting will be adjusted automatically to maintain the proportion of the original image. As you enlarge or reduce the selection, note that the Width and Height of the selection remain in correct proportion. 32
-
 1
1 -
2
-
3
-
4
-
5
-
6
-
7
-
8
-
9
-
10
-
11
-
12
-
13
-
14
-
15
-
16
-
17
-
18
-
19
-
20
-
21
-
22
-
23
-
24
-
25
-
26
-
 27
27 -
 28
28 -
 29
29 -
 30
30 -
 31
31 -
 32
32 -
 33
33 -
 34
34 -
 35
35 -
 36
36 -
 37
37 -
38
-
39
-
40
-
41
-
42
-
43
-
44
-
45
-
46
-
47
-
48
-
49
-
50
-
51
-
52
-
53
-
54
-
55
-
56
-
57
-
58
-
59
-
60
-
61
-
62
-
63
-
64
-
65
-
66
-
67
-
68
-
69
-
70
-
71
-
72
-
73
-
74
-
75
-
76
-
77
-
78
-
79
-
80
-
81
-
82
-
83
-
84
-
85
-
86
-
87
-
88
-
89
-
90
-
91
-
92
-
93
-
94
-
95
-
96
-
97
-
98
-
99
-
100
-
101
-
102
-
103
-
104
-
105
-
106
-
107
-
108
-
109
 |
 |
