Canon PIXMA iP6310D Direct Printing Guide - Page 38
Printing the Nozzle Check Pattern, Examining the Nozzle Check Pattern - ink cartridge
 |
View all Canon PIXMA iP6310D manuals
Add to My Manuals
Save this manual to your list of manuals |
Page 38 highlights
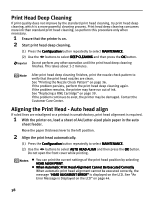
Printing the Nozzle Check Pattern Print the nozzle check pattern to determine whether the ink ejects properly from the print head nozzles. Use this function when printed results are blurred or the colors are incorrect. 1 With the printer on, load a sheet of A4/Letter-sized plain paper in the auto sheet feeder. Move the paper thickness lever to the left position. 2 Print the nozzle check pattern. (1) Press the Configuration button repeatedly to select MAINTENANCE. (2) Use the buttons to select NOZZLE CHECK and then press the OK button. Do not open the front cover while printing. (3) Examine the nozzle check pattern. See below. Examining the Nozzle Check Pattern The nozzle check pattern should appear as follows when ink is discharged properly. Examine the nozzle check pattern output by the printer. If the ink level is low, the nozzle check pattern is not printed properly. Stop printing the nozzle check pattern, and replace the FINE Cartridge. See "Replacing a FINE Cartridge" on page 39. 1 Confirm the printed nozzle check pattern. White stripes in this pattern indicate that the FINE Cartridges require cleaning. When white stripes appear See "Print Head Cleaning" on page 37. 36
-
 1
1 -
2
-
3
-
4
-
5
-
6
-
7
-
8
-
9
-
10
-
11
-
12
-
13
-
14
-
15
-
16
-
17
-
18
-
19
-
20
-
21
-
22
-
23
-
24
-
25
-
26
-
27
-
28
-
29
-
30
-
31
-
32
-
 33
33 -
 34
34 -
 35
35 -
 36
36 -
 37
37 -
 38
38 -
 39
39 -
 40
40 -
 41
41 -
 42
42 -
 43
43 -
44
-
45
-
46
-
47
-
48
-
49
-
50
-
51
-
52
-
53
-
54
-
55
-
56
-
57
 |
 |