Canon PIXMA iP6310D Direct Printing Guide - Page 46
Adjusting the Print Head Manually
 |
View all Canon PIXMA iP6310D manuals
Add to My Manuals
Save this manual to your list of manuals |
Page 46 highlights
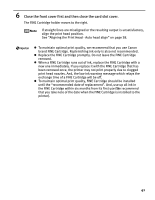
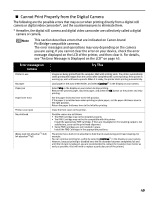
Message INCOMPATIBLE CAMERA HEAD ALIGNMENT ERROR CHECK INK U140 CHECK INK U162 CHECK PRINTER Try This Disconnect the camera cable and reconnect it. Depending on the model or brand of your PictBridge compliant device, you may have to select a print mode before connecting the device. You may also have to turn on the device or select Play mode manually after connecting the device to the printer. Perform necessary operations according to the instruction manual supplied with your device. If the error is still unresolved, there is a possibility that you are using a digital camera or digital video camcorder that is not supported by this printer. PictBridge-compatible digital camera or digital video camcorder can be connected to your printer for Direct Printing. Possible causes are as follows: • Other than A4/Letter-sized plain paper is loaded. Press the OK button to clear the error, and then load A4/Letter-sized plain paper in the auto sheet feeder. • Print head nozzles are clogged. Press the OK button to clear the error, and then print the nozzle check pattern to examine the print head condition. For information on how to print a nozzle check pattern, See "Printing the Nozzle Check Pattern" on page 36. • The paper output slot has been exposed to a strong light source preventing current print head alignment. Press the OK button to clear the error and move the printer to a darker location. After carrying out the above measures, if the problem continues after aligning the print head again, press the OK button to clear the error, and then perform manual print head alignment. For details on manual print head alignment, see "Adjusting the Print Head Manually" on page 44. The FINE Cartridge may not be the compatible with this printer. Install the appropriate FINE Cartridge. If lines are misaligned or the resulting output is not satisfactory, carry out the Print Head Alignment. Possible causes are as follows: • This FINE Cartridge has previously been used. • Ink may have run out. The function for detecting the remaining ink level will be disabled since the remaining ink level cannot be correctly detected. If you want to continue printing without this function, press the OK button. Canon recommends to use new genuine Canon cartridges in order to obtain optimum qualities. An error that requires contacting the Customer Care Center may have occurred. (POWER lamp and Alarm lamp alternately.) Disconnect the printer cable from the printer, and then turn the printer off and unplug the printer from the power supply. Plug the printer back in and turn the printer back on after leaving it for a while. If the problem remains, contact the Customer Care Center. Adjusting the Print Head Manually If the automatic print head adjustment does not work or if you wish to adjust the print heads manually, follow the procedure below. 1. With the printer on, load a sheet of A4/Letter-sized plain paper in the auto sheet feeder. 2. Press the Configuration button repeatedly to select MAINTENANCE. 3. Use the buttons to select ALIGN PRINT HEAD and then press the OK button. SET VALUE A 0 4. Examine the printed pattern and enter the number of column "A" with fewest white stripes using the buttons. 5. Press the OK button. 6. Repeat Steps (4) through (5) and enter the pattern numbers up to column "N". 44
-
 1
1 -
2
-
3
-
4
-
5
-
6
-
7
-
8
-
9
-
10
-
11
-
12
-
13
-
14
-
15
-
16
-
17
-
18
-
19
-
20
-
21
-
22
-
23
-
24
-
25
-
26
-
27
-
28
-
29
-
30
-
31
-
32
-
33
-
34
-
35
-
36
-
37
-
38
-
39
-
40
-
 41
41 -
 42
42 -
 43
43 -
 44
44 -
 45
45 -
 46
46 -
 47
47 -
 48
48 -
 49
49 -
 50
50 -
 51
51 -
52
-
53
-
54
-
55
-
56
-
57
 |
 |