Canon PIXMA iP6310D Direct Printing Guide - Page 40
Print Head Deep Cleaning, Aligning the Print Head - Auto head align - ink cartridges
 |
View all Canon PIXMA iP6310D manuals
Add to My Manuals
Save this manual to your list of manuals |
Page 40 highlights
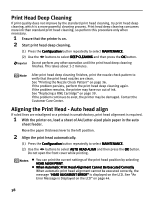
Print Head Deep Cleaning If print quality does not improve by the standard print head cleaning, try print head deep cleaning, which is a more powerful cleaning process. Print head deep cleaning consumes more ink than standard print head cleaning, so perform this procedure only when necessary. 1 Ensure that the printer is on. 2 Start print head deep cleaning. (1) Press the Configuration button repeatedly to select MAINTENANCE. (2) Use the buttons to select DEEP CLEANING and then press the OK button. Do not perform any other operation until the print head deep cleaning finishes. This takes about 1-2 minutes. After print head deep cleaning finishes, print the nozzle check pattern to verify that the print head nozzles are clean. See "Printing the Nozzle Check Pattern" on page 36. If the problem persists, perform the print head deep cleaning again. If the problem remains, the printer may have run out of ink. See "Replacing a FINE Cartridge" on page 39. If the problem continues to exist, the printer may be damaged. Contact the Customer Care Center. Aligning the Print Head - Auto head align If ruled lines are misaligned or a printout is unsatisfactory, print head alignment is required. 1 With the printer on, load a sheet of A4/Letter-sized plain paper in the auto sheet feeder. Move the paper thickness lever to the left position. 2 Align the print head automatically. (1) Press the Configuration button repeatedly to select MAINTENANCE. (2) Use the buttons to select AUTO HEAD ALIGN and then press the OK button. Do not open the front cover while printing. You can print the current settings of the print head position by selecting HEAD ALIGN PRINT. When Automatic Print Head Alignment Cannot Be Executed Correctly When automatic print head alignment cannot be executed correctly, the message "HEAD ALIGNMENT ERROR" is displayed on the LCD. See "An Error Message is Displayed on the LCD" on page 44. 38
-
 1
1 -
2
-
3
-
4
-
5
-
6
-
7
-
8
-
9
-
10
-
11
-
12
-
13
-
14
-
15
-
16
-
17
-
18
-
19
-
20
-
21
-
22
-
23
-
24
-
25
-
26
-
27
-
28
-
29
-
30
-
31
-
32
-
33
-
34
-
 35
35 -
 36
36 -
 37
37 -
 38
38 -
 39
39 -
 40
40 -
 41
41 -
 42
42 -
 43
43 -
 44
44 -
 45
45 -
46
-
47
-
48
-
49
-
50
-
51
-
52
-
53
-
54
-
55
-
56
-
57
 |
 |