Canon REALiS WUX6000 D Pro AV User Manual - Page 194
Cleaning the Projector and the Air Filter, Cleaning the Air Filter
 |
View all Canon REALiS WUX6000 D Pro AV manuals
Add to My Manuals
Save this manual to your list of manuals |
Page 194 highlights
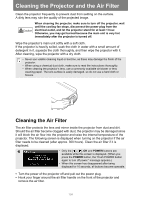
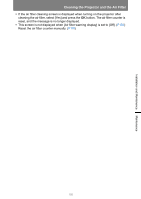
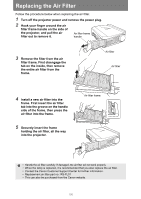
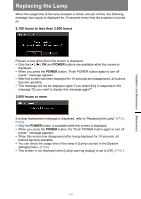
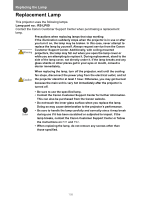
Cleaning the Projector and the Air Filter Clean the projector frequently to prevent dust from settling on the surface. A dirty lens may ruin the quality of the projected image. When cleaning the projector, make sure to turn off the projector, wait until the cooling fan stops, disconnect the power plug from the electrical outlet, and let the projector stand for at least 1 hour. Otherwise, you may get burned because the main unit is very hot immediately after the projector is turned off. Wipe the projector's main unit softly with a soft cloth. If the projector is heavily soiled, soak the cloth in water with a small amount of detergent in it, squeeze the cloth thoroughly, and then wipe the projector with it. After cleaning, wipe the projector with a dry cloth. • Never use volatile cleaning liquid or benzine, as these may damage the finish of the projector. • When using a chemical dust cloth, make sure to read the instructions thoroughly. • When cleaning the projector's lens, use a commonly available air blower or lens cleaning paper. The lens surface is easily damaged, so do not use a hard cloth or tissues. Cleaning the Air Filter The air filter protects the lens and mirror inside the projector from dust and dirt. Should the air filter become clogged with dust, the projector may be damaged since it will block the air flow into the projector and raise the internal temperature of the projector. The following screen is displayed when turning on the projector if the air filter needs to be cleaned (after approx. 300 hours). Clean the air filter if it is displayed. • Only the [ ], [ ], OK and POWER buttons are available while this screen is displayed. (When you press the POWER button, the "Push POWER button again to turn off power." message appears.) • When this screen has disappeared after being displayed for 10 seconds, all buttons become operable. • Turn the power of the projector off and pull out the power plug. • Hook your finger around the air filter handle on the front of the projector and remove the air filter. 194
-
 1
1 -
2
-
3
-
4
-
5
-
6
-
7
-
8
-
9
-
10
-
11
-
12
-
13
-
14
-
15
-
16
-
17
-
18
-
19
-
20
-
21
-
22
-
23
-
24
-
25
-
26
-
27
-
28
-
29
-
30
-
31
-
32
-
33
-
34
-
35
-
36
-
37
-
38
-
39
-
40
-
41
-
42
-
43
-
44
-
45
-
46
-
47
-
48
-
49
-
50
-
51
-
52
-
53
-
54
-
55
-
56
-
57
-
58
-
59
-
60
-
61
-
62
-
63
-
64
-
65
-
66
-
67
-
68
-
69
-
70
-
71
-
72
-
73
-
74
-
75
-
76
-
77
-
78
-
79
-
80
-
81
-
82
-
83
-
84
-
85
-
86
-
87
-
88
-
89
-
90
-
91
-
92
-
93
-
94
-
95
-
96
-
97
-
98
-
99
-
100
-
101
-
102
-
103
-
104
-
105
-
106
-
107
-
108
-
109
-
110
-
111
-
112
-
113
-
114
-
115
-
116
-
117
-
118
-
119
-
120
-
121
-
122
-
123
-
124
-
125
-
126
-
127
-
128
-
129
-
130
-
131
-
132
-
133
-
134
-
135
-
136
-
137
-
138
-
139
-
140
-
141
-
142
-
143
-
144
-
145
-
146
-
147
-
148
-
149
-
150
-
151
-
152
-
153
-
154
-
155
-
156
-
157
-
158
-
159
-
160
-
161
-
162
-
163
-
164
-
165
-
166
-
167
-
168
-
169
-
170
-
171
-
172
-
173
-
174
-
175
-
176
-
177
-
178
-
179
-
180
-
181
-
182
-
183
-
184
-
185
-
186
-
187
-
188
-
 189
189 -
 190
190 -
 191
191 -
 192
192 -
 193
193 -
 194
194 -
 195
195 -
 196
196 -
 197
197 -
 198
198 -
 199
199 -
200
-
201
-
202
-
203
-
204
-
205
-
206
-
207
-
208
-
209
-
210
-
211
-
212
-
213
-
214
-
215
-
216
-
217
-
218
-
219
-
220
-
221
-
222
-
223
-
224
-
225
-
226
-
227
-
228
-
229
-
230
-
231
-
232
-
233
-
234
-
235
-
236
 |
 |
