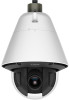
Canon VB-R12VE Camera Management Tool User Manual - Page 25
Setting Notes or a Group, Removing a Camera from the Camera List
 |
View all Canon VB-R12VE manuals
Add to My Manuals
Save this manual to your list of manuals |
Page 25 highlights
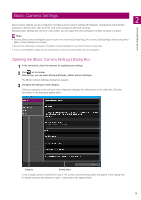
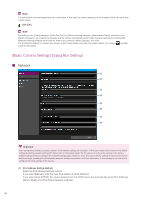
Setting Notes or a Group You can assign any group name or enter a note as a remark for a camera displayed in the camera list. When the number of cameras has increased, use [Notes] or [Group Name] to sort cameras and make cameras 2 easier to identify. Click the [Notes] or [Group Name] display item for selected cameras to display an input field. Enter the information and then press the Enter key. Detecting/Setting Cameras Note • You can enter up to 259 characters in each of the [Notes] or [Group Name] input fields. • [Group Name] is not displayed by default. To set the group name, select [Group Name] to display in the list in [Display Items Settings] (P. 24). • Even if the [Notes] or [Group Name] fields are entered, in the following cases, the entered details will not appear in the camera list when launched the next time. - If the camera specification file has not been saved after the [Notes] or [Group Name] fields are entered (P. 42). - When the saved camera specification file has not been loaded when launched, after the [Notes] or [Group Name] fields have been entered (P. 47). Removing a Camera from the Camera List If there is a camera you wish to remove from the list, remove it as described below. 1 Select the camera you wish to remove from the list. 2 Select [Camera List] > [Remove Camera]. Alternatively, you can press the Delete key. A message appears for confirming whether or not to remove the camera. 3 Click [Yes]. The camera is removed from the camera list. Right-Click Operations for the Camera List Right-click the camera list to carry out the following operations in the menu. Note Grayed out items cannot be operated due to the [Connection Status] of the camera or camera model. Menu name Update Camera Information Camera Authentication Remove Camera Open Camera Error Information Camera Settings Tools Description Reacquire the settings of the selected camera, and update them. Changes the authentication information of the camera used with this tool (P. 28). The selected camera will be removed from the camera list (P. 25). Displays the error information of selected cameras (P. 21). • Displaying the Settings Page (P. 36) • Basic camera settings (P. 29) • Advanced camera settings (P. 54) • Registering the Administrator Account (P. 20) Activate the selected tool (P. 38) 25
-
 1
1 -
2
-
3
-
4
-
5
-
6
-
7
-
8
-
9
-
10
-
11
-
12
-
13
-
14
-
15
-
16
-
17
-
18
-
19
-
 20
20 -
 21
21 -
 22
22 -
 23
23 -
 24
24 -
 25
25 -
 26
26 -
 27
27 -
 28
28 -
 29
29 -
 30
30 -
31
-
32
-
33
-
34
-
35
-
36
-
37
-
38
-
39
-
40
-
41
-
42
-
43
-
44
-
45
-
46
-
47
-
48
-
49
-
50
-
51
-
52
-
53
-
54
-
55
-
56
-
57
-
58
-
59
-
60
-
61
-
62
-
63
-
64
-
65
-
66
-
67
-
68
-
69
-
70
-
71
-
72
-
73
-
74
-
75
-
76
-
77
-
78
-
79
-
80
 |
 |
