Canon VB-R12VE Camera Management Tool User Manual - Page 33
Date and Time, Select the Settings method in [Set NTP Server Settings Automatically].
 |
View all Canon VB-R12VE manuals
Add to My Manuals
Save this manual to your list of manuals |
Page 33 highlights
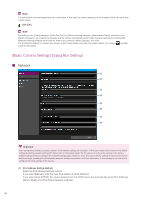
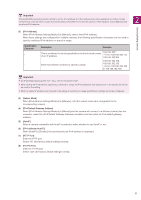
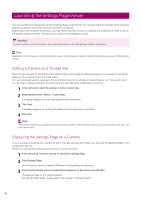
Date and Time (1) 2 Detecting/Setting Cameras (2) (3) (4) (5) (6) (1) [Settings Method] Select the Settings method for the date and time. (2) [Date], [Time] Configure the settings as follows in accordance with the [Settings Method] setting. When [Set manually] is selected Set the desired date and time. Set the time in 24-hour format in order. When [Set manually] is selected and [Synchronize with computer time] is selected Synchronizes the date and time with the computer that is currently accessing the camera. [Time Zone] is not selected automatically so set it separately if necessary. When [Synchronize with NTP server] is selected Select the Settings method in [Set NTP Server Settings Automatically]. When [Synchronize with NTP broadcast] is selected Receives NTP broadcasts sent from the NTP server and synchronizes the time with them. The camera's NTP broadcast mode does not support IPv6. (3) [Set NTP Server Settings Automatically] [Disable] Enter the IP address or host name of the NTP server in [NTP Server]. [Use DHCP] The address of NTP server is automatically acquired from the DHCP server (IPv4). To configure the settings, you need to set [Network] > [IPv4 Address Settings Method] to [Auto (DHCP)] (P. 30). [Use DHCPv6] The address of NTP server is automatically acquired from the DHCPv6 server. To enable this setting, settings for [IPv6] need to be configured on the camera Settings page. For details about the Settings page, refer to the camera's "Operation Guide". [Use DHCP/DHCPv6] The address of DHCP server (IPv4) or DHCPv6 server is automatically acquired. 33
-
 1
1 -
2
-
3
-
4
-
5
-
6
-
7
-
8
-
9
-
10
-
11
-
12
-
13
-
14
-
15
-
16
-
17
-
18
-
19
-
20
-
21
-
22
-
23
-
24
-
25
-
26
-
27
-
 28
28 -
 29
29 -
 30
30 -
 31
31 -
 32
32 -
 33
33 -
 34
34 -
 35
35 -
 36
36 -
 37
37 -
 38
38 -
39
-
40
-
41
-
42
-
43
-
44
-
45
-
46
-
47
-
48
-
49
-
50
-
51
-
52
-
53
-
54
-
55
-
56
-
57
-
58
-
59
-
60
-
61
-
62
-
63
-
64
-
65
-
66
-
67
-
68
-
69
-
70
-
71
-
72
-
73
-
74
-
75
-
76
-
77
-
78
-
79
-
80
 |
 |
