Canon VB-R12VE Camera Management Tool User Manual - Page 61
Click [Run].
 |
View all Canon VB-R12VE manuals
Add to My Manuals
Save this manual to your list of manuals |
Page 61 highlights
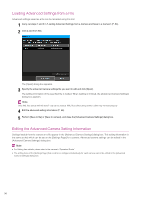
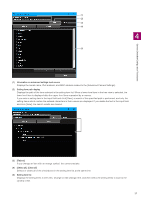
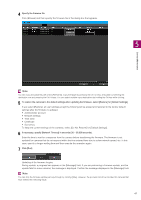
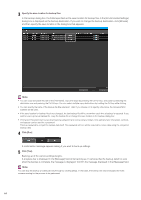
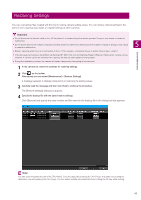
Camera Maintenance 4 Specify the firmware file. Click [Browse] and then specify the firmware file in the dialog box that appears. 5 Note You can copy and paste the path of the [File Name]. Copy the target by pressing the Ctrl+C keys, and paste by selecting the destination row and pressing the Ctrl+V keys. You can select multiple copy destinations by holding the Ctrl key while clicking. 5 To restore the cameras to the default settings when updating the firmware, select [Restore] for [Default Settings]. If you select [Restore], all user settings except the following will be erased and restored to the factory default settings after the firmware is updated. • Administrator account • Network settings • Time zone • Certificate • Secret key To keep the current settings of the cameras, select [Do Not Restore] for [Default Settings]. 6 If necessary, specify [Network Timeout] in seconds (30 - 36,000 seconds). Enter the time to wait for a response from the camera before transferring the firmware. The firmware is not updated for cameras that do not respond within the time entered here due to a slow network speed, etc. In this case, specify a longer waiting time and then execute the operation again. 7 Click [Run]. Updating of the firmware begins. During update, a progress bar appears in the [Message] field. If you are performing a firmware update, and the update fails for some cameras, the message is displayed. Confirm the message displayed in the [Message] field. Note You can stop the firmware update part way through by clicking [Stop]. However, the process cannot be canceled for cameras that have entered the restarting stage. 61
-
 1
1 -
2
-
3
-
4
-
5
-
6
-
7
-
8
-
9
-
10
-
11
-
12
-
13
-
14
-
15
-
16
-
17
-
18
-
19
-
20
-
21
-
22
-
23
-
24
-
25
-
26
-
27
-
28
-
29
-
30
-
31
-
32
-
33
-
34
-
35
-
36
-
37
-
38
-
39
-
40
-
41
-
42
-
43
-
44
-
45
-
46
-
47
-
48
-
49
-
50
-
51
-
52
-
53
-
54
-
55
-
 56
56 -
 57
57 -
 58
58 -
 59
59 -
 60
60 -
 61
61 -
 62
62 -
 63
63 -
 64
64 -
 65
65 -
 66
66 -
67
-
68
-
69
-
70
-
71
-
72
-
73
-
74
-
75
-
76
-
77
-
78
-
79
-
80
 |
 |
