Canon XA50 XA50 XA55 Instruction Manual - Page 20
Preparing the Camcorder, Attaching the Handle Unit
 |
View all Canon XA50 manuals
Add to My Manuals
Save this manual to your list of manuals |
Page 20 highlights
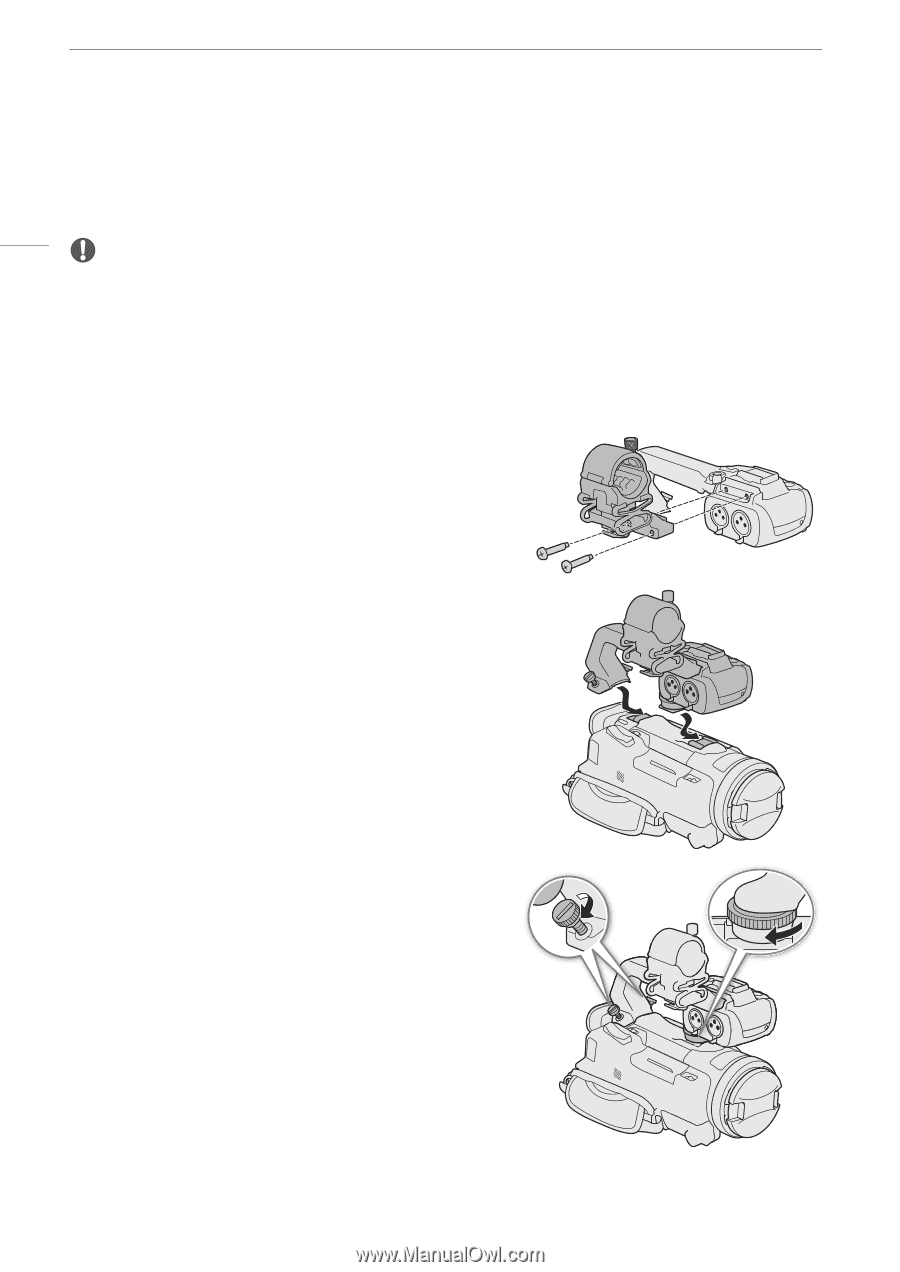
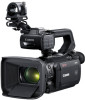
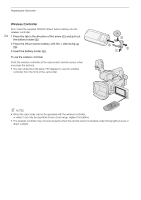
Preparing the Camcorder Preparing the Camcorder This section covers basic preparations for the camcorder such as attaching the handle unit and lens hood, and adjusting the viewfinder and LCD screen. 20 IMPORTANT • Be careful not to drop the camcorder when attaching, removing or adjusting the various accessories. Using a table or other stable surface is recommended. Attaching the Handle Unit The camcorder is functional even if you remove the handle unit. However, to use the INPUT terminals (A 79), infrared light (A 88) and tally lamp (A 37), the handle unit must be correctly attached to the camcorder. 1 Attach the microphone holder unit to the handle unit. • Use a commercially available Phillips head ("crosshead") screwdriver and the two supplied screws. 2 Align the handle unit with the handle attachment unit and then slide the handle unit forward all the way. 3 Firmly tighten the front and rear screws. • To tighten the rear screws you can use a coin or similar object.
-
 1
1 -
2
-
3
-
4
-
5
-
6
-
7
-
8
-
9
-
10
-
11
-
12
-
13
-
14
-
 15
15 -
 16
16 -
 17
17 -
 18
18 -
 19
19 -
 20
20 -
 21
21 -
 22
22 -
 23
23 -
 24
24 -
 25
25 -
26
-
27
-
28
-
29
-
30
-
31
-
32
-
33
-
34
-
35
-
36
-
37
-
38
-
39
-
40
-
41
-
42
-
43
-
44
-
45
-
46
-
47
-
48
-
49
-
50
-
51
-
52
-
53
-
54
-
55
-
56
-
57
-
58
-
59
-
60
-
61
-
62
-
63
-
64
-
65
-
66
-
67
-
68
-
69
-
70
-
71
-
72
-
73
-
74
-
75
-
76
-
77
-
78
-
79
-
80
-
81
-
82
-
83
-
84
-
85
-
86
-
87
-
88
-
89
-
90
-
91
-
92
-
93
-
94
-
95
-
96
-
97
-
98
-
99
-
100
-
101
-
102
-
103
-
104
-
105
-
106
-
107
-
108
-
109
-
110
-
111
-
112
-
113
-
114
-
115
-
116
-
117
-
118
-
119
-
120
-
121
-
122
-
123
-
124
-
125
-
126
-
127
-
128
-
129
-
130
-
131
-
132
-
133
-
134
-
135
-
136
-
137
-
138
-
139
-
140
-
141
-
142
-
143
-
144
-
145
-
146
-
147
 |
 |