Canon iP100 Quick Start Guide - Page 38
Canon IJ Printer Utility, Important
 |
UPC - 013803067316
View all Canon iP100 manuals
Add to My Manuals
Save this manual to your list of manuals |
Page 38 highlights
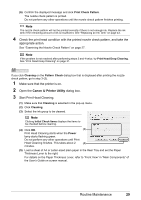
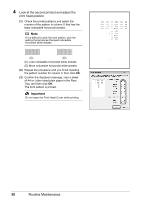
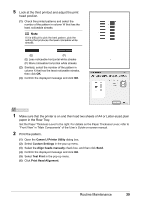
(3) Confirm the displayed message and click Align Print Head. The print head alignment pattern is printed. Printing takes about 4 minutes to complete. Important Do not open the Print Head Cover while printing. Note Clicking Print Alignment Value prints the current settings and finishes Print Head Alignment. If the pattern is printed as shown right, the Print Head is aligned automatically. Note z If the pattern is not printed successfully, see "Alarm Lamp Flashes Orange" on page 67. z If results of Automatic Print Head Alignment are not satisfactory, see "Manual Print Head Alignment" on page 36 and align the Print Head manually. 1 Make sure that the printer is turned on, and then load a sheet of the supplied paper (Paper For Print Head Alignment) or A4/Letter-sized Canon Matte Photo Paper MP-101 with the printing side (whiter side) facing up in the Rear Tray. Set the Paper Thickness Lever to the right. For details on the Paper Thickness Lever, refer to "Front View" in "Main Components" of the User's Guide on-screen manual. 2 Open the Canon IJ Printer Utility dialog box. 3 Adjust the print head pattern. 34 Routine Maintenance
-
 1
1 -
2
-
3
-
4
-
5
-
6
-
7
-
8
-
9
-
10
-
11
-
12
-
13
-
14
-
15
-
16
-
17
-
18
-
19
-
20
-
21
-
22
-
23
-
24
-
25
-
26
-
27
-
28
-
29
-
30
-
31
-
32
-
 33
33 -
 34
34 -
 35
35 -
 36
36 -
 37
37 -
 38
38 -
 39
39 -
 40
40 -
 41
41 -
 42
42 -
 43
43 -
44
-
45
-
46
-
47
-
48
-
49
-
50
-
51
-
52
-
53
-
54
-
55
-
56
-
57
-
58
-
59
-
60
-
61
-
62
-
63
-
64
-
65
-
66
-
67
-
68
-
69
-
70
-
71
-
72
-
73
-
74
-
75
-
76
-
77
-
78
-
79
-
80
-
81
-
82
-
83
-
84
-
85
-
86
-
87
-
88
-
89
-
90
-
91
-
92
 |
 |
