Canon iP100 Quick Start Guide - Page 78
Error Message Appears on a PictBridge Compliant Device, Error Message On, PictBridge Compliant, Device - ink absorber reset
 |
UPC - 013803067316
View all Canon iP100 manuals
Add to My Manuals
Save this manual to your list of manuals |
Page 78 highlights
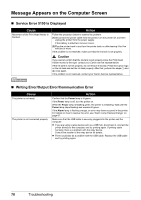
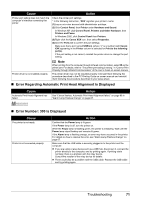
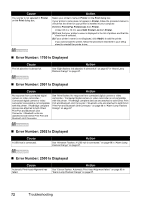
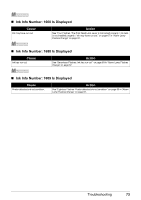
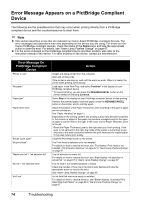
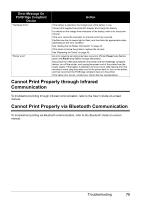
Error Message Appears on a PictBridge Compliant Device The following are the possible errors that may occur when printing directly from a PictBridge compliant device and the countermeasures to clear them. Note z This section describes errors that are indicated on Canon-brand PictBridge compliant devices. The error messages and operations may vary depending on the device you are using. For errors on nonCanon PictBridge compliant devices, check the status of the Alarm lamp and take the appropriate action to clear the error. For details, see "Alarm Lamp Flashes Orange" on page 67. z For the errors indicated on the PictBridge compliant device and their solution, also refer to the instruction manual of the device. For other troubles on the device, contact the manufacturer. Error Message On PictBridge Compliant Device "Printer in use" "No paper" "Paper jam" "Paper lever error" "Printer cover open" "No print head" "Waste tank full" / "ink absorber full" "No ink" / "Ink cassette error" "Ink Error" Action Images are being printed from the computer. Wait until printing ends. If the printer is warming up, wait until the warm-up ends. When it is ready, the printer starts printing automatically. Load paper in the Rear Tray, and select Continue* in the display on your PictBridge compliant device. * To resume printing, you can press the RESUME/CANCEL button on the printer instead of selecting Continue. Select Stop in the display on your PictBridge compliant device to stop printing. Remove the jammed paper, load new paper, press the RESUME/CANCEL button on the printer, and try printing again. Adjust the position of the Paper Thickness Lever according to the type of paper you are printing on. See "Paper Handling" on page 11. Depending on the printing content, the printing surface may become scratched or the corners or edges of the paper may become smudged even for the types of paper to set the lever to the right. In this case, set the Paper Thickness Lever to the left. * Reset the Paper Thickness Lever to the right when you finish printing. If the lever is not set back to the right, the inside of the printer is more likely to get dirty due to the wider clearance between the print head and the loaded paper. It may also reduce print quality. Close the Print Head Cover on the printer. The Print Head is defective or is not installed. For details on how to resolve the error, see "Five flashes: Print Head is not installed. / Print Head is defective." on page 67 in "Alarm Lamp Flashes Orange" on page 67. The ink absorber is nearly full. For details on how to resolve the error, see "Eight flashes: Ink absorber is almost full." on page 67 in "Alarm Lamp Flashes Orange" on page 67. The ink tank is not installed properly or empty. Check the number of how many the Alarm lamp flashes and take the appropriate action to resolve the error. See "Alarm Lamp Flashes Orange" on page 67. An ink tank that was once empty is installed. For details on how to resolve the error, see "Eleven flashes: Automatic Print Head Alignment failed." on page 68 in "Alarm Lamp Flashes Orange" on page 67. 74 Troubleshooting
-
 1
1 -
2
-
3
-
4
-
5
-
6
-
7
-
8
-
9
-
10
-
11
-
12
-
13
-
14
-
15
-
16
-
17
-
18
-
19
-
20
-
21
-
22
-
23
-
24
-
25
-
26
-
27
-
28
-
29
-
30
-
31
-
32
-
33
-
34
-
35
-
36
-
37
-
38
-
39
-
40
-
41
-
42
-
43
-
44
-
45
-
46
-
47
-
48
-
49
-
50
-
51
-
52
-
53
-
54
-
55
-
56
-
57
-
58
-
59
-
60
-
61
-
62
-
63
-
64
-
65
-
66
-
67
-
68
-
69
-
70
-
71
-
72
-
 73
73 -
 74
74 -
 75
75 -
 76
76 -
 77
77 -
 78
78 -
 79
79 -
 80
80 -
 81
81 -
 82
82 -
 83
83 -
84
-
85
-
86
-
87
-
88
-
89
-
90
-
91
-
92
 |
 |
