Canon iP100 Quick Start Guide - Page 72
RESUME/CANCEL, and then perform Manual Print Head Alignment. For details on Manual Print - bluetooth
 |
UPC - 013803067316
View all Canon iP100 manuals
Add to My Manuals
Save this manual to your list of manuals |
Page 72 highlights
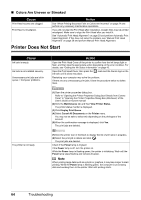
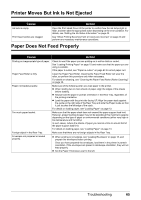
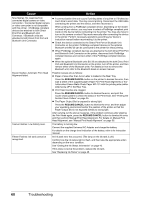
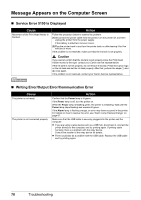
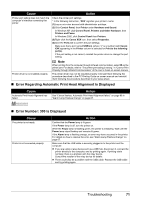
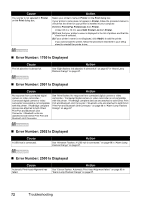
Cause Action Nine flashes: No response from connected digital camera or video camcorder. / Connected digital camera or video camcorder is not compatible with this printer. / PictBridge compliant devices are attached to both Direct Print Port and Bluetooth Unit Connector. / Bluetooth units are attached to both Direct Print Port and Bluetooth Unit Connector. z A communication time out occurs if printing takes a long time or if it takes too much time to send data. This may cancel printing. Disconnect the USB cable connecting the printer and the device, and then reconnect it. When printing from a PictBridge compliant device, depending on the model or brand of your device, you may have to select a PictBridge compliant print mode on the device before connecting it to the printer. You may also have to turn on the camera or select Play mode manually after connecting the device to the printer. Perform necessary operations according your device's instruction manual before reconnecting it to the printer. z Check the device connected to the Direct Print Port or Bluetooth Unit Connector on the printer. PictBridge compliant devices or the optional Bluetooth unit BU-30 can be connected to the printer for direct printing. z When PictBridge compliant devices are attached to the both Direct Print Port and Bluetooth Unit Connector on the printer, disconnect both PictBridge compliant devices and connect either of the PictBridge compliant devices again. z When the optional Bluetooth units BU-30 are attached to the both Direct Print Port and Bluetooth Unit Connector on the printer, turn off the printer, and then remove either of the Bluetooth units. For details on how to remove the Bluetooth unit, refer to the Bluetooth Guide on screen manual. Eleven flashes: Automatic Print Head Alignment failed. Possible causes are as follows: z Paper of size other than A4 or Letter is loaded in the Rear Tray. Press the RESUME/CANCEL button on the printer to dismiss the error, then load a sheet of the supplied paper (Paper For Print Head Alignment) or A4/ Letter-sized Canon Matte Photo Paper MP-101 with the printing side (whiter side) facing UP in the Rear Tray. z Print Head nozzles are clogged. Press the RESUME/CANCEL button to dismiss the error, and print the nozzle check pattern to check the status of the Print Head. See "Printing the Nozzle Check Pattern" on page 25. z The Paper Output Slot is exposed to strong light. Press the RESUME/CANCEL button to dismiss the error, and then adjust your operating environment and/or the position of the printer so that the Paper Output Slot is not exposed directly to strong light. After carrying out the above measures, if the problem continues after aligning the Print Head again, press the RESUME/CANCEL button to dismiss the error, and then perform Manual Print Head Alignment. For details on Manual Print Head Alignment, see "Manual Print Head Alignment" on page 36. Twelve Flashes: Low battery level. The battery is running low. Connect the supplied Universal AC Adapter and charge the battery. For details on the charge level indication of the battery, refer to its instruction manual. Fifteen Flashes: Ink tank cannot be recognized. An Ink tank error has occurred. (The lamp on the ink tank is off.) Confirm how the ink lamps light or flash, and then take the appropriate action depending on the error condition. See "Getting the Ink Status Information" on page 43. If this does not solve the problem, replace the ink tank. See "Replacing Ink Tanks" on page 45. 68 Troubleshooting
-
 1
1 -
2
-
3
-
4
-
5
-
6
-
7
-
8
-
9
-
10
-
11
-
12
-
13
-
14
-
15
-
16
-
17
-
18
-
19
-
20
-
21
-
22
-
23
-
24
-
25
-
26
-
27
-
28
-
29
-
30
-
31
-
32
-
33
-
34
-
35
-
36
-
37
-
38
-
39
-
40
-
41
-
42
-
43
-
44
-
45
-
46
-
47
-
48
-
49
-
50
-
51
-
52
-
53
-
54
-
55
-
56
-
57
-
58
-
59
-
60
-
61
-
62
-
63
-
64
-
65
-
66
-
 67
67 -
 68
68 -
 69
69 -
 70
70 -
 71
71 -
 72
72 -
 73
73 -
 74
74 -
 75
75 -
 76
76 -
 77
77 -
78
-
79
-
80
-
81
-
82
-
83
-
84
-
85
-
86
-
87
-
88
-
89
-
90
-
91
-
92
 |
 |
