Canon imageFORMULA DR-C125 Document Scanner Operating Guide - Page 15
Scanner Selection and Settings, Scanner Selection, Scanner Settings
 |
View all Canon imageFORMULA DR-C125 Document Scanner manuals
Add to My Manuals
Save this manual to your list of manuals |
Page 15 highlights
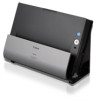
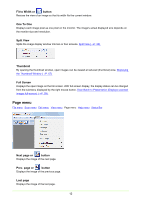
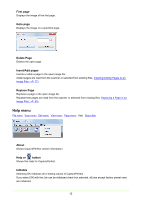
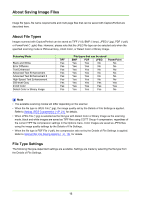
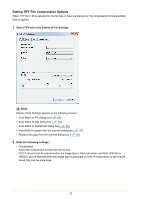
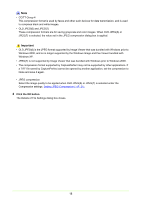
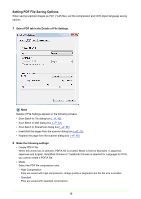
Scanner Selection and Settings Scanner Selection Before using CapturePerfect, follow the procedure below to select a scanner to use with it. The selected scanner setting is retained until another scanner is selected. Important Verify that your scanner is properly connected to the computer, and that the scanner and computer are both turned on. Refer to your scanner's operating manual for details. 1 Click Select Scanner in the Scan menu. The Select Scanner dialog box appears. Note If the name of the scanner does not appear in the dialog box, install the ISIS/TWAIN driver for the scanner. 2 Select the scanner to be used, and click the OK button. The Select Scanner dialog box closes and scanner selection is complete. Scanner Settings Before scanning a document, set up the scan settings. Settings remain in effect until changed. 1 Click Scanner Setting in the Scan menu, or click the The scanner setting dialog box appears. button. Note • The settings dialog box displayed depends on your scanner model. • Scanner settings can be made in the settings dialog box while scanning. Scanning Methods (→P. 46) • In case of using the Long Document mode, some functions may be restricted. 2 Make the appropriate settings for your scanning conditions. For help related to these settings, click the Help button in the dialog box to refer to the driver help. 3 Click the OK button to exit the settings dialog. 15
-
 1
1 -
2
-
3
-
4
-
5
-
6
-
7
-
8
-
9
-
 10
10 -
 11
11 -
 12
12 -
 13
13 -
 14
14 -
 15
15 -
 16
16 -
 17
17 -
 18
18 -
 19
19 -
 20
20 -
21
-
22
-
23
-
24
-
25
-
26
-
27
-
28
-
29
-
30
-
31
-
32
-
33
-
34
-
35
-
36
-
37
-
38
-
39
-
40
-
41
-
42
-
43
-
44
-
45
-
46
-
47
-
48
-
49
-
50
-
51
-
52
-
53
-
54
-
55
-
56
-
57
-
58
-
59
-
60
-
61
-
62
-
63
-
64
-
65
-
66
-
67
-
68
-
69
-
70
-
71
-
72
-
73
-
74
-
75
-
76
-
77
-
78
-
79
-
80
-
81
-
82
-
83
-
84
-
85
 |
 |