Canon imageFORMULA DR-C125 Document Scanner Operating Guide - Page 53
Scan Batch to Mail (Attaches scanned images to email), File Type Settings, P. 16
 |
View all Canon imageFORMULA DR-C125 Document Scanner manuals
Add to My Manuals
Save this manual to your list of manuals |
Page 53 highlights
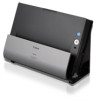
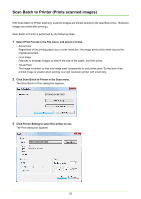
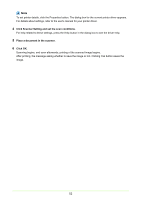
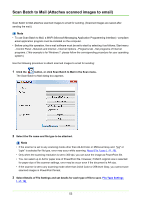
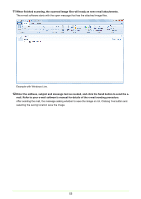
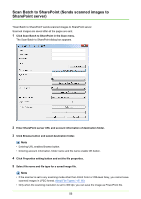
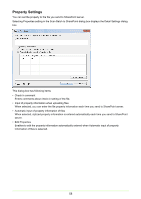
Scan Batch to Mail (Attaches scanned images to email) Scan Batch to Mail attaches scanned images to email for sending. (Scanned images are saved after sending the mail.) Note • To use Scan Batch to Mail, a MAPI (Microsoft Messaging Application Programming Interface) -compliant email application program must be installed on the computer. • Before using this operation, the e-mail software must be set to start by selecting it as follows; Start menu - Control Panel - Network and Internet - Internet Options - Programs tab - Set programs of Internet programs. (This example is for Windows 7: please follow the corresponding procedure for your operating system.) Use the following procedure to attach scanned images to email for sending: 1 Click the button, or click Scan Batch to Mail in the Scan menu. The Scan Batch to Mail dialog box appears. 2 Select the file name and file type to be attached. Note • If the scanner is set to any scanning mode other than 24-bit Color or 256-level Gray and "jpg" or "pptx" is selected for file type, error may occur while scanning. About File Types (→P. 16) • Only when the scanning resolution is set to 300 dpi, you can save the image as PowerPoint file. • You can select up to A4 for paper size of PowerPoint file. However, if Match original size is selected for paper size of the scanner settings, error may be occur even if the document is A4 size. • If the scanner is set to any scanning mode other than 24-bit Color or 256-level Gray, you cannot save scanned images in PowerPoint format. 3 Select Details of File Settings and set details for each type of file to save. File Type Settings (→P. 16) 53
-
 1
1 -
2
-
3
-
4
-
5
-
6
-
7
-
8
-
9
-
10
-
11
-
12
-
13
-
14
-
15
-
16
-
17
-
18
-
19
-
20
-
21
-
22
-
23
-
24
-
25
-
26
-
27
-
28
-
29
-
30
-
31
-
32
-
33
-
34
-
35
-
36
-
37
-
38
-
39
-
40
-
41
-
42
-
43
-
44
-
45
-
46
-
47
-
 48
48 -
 49
49 -
 50
50 -
 51
51 -
 52
52 -
 53
53 -
 54
54 -
 55
55 -
 56
56 -
 57
57 -
 58
58 -
59
-
60
-
61
-
62
-
63
-
64
-
65
-
66
-
67
-
68
-
69
-
70
-
71
-
72
-
73
-
74
-
75
-
76
-
77
-
78
-
79
-
80
-
81
-
82
-
83
-
84
-
85
 |
 |