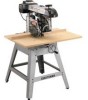
Craftsman #10402 Operation Manual - Page 35
R_v_ng, Knife, Blade
 |
View all Craftsman #10402 manuals
Add to My Manuals
Save this manual to your list of manuals |
Page 35 highlights
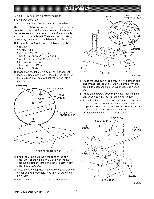
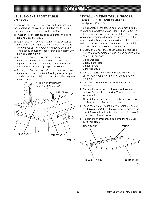
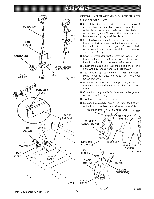
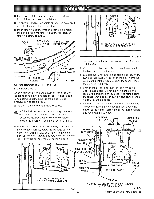
[] Orientinnerslottedmetalstripsothatit is located to theleftof outerslottedmetalstrip. [] Toprevenbt indinga, lignflatsofretainingscrewnut in slotsof innerslottedmetalstrip. [] insertretainingscrewthroughouterslottedmetal stripandthreadintoretainingscrewnut.Tighten retainingscrewsecurely. FLATS RETAININGINNESRLOTTEJD SCRENWUT METASLTRIPJ RIVINGKNIFE ONTOP OF FENCE TOO FAR LEFT OF BLADE AUGN R_V_NG KNIFE TO BLADE See F_gures 2ZA _27C. When ripping the riving knife must be centered with the blade to ride in the middle of the kerr and keep it from binding. Binding pinches the blade. Blade pinching can cause kickback. There are two pairs of anti-kickback pawls. ,_ WARMNG: Failure to use the riving knife, hold downs, and anti-kickback pawls can allow kickback. Kickback can throw the workpiece toward the operator, resulting in serious injury. [] Put the blade to the in-rip position by first loosening the yoke lock handle, below the carriage on the right. Then pull the yoke pivot latch (right side of arm, on carriage) forward and rotate the yoke to the left. This indexes the yoke 90 ° so the blade is Fig. 27B between the motor and the column. Lock the yoke lock handle. [] With the elevating handwheeJ, lower the arm until the blade just clears the table. [] Support the lower outer blade guard and loosen the carriage lock knob on the left of the arm. Move the yoke back until the blade touches the fence. Reset the carriage lock knob. [] Loosen the riving knife knob, at the front of the upper blade guard. Lower the riving knife to the table and tighten the knob. If the knife rests against the fence, with one set of pawls riding on the fence, no adjustment is needed. [] If the riving knife is on the fence or not touching it, loosen the riving knife slotted nut (just above the pawls, to the right). Correct the riving knife position and retighten the cap nut. RIVINGKNIFETOOFAR RIGHTOF FENCEAND BLADE Fig. 27A 35 CORRECTALIGNMENTOF THE RIVINGKNIFE AND ANTFKICKPAWLS Fig. 27C CRRFT'$Nn°NRADIALSAW315.220100
-
 1
1 -
2
-
3
-
4
-
5
-
6
-
7
-
8
-
9
-
10
-
11
-
12
-
13
-
14
-
15
-
16
-
17
-
18
-
19
-
20
-
21
-
22
-
23
-
24
-
25
-
26
-
27
-
28
-
29
-
 30
30 -
 31
31 -
 32
32 -
 33
33 -
 34
34 -
 35
35 -
 36
36 -
 37
37 -
 38
38 -
 39
39 -
 40
40 -
41
-
42
-
43
-
44
-
45
-
46
-
47
-
48
-
49
-
50
-
51
-
52
-
53
-
54
-
55
-
56
-
57
-
58
-
59
-
60
-
61
-
62
-
63
-
64
-
65
-
66
-
67
-
68
-
69
-
70
-
71
-
72
-
73
-
74
-
75
-
76
-
77
-
78
-
79
-
80
-
81
-
82
-
83
-
84
-
85
-
86
 |
 |
