Craftsman #10402 Operation Manual - Page 43
of your Radial Arm Saw,
 |
View all Craftsman #10402 manuals
Add to My Manuals
Save this manual to your list of manuals |
Page 43 highlights
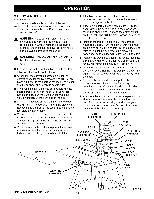
CHECK ALIGNMENT USING LASER OF ARM AND BLADE See Figure 35. The laser can be used as a quick, accurate routine check for the alignment of your Radial Arm Saw, The saw should be aligned according to the procedures outlined in the Adjustments Section of this manual, • Using a two-foot length of 1 x 12 in, board and an accurate framing square, draw a fine line perpendicular to the edge of the board using the fence as a guide. Position the marked board against the fence, • With the guard in place, align the blade arbor at the CENTER of the width of the board. • Raise the arm so that the blade is approximately 5 in, above the surface of the board. • Tighten the carriage lock knob to prevent the carriage from moving, • Carefully start the motor and observe the red laser line. By shifting the board, align the laser line with the line you drew on the board. If the laser line aligns parallel with the drawn line, the saw alignment is acceptable, • When making adjustments to the radial arm saw, use ONLY the procedures outlined in the adjustments section of this manual, using a framing square and the saw UNPLUGGED. Do not attempt to perform adjustments while using the laser as an indication of alignment. • Save the board with the drawn line for future routine alignment checks, Fig. 35 43 CRAFTSI4RX_ RADIALSAW315.220100
-
 1
1 -
2
-
3
-
4
-
5
-
6
-
7
-
8
-
9
-
10
-
11
-
12
-
13
-
14
-
15
-
16
-
17
-
18
-
19
-
20
-
21
-
22
-
23
-
24
-
25
-
26
-
27
-
28
-
29
-
30
-
31
-
32
-
33
-
34
-
35
-
36
-
37
-
 38
38 -
 39
39 -
 40
40 -
 41
41 -
 42
42 -
 43
43 -
 44
44 -
 45
45 -
 46
46 -
 47
47 -
 48
48 -
49
-
50
-
51
-
52
-
53
-
54
-
55
-
56
-
57
-
58
-
59
-
60
-
61
-
62
-
63
-
64
-
65
-
66
-
67
-
68
-
69
-
70
-
71
-
72
-
73
-
74
-
75
-
76
-
77
-
78
-
79
-
80
-
81
-
82
-
83
-
84
-
85
-
86
 |
 |
