Craftsman #10402 Operation Manual - Page 51
Rip Cut, Hazards, Precautions
 |
View all Craftsman #10402 manuals
Add to My Manuals
Save this manual to your list of manuals |
Page 51 highlights
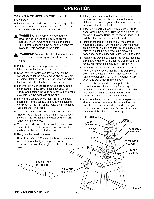
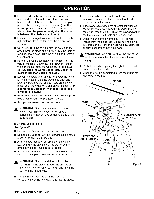
RIP CUT HAZARDS AND PRECAUTIONS Two hazards are specifically associated with rip cutting: outfeed zone and wrong way feed, In the outfeed zone (behind the blade), the blade teeth point down. The slightest contact while the blade is still spinning can snag clothing, jewelry, the workpiece, or even skin, causing serious personal injury. Wrong way feed occurs when the workpiece contacts the blade from the outfeed side, It is very hazardous and will jerk the workpiece violently, You could be cut if you are holding the workpiece, ,_, WARNING: Failure to observe any of these precautions can result in serious injury, • The first precaution is, of course, simply to stay completely away from the outfeed zone, Keep hands away from the outfeed zone. • Point the anti-kickback pawls away from the blade teeth to snag a workpiece if the blade grabs, They should be positioned to rest lightly on the workpiece. The flat side of the pawls should be level and horizontal. • Set the riving knife to just clear the table, • Set the hold down in front of the blade to just clear the workpiece, • Start and finish your cut from the infeed side, • Push the workpiece past the pawls with pushblocks and pushsticks to finish the cut, • If the blade jams, turn the saw off with the switch on the arm, remove the yellow key, and wait for the blade to fully stop before freeing it, • Make sure the blade is parallel to the fence and the workpiece is not warped or twisted, • Make sure no pressure is applied to the workpiece on the outfeed side, • Make sure the blade guard is lowered and is working properly. • Always set up the workpiece so the wider part of the wood is between the blade and the fence, This stabilizes the workpiece better, • Do not release the workpiece until it has moved past the pawls. Keep pushsticks firmly in place, • Use pushsticks and pushblocks, not your hands, when the trailing edge of the workpiece is within 3 in, of the blade. If the blade is set 2 in. or more from the fence, use a pushstick. Use a pushblock and auxiliary fence when the blade is between 2 in, and 1/2 in, from the fence, (If the cut is narrower than 1/2 in,, use a different saw.) For large panel rip cuts, use a featherboard instead of pushblocks or pushsticks. See the section on Cutting Aids. SETTING UP A RIP CUT See Figure 47, Note: For ease of set-up, better accuracy, and your safety, do not use the laser guide during any rip cuts, A precise and safe rip cut requires a careful set up, Before setting up for in-rip or out-rip, especially for a bevel cut, try the workpiece in both placements. Check for stability, visibility, and control, Test which will give the best pushstick clearance, Instructions are given for an in-rip cut. At certain points, the instructions will vary for a bevel rip cut or an out-rip process and will be enclosed in parentheses (example), Figure 47 shows an out-rip setup. • Insert a solid fence with no kerfs. Use an auxiliary fence if the blade will be set only 1/2 in. to 2 in, from the fence, Tighten the table clamps, • If the arm is too low or too high, first lift the blade guard if the arm is too low, and turn the elevating handwheel at the front of the table. Set the blade to just clear the kerf or table, • Change the blade angle if needed. Raise the plastic lower guard to keep it from jamming, release the bevel lock lever, and set the bevel indicator to zero, (For a bevel rip cut, set the bevel indicator to the desired angle.) Test the clearance on the guard, Retighten the bevel lock lever, SWITCH HOLDDOWN ELEVATING HANDWHEEL INFEEDFOR IN RIP CUTTING Fig, 47 51 rRRFTSMRN_RADIALSAW 315.220100
-
 1
1 -
2
-
3
-
4
-
5
-
6
-
7
-
8
-
9
-
10
-
11
-
12
-
13
-
14
-
15
-
16
-
17
-
18
-
19
-
20
-
21
-
22
-
23
-
24
-
25
-
26
-
27
-
28
-
29
-
30
-
31
-
32
-
33
-
34
-
35
-
36
-
37
-
38
-
39
-
40
-
41
-
42
-
43
-
44
-
45
-
 46
46 -
 47
47 -
 48
48 -
 49
49 -
 50
50 -
 51
51 -
 52
52 -
 53
53 -
 54
54 -
 55
55 -
 56
56 -
57
-
58
-
59
-
60
-
61
-
62
-
63
-
64
-
65
-
66
-
67
-
68
-
69
-
70
-
71
-
72
-
73
-
74
-
75
-
76
-
77
-
78
-
79
-
80
-
81
-
82
-
83
-
84
-
85
-
86
 |
 |
