Craftsman #10402 Operation Manual - Page 9
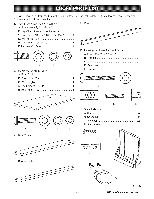
Switchshownin110-120voltposition
 |
View all Craftsman #10402 manuals
Add to My Manuals
Save this manual to your list of manuals |
Page 9 highlights
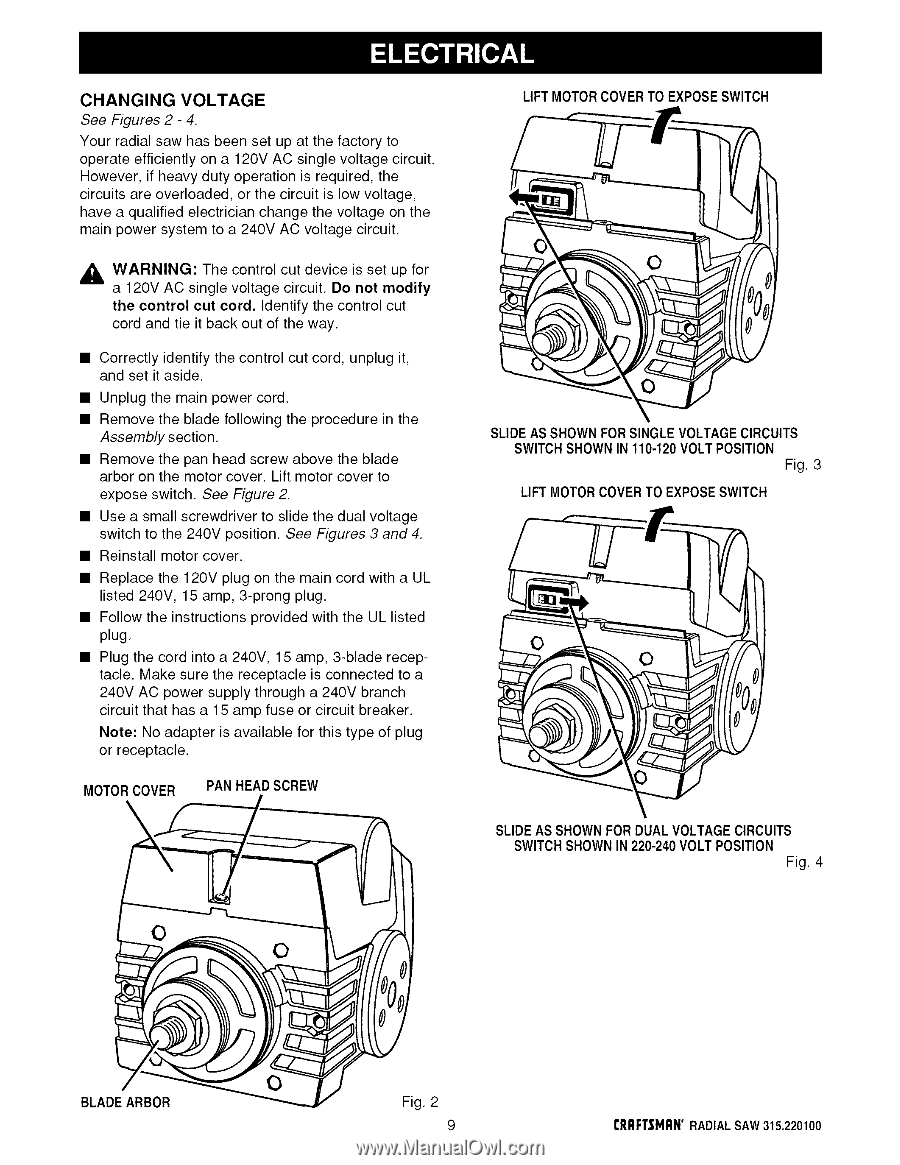
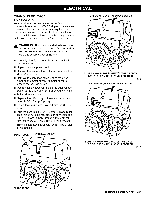
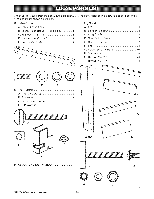
CHANGING VOLTAGE See Figures 2- 4. Your radial saw has been set up at the factory to operate efficiently on a 120V AC single voltage circuit, However, if heavy duty operation is required, the circuits are overloaded, or the circuit is low voltage, have a qualified electrician change the voltage on the main power system to a 240V AC voltage circuit, ,_ WARNING: The control cut device is set up for a 120V AC single voltage circuit. Do not modify the control cut cord. Identify the control cut cord and tie it back out of the way. • Correctly identify the control cut cord, unplug it, and set it aside. • Unplug the main power cord, • Remove the blade following the procedure in the Assembly section, • Remove the pan head screw above the blade arbor on the motor cover, Lift motor cover to expose switch. See Figure 2, • Use a small screwdriver to slide the dual voltage switch to the 240V position, See Figures 3 and 4, • Reinstall motor cover. • Replace the 120V plug on the main cord with a UL listed 240V, 15 amp, 3-prong plug, • Follow the instructions provided with the UL listed plug, • Plug the cord into a 240V, 15 amp, 3-blade receptacle. Make sure the receptacle is connected to a 240V AC power supply through a 240V branch circuit that has a 15 amp fuse or circuit breaker. Note: No adapter is available for this type of plug or receptacle. MOTORCOVER PAN HEADSCREW LIFT MOTORCOVERTO EXPOSESWITCH SLIDE AS SHOWNFORSINGLE VOLTAGECIRCUITS SWITCHSHOWNIN 110-120VOLTPOSITION Fig. 3 LIFT MOTORCOVERTO EXPOSESWITCH SLIDE AS SHOWNFOR DUAL VOLTAGECIRCUITS SWITCHSHOWNIN 220-240VOLT POSITION Fig. 4 / BLADEARBOR _ Fig. 2 rRFIFTSMR_NRADIAL SAW315.220100
-
 1
1 -
2
-
3
-
 4
4 -
 5
5 -
 6
6 -
 7
7 -
 8
8 -
 9
9 -
 10
10 -
 11
11 -
 12
12 -
 13
13 -
 14
14 -
15
-
16
-
17
-
18
-
19
-
20
-
21
-
22
-
23
-
24
-
25
-
26
-
27
-
28
-
29
-
30
-
31
-
32
-
33
-
34
-
35
-
36
-
37
-
38
-
39
-
40
-
41
-
42
-
43
-
44
-
45
-
46
-
47
-
48
-
49
-
50
-
51
-
52
-
53
-
54
-
55
-
56
-
57
-
58
-
59
-
60
-
61
-
62
-
63
-
64
-
65
-
66
-
67
-
68
-
69
-
70
-
71
-
72
-
73
-
74
-
75
-
76
-
77
-
78
-
79
-
80
-
81
-
82
-
83
-
84
-
85
-
86
 |
 |