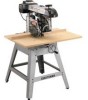
Craftsman #10402 Operation Manual - Page 52
See Hazards, and Precautions
 |
View all Craftsman #10402 manuals
Add to My Manuals
Save this manual to your list of manuals |
Page 52 highlights
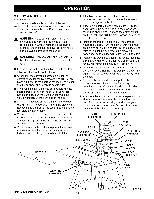
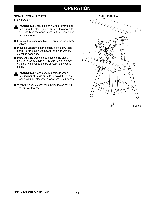
• Put the blade in the in-rip position between the motor and the column. Release the yoke lock handle and pivot the yoke to the left, with the yoke pivot latch on the right side of the arm, (Use the out-rip position only for rips 12 in. or more in width; pivot the yoke to the right so the motor is between the blade and column.) • Loosen the carriage lock knob, Place the blade the right distance from the fence for the cut and lock the knob, • Cut a kerr. Turn the saw on with the switch on the arm, Lower the blade about 1/16 in, into the table to cut a shallow groove, Turn the saw off and remove the yellow key, • Position the workpiece against the blade, from the front of the table, Lower the hold-down in front of the blade to just clear the workpiece, (For a bevel rip cut, place the workpiece directly under the guard rather than beside the blade.) • Loosen the pawls and riving knife. Lower the riving knife to the table. Slide the workpiece back and lower the pawls so that one set rests on the workpiece, Lock the riving knife and pawls in place, (For a bevel rip cut, place the workpiece under the lower set of pawls.) • Remove the workpiece from the table, Set the push block, featherboard, or pushstick nearby, • Set up table extension(s) and supports. • Keep your other hand on the table and steady the workpiece against the fence. Keep that hand at least 8 in. from the blade, • If the blade cover does not automatically rise as the workpiece moves from the infeed to the outfeed side, stop the cut, Turn off the saw and adjust the blade cover so it rests on the workpiece, • When the end of the workpiece is still several inches from the blade, pick up the cutting aid you selected earlier. Push the wood with the pushstick or pushblock rather than your hand. WARNING: Use a pushstick as the end of the workpiece nears the blade to reduce the risk of injury, • Push the wood completely through the blade to the outfeed, past the pawls, • When the work is completed, press the switch off and remove the key. I_-I_ SWITCH RIP CUT ,_ WARNING: Never use a person to support workpieces, This can cause kickback and serious injury. Never have someone stand at the outfeed side, ANTI-KICKBACK PAWLS MAKING A RIP CUT See Figure 48, • Review the Hazards and Precautions page. • Do not make a rip cut without following all the setup steps in the previous procedure, • After the saw has been set up, insert the yellow key, and turn the saw on with the switch on the arm, Let the blade build up to full speed, • Stand at the infeed side of the blade and out of the line of the workpiece, in case kickback occurs. INFEEDFOR OUT RIPCUTTING _1, WARNING: Never stand directly in the line of cut. Stand to the side to reduce the chance of injury should kickback occur. Start and finish the cut from the infeed side. • With the hand closest to the fence, push the workpiece under the hold down and into the blade, Fig. 48 CRAFTSMAN_RADIALSAW 315.220100 52
-
 1
1 -
2
-
3
-
4
-
5
-
6
-
7
-
8
-
9
-
10
-
11
-
12
-
13
-
14
-
15
-
16
-
17
-
18
-
19
-
20
-
21
-
22
-
23
-
24
-
25
-
26
-
27
-
28
-
29
-
30
-
31
-
32
-
33
-
34
-
35
-
36
-
37
-
38
-
39
-
40
-
41
-
42
-
43
-
44
-
45
-
46
-
 47
47 -
 48
48 -
 49
49 -
 50
50 -
 51
51 -
 52
52 -
 53
53 -
 54
54 -
 55
55 -
 56
56 -
 57
57 -
58
-
59
-
60
-
61
-
62
-
63
-
64
-
65
-
66
-
67
-
68
-
69
-
70
-
71
-
72
-
73
-
74
-
75
-
76
-
77
-
78
-
79
-
80
-
81
-
82
-
83
-
84
-
85
-
86
 |
 |
