Craftsman #10402 Operation Manual - Page 44
Basic, Operation, Of The, Radial
 |
View all Craftsman #10402 manuals
Add to My Manuals
Save this manual to your list of manuals |
Page 44 highlights
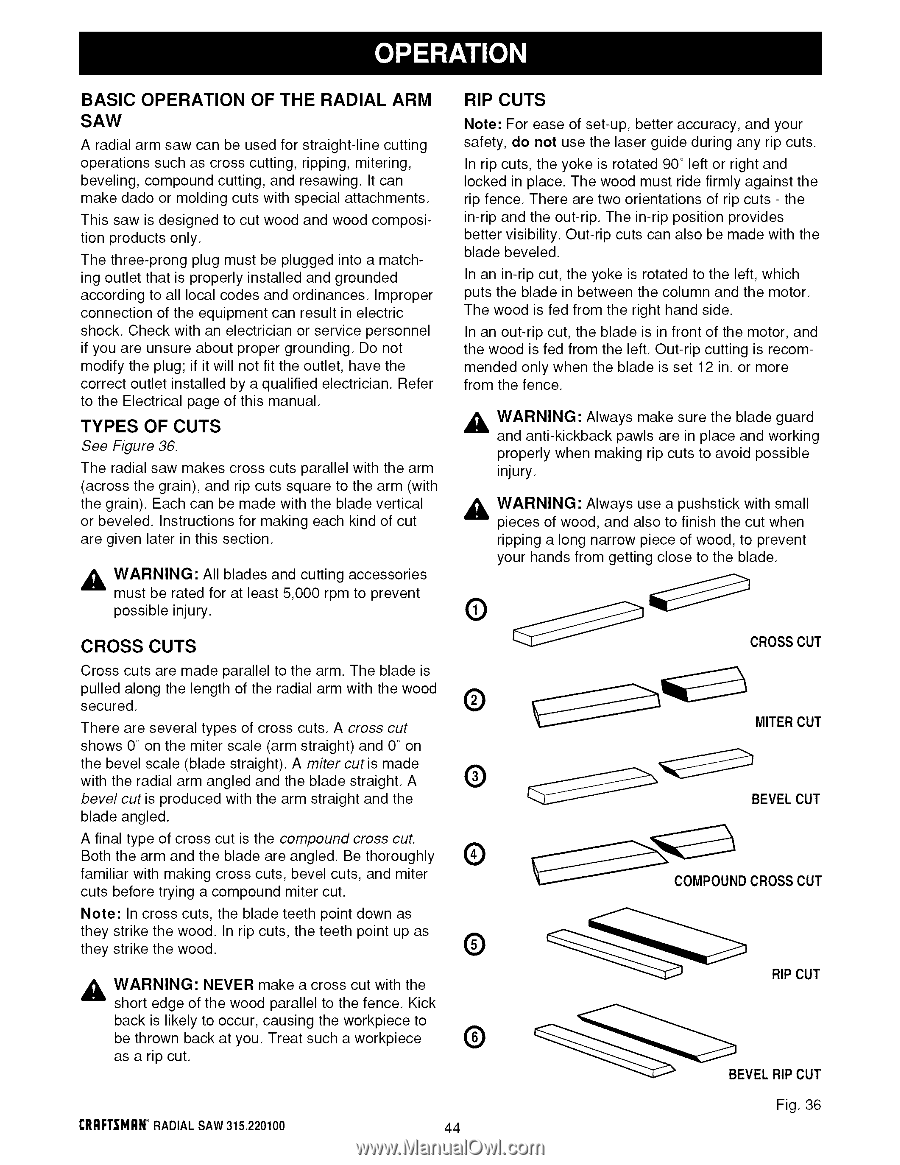
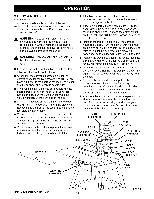
BASIC OPERATION OF THE RADIAL ARM SAW A radial arm saw can be used for straight-line cutting operations such as cross cutting, ripping, mitering, beveling, compound cutting, and resawing. It can make dado or molding cuts with special attachments, This saw is designed to cut wood and wood composition products only, The three-prong plug must be plugged into a matching outlet that is properly installed and grounded according to all local codes and ordinances, Improper connection of the equipment can result in electric shock, Check with an electrician or service personnel if you are unsure about proper grounding, Do not modify the plug; if it will not fit the outlet, have the correct outlet installed by a qualified electrician, Refer to the Electrical page of this manual, TYPES OF CUTS See Figure 36, The radial saw makes cross cuts parallel with the arm (across the grain), and rip cuts square to the arm (with the grain). Each can be made with the blade vertical or beveled, Instructions for making each kind of cut are given later in this section, ,_ WARNING: All blades and cutting accessories must be rated for at least 5,000 rpm to prevent possible injury. CROSS CUTS Cross cuts are made parallel to the arm, The blade is pulled along the length of the radial arm with the wood secured, There are several types of cross cuts, A cross cut shows 0 ° on the miter scale (arm straight) and 0 ° on the bevel scale (blade straight). A miter cut is made with the radial arm angled and the blade straight, A bevel cut is produced with the arm straight and the blade angled. A final type of cross cut is the compound cross cut. Both the arm and the blade are angled. Be thoroughly familiar with making cross cuts, bevel cuts, and miter cuts before trying a compound miter cut. Note: In cross cuts, the blade teeth point down as they strike the wood. In rip cuts, the teeth point up as they strike the wood, ,_ WARNING: NEVER make a cross cut with the .! short edge of the wood parallel to the fence, Kick back is likely to occur, causing the workpiece to be thrown back at you, Treat such a workpiece as a rip cut, RIP CUTS Note: For ease of set-up, better accuracy, and your safety, do not use the laser guide during any rip cuts. In rip cuts, the yoke is rotated 90 ° left or right and locked in place, The wood must ride firmly against the rip fence, There are two orientations of rip cuts - the in-rip and the out-rip. The in-rip position provides better visibility, Out-rip cuts can also be made with the blade beveled, In an in-rip cut, the yoke is rotated to the left, which puts the blade in between the column and the motor, The wood is fed from the right hand side, In an out-rip cut, the blade is in front of the motor, and the wood is fed from the left, Out-rip cutting is recommended only when the blade is set 12 in, or more from the fence. ,_, WARNING: Always make sure the blade guard and anti-kickback pawls are in place and working properly when making rip cuts to avoid possible injury, WARNING:, Always use a pushstick with small pieces of wood, and also to finish the cut when ripping a long narrow piece of wood, to prevent your hands from getting close to the blade, Q _ _CROSS CUT Q MITERCUT BEVELCUT 4_ COMPOUNDCROSSCUT ® __EVEL RIP CUT RIPCUT CRRFTSMR_NRADIALSAW 315.220100 44 Fig, 36
-
 1
1 -
2
-
3
-
4
-
5
-
6
-
7
-
8
-
9
-
10
-
11
-
12
-
13
-
14
-
15
-
16
-
17
-
18
-
19
-
20
-
21
-
22
-
23
-
24
-
25
-
26
-
27
-
28
-
29
-
30
-
31
-
32
-
33
-
34
-
35
-
36
-
37
-
38
-
 39
39 -
 40
40 -
 41
41 -
 42
42 -
 43
43 -
 44
44 -
 45
45 -
 46
46 -
 47
47 -
 48
48 -
 49
49 -
50
-
51
-
52
-
53
-
54
-
55
-
56
-
57
-
58
-
59
-
60
-
61
-
62
-
63
-
64
-
65
-
66
-
67
-
68
-
69
-
70
-
71
-
72
-
73
-
74
-
75
-
76
-
77
-
78
-
79
-
80
-
81
-
82
-
83
-
84
-
85
-
86
 |
 |