Dell 1600n Multifunction Mono Laser Printer Dell Laser Multi-Function Printer - Page 83
Making Copies From the ADF, Press <Start Copy>
 |
View all Dell 1600n Multifunction Mono Laser Printer manuals
Add to My Manuals
Save this manual to your list of manuals |
Page 83 highlights
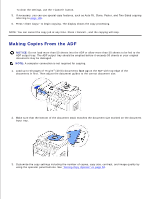
4. To clear the settings, use the button. 5. If necessary, you can use special copy features, such as Auto Fit, Clone, Poster, and Two Sided copying referring to page 100. 6. Press to begin copying. The display shows the copy processing. NOTE: You can cancel the copy job at any time. Press , and the copying will stop. Making Copies From the ADF NOTICE: Do not load more than 50 sheets into the ADF or allow more than 50 sheets to be fed to the ADF output tray. The ADF output tray should be emptied before it exceeds 50 sheets or your original documents may be damaged. NOTE: A computer connection is not required for copying. 1. Load up to 50 pages of 75 g/m2 (20 lb) documents face up on the ADF with top edge of the documents in first. Then adjust the document guides to the correct document size. 2. Make sure that the bottom of the document stack matches the document size marked on the document input tray. 3. Customize the copy settings including the number of copies, copy size, contrast, and image quality by using the operator panel buttons. See "Setting Copy Options" on page 98. 4.
-
 1
1 -
2
-
3
-
4
-
5
-
6
-
7
-
8
-
9
-
10
-
11
-
12
-
13
-
14
-
15
-
16
-
17
-
18
-
19
-
20
-
21
-
22
-
23
-
24
-
25
-
26
-
27
-
28
-
29
-
30
-
31
-
32
-
33
-
34
-
35
-
36
-
37
-
38
-
39
-
40
-
41
-
42
-
43
-
44
-
45
-
46
-
47
-
48
-
49
-
50
-
51
-
52
-
53
-
54
-
55
-
56
-
57
-
58
-
59
-
60
-
61
-
62
-
63
-
64
-
65
-
66
-
67
-
68
-
69
-
70
-
71
-
72
-
73
-
74
-
75
-
76
-
77
-
 78
78 -
 79
79 -
 80
80 -
 81
81 -
 82
82 -
 83
83 -
 84
84 -
 85
85 -
 86
86 -
 87
87 -
 88
88 -
89
-
90
-
91
-
92
-
93
-
94
-
95
-
96
-
97
-
98
-
99
-
100
-
101
-
102
-
103
-
104
-
105
-
106
-
107
-
108
-
109
-
110
-
111
-
112
-
113
-
114
-
115
-
116
-
117
-
118
-
119
-
120
-
121
-
122
-
123
-
124
-
125
-
126
-
127
-
128
-
129
-
130
-
131
-
132
-
133
-
134
-
135
-
136
-
137
-
138
-
139
-
140
-
141
-
142
-
143
-
144
-
145
-
146
-
147
-
148
-
149
-
150
-
151
-
152
-
153
-
154
-
155
-
156
-
157
-
158
-
159
-
160
-
161
-
162
-
163
-
164
-
165
-
166
-
167
-
168
-
169
-
170
-
171
-
172
-
173
-
174
-
175
-
176
-
177
-
178
-
179
-
180
-
181
-
182
-
183
-
184
-
185
-
186
-
187
-
188
 |
 |
