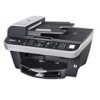
Dell 962 All In One Photo Printer User's Guide - Page 47
Faxing Through the Computer Modem, Printer Setup Utility Tabs
 |
View all Dell 962 All In One Photo Printer manuals
Add to My Manuals
Save this manual to your list of manuals |
Page 47 highlights
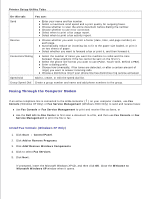
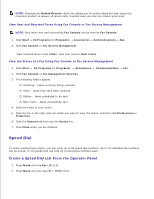
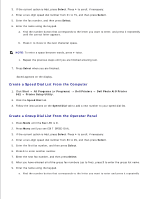
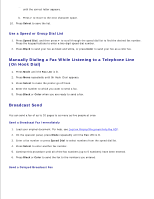
Printer Setup Utility Tabs On this tab: You can: Send Enter your name and fax number. Select a maximum send speed and a print quality for outgoing faxes. Choose whether to scan the entire document before dialing the number. Choose whether to use error correction. Select when to print a fax usage report. Select when to print a fax activity report. Receive Choose whether you want to print a footer (date, time, and page number) on each page. Automatically reduce an incoming fax to fit to the paper size loaded, or print it on two sheets of paper. Select whether you want to forward a fax or print it, and then forward it. Connection/Dialing Select the number of times you want the machine to redial and the time between those attempts if the fax cannot be sent on the first try. Select the phone line format you want to use (Pulse, Touch-tone, Behind a PBX). Enter a dialing prefix. Choose how (manually, if fax tones are detected, or after a certain amount of rings) you want to answer incoming calls. Choose a distinctive ring if your phone line has distinctive ring service activated. Speed Dial Add to, create, or edit the speed dial list. Group Speed Dial Create a group number and name and add phone numbers to the group. Faxing Through the Computer Modem If an active telephone line is connected to the LINE connector ( ) on your computer modem, use Fax Console (Windows XP Only) or Fax Service Management (Windows 2000 Only) to send and receive faxes: Use Fax Console or Fax Service Management to print and receive files as faxes, or Use the Dell All-In-One Center to first scan a document to a file, and then use Fax Console or Fax Service Management to print the file to fax. Install Fax Console (Windows XP Only) 1. Click Start Control Panel. 2. Click Add or Remove Programs. 3. Click Add/Remove Windows Components. 4. Click to select Fax Services. 5. Click Next. If prompted, insert the Microsoft Windows XP CD, and then click OK. Close the Welcome to Microsoft Windows XP window when it opens. 6. 7.
-
 1
1 -
2
-
3
-
4
-
5
-
6
-
7
-
8
-
9
-
10
-
11
-
12
-
13
-
14
-
15
-
16
-
17
-
18
-
19
-
20
-
21
-
22
-
23
-
24
-
25
-
26
-
27
-
28
-
29
-
30
-
31
-
32
-
33
-
34
-
35
-
36
-
37
-
38
-
39
-
40
-
41
-
 42
42 -
 43
43 -
 44
44 -
 45
45 -
 46
46 -
 47
47 -
 48
48 -
 49
49 -
 50
50 -
 51
51 -
 52
52 -
53
-
54
-
55
-
56
-
57
-
58
-
59
-
60
-
61
-
62
-
63
-
64
-
65
-
66
-
67
-
68
-
69
-
70
-
71
-
72
-
73
-
74
-
75
-
76
-
77
-
78
-
79
-
80
-
81
-
82
-
83
-
84
-
85
-
86
-
87
-
88
-
89
-
90
-
91
-
92
 |
 |
