Dell E515dn Dell Multifunction Printer Users Guide - Page 227
Operate Fax to Server, Synchronize Time with the SNTP Server Using Web Based Management
 |
View all Dell E515dn manuals
Add to My Manuals
Save this manual to your list of manuals |
Page 227 highlights
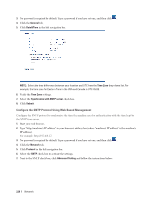
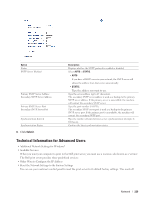
1. Press Menu. 2. Press p or q to display the Network option, and then press OK. 3. Press p or q to display the Fax to Server option, and then press OK. 4. Press p or q to display the On option, and then press OK. 5. Press p or q to display the Prefix option, and then press OK. 6. Enter the prefix (up to 40 characters) using the machine's control panel, and then press OK. 7. Press p or q to display the Suffix option, and then press OK. 8. Enter the suffix (up to 40 characters) using the machine's control panel, and then press OK. 9. Press Cancel. Operate Fax to Server Related Models:Dell E515dn / Dell E515dw 1. Place the document in the ADF or on the scanner glass. 2. Enter the fax number. 3. Press Start. The machine will send the message over a TCP/IP network to the fax server. Synchronize Time with the SNTP Server Using Web Based Management The Simple Network Time Protocol (SNTP) is used to synchronize the time used by the machine for authentication with the SNTP time server. (This is not the time displayed on the machine's LCD.) You can automatically or manually synchronize the machine's time with the Coordinated Universal Time (UTC) provided by the SNTP time server. • Configure Date and Time Using Web Based Management Configure date and time to synchronize the time used by the machine with the SNTP time server. • Configure the SNTP Protocol Using Web Based Management Configure the SNTP protocol to synchronize the time the machine uses for authentication with the time kept by the SNTP time server. Configure Date and Time Using Web Based Management Configure date and time to synchronize the time used by the machine with the SNTP time server. This feature is not available in some countries. 1. Start your web browser. 2. Type "http://machine's IP address" in your browser's address bar (where "machine's IP address" is the machine's IP address). For example: http://192.168.1.2 Network 227
-
 1
1 -
2
-
3
-
4
-
5
-
6
-
7
-
8
-
9
-
10
-
11
-
12
-
13
-
14
-
15
-
16
-
17
-
18
-
19
-
20
-
21
-
22
-
23
-
24
-
25
-
26
-
27
-
28
-
29
-
30
-
31
-
32
-
33
-
34
-
35
-
36
-
37
-
38
-
39
-
40
-
41
-
42
-
43
-
44
-
45
-
46
-
47
-
48
-
49
-
50
-
51
-
52
-
53
-
54
-
55
-
56
-
57
-
58
-
59
-
60
-
61
-
62
-
63
-
64
-
65
-
66
-
67
-
68
-
69
-
70
-
71
-
72
-
73
-
74
-
75
-
76
-
77
-
78
-
79
-
80
-
81
-
82
-
83
-
84
-
85
-
86
-
87
-
88
-
89
-
90
-
91
-
92
-
93
-
94
-
95
-
96
-
97
-
98
-
99
-
100
-
101
-
102
-
103
-
104
-
105
-
106
-
107
-
108
-
109
-
110
-
111
-
112
-
113
-
114
-
115
-
116
-
117
-
118
-
119
-
120
-
121
-
122
-
123
-
124
-
125
-
126
-
127
-
128
-
129
-
130
-
131
-
132
-
133
-
134
-
135
-
136
-
137
-
138
-
139
-
140
-
141
-
142
-
143
-
144
-
145
-
146
-
147
-
148
-
149
-
150
-
151
-
152
-
153
-
154
-
155
-
156
-
157
-
158
-
159
-
160
-
161
-
162
-
163
-
164
-
165
-
166
-
167
-
168
-
169
-
170
-
171
-
172
-
173
-
174
-
175
-
176
-
177
-
178
-
179
-
180
-
181
-
182
-
183
-
184
-
185
-
186
-
187
-
188
-
189
-
190
-
191
-
192
-
193
-
194
-
195
-
196
-
197
-
198
-
199
-
200
-
201
-
202
-
203
-
204
-
205
-
206
-
207
-
208
-
209
-
210
-
211
-
212
-
213
-
214
-
215
-
216
-
217
-
218
-
219
-
220
-
221
-
 222
222 -
 223
223 -
 224
224 -
 225
225 -
 226
226 -
 227
227 -
 228
228 -
 229
229 -
 230
230 -
 231
231 -
 232
232 -
233
-
234
-
235
-
236
-
237
-
238
-
239
-
240
-
241
-
242
-
243
-
244
-
245
-
246
-
247
-
248
-
249
-
250
-
251
-
252
-
253
-
254
-
255
-
256
-
257
-
258
-
259
-
260
-
261
-
262
-
263
-
264
-
265
-
266
-
267
-
268
-
269
-
270
-
271
-
272
-
273
-
274
-
275
-
276
-
277
-
278
-
279
-
280
-
281
-
282
-
283
-
284
-
285
-
286
-
287
-
288
-
289
-
290
-
291
-
292
-
293
-
294
-
295
-
296
-
297
-
298
-
299
-
300
-
301
-
302
-
303
-
304
-
305
-
306
-
307
-
308
-
309
-
310
-
311
-
312
-
313
-
314
-
315
-
316
-
317
-
318
-
319
-
320
-
321
-
322
-
323
-
324
-
325
-
326
-
327
-
328
-
329
-
330
-
331
-
332
-
333
-
334
-
335
-
336
-
337
-
338
-
339
-
340
-
341
-
342
-
343
-
344
-
345
-
346
-
347
-
348
-
349
-
350
-
351
-
352
-
353
-
354
-
355
-
356
-
357
-
358
-
359
-
360
-
361
-
362
-
363
-
364
-
365
-
366
-
367
-
368
-
369
-
370
-
371
-
372
-
373
-
374
-
375
-
376
-
377
-
378
-
379
-
380
-
381
-
382
-
383
-
384
-
385
-
386
 |
 |
