Dell E515dn Dell Multifunction Printer Users Guide - Page 97
Con Network Scanning for Macintosh, Scan Using the Scan Button on Your Dell Machine - scan to pdf
 |
View all Dell E515dn manuals
Add to My Manuals
Save this manual to your list of manuals |
Page 97 highlights
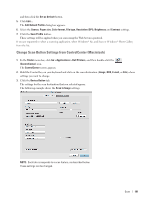
Configure Network Scanning for Macintosh To use the machine as a network scanner, the machine must be configured with a TCP/IP address. • If you installed the machine following the instructions for a network user, the machine should already be configured for your network. • To use the machine as a network scanner, the machine must be configured with a TCP/IP address. You can set or change the address settings from the machine's control panel. • To scan from the machine on a network, you must select the networked machine in the Device Selector application. 1. In the Finder menu bar, click Go > Applications > Dell Printers, and then double-click the (ControlCenter) icon. The ControlCenter screen appears. 2. Click the Model pop-up menu, and then select Other.... The Device Selector window appears. 3. Click the + button. 4. Select a machine from the list of available machines, and then click Add. You can also specify your machine by IP address. Click the IP button, and then type the IP address. 5. Click OK. NOTE: To use the Scan button features on the machine, select the Scan Key Setting check box to register your computer with the "Scan To" features at the machine. Type the name for your Macintosh that you want to be displayed on the machine's LCD (up to 15 characters). NOTE: To avoid receiving unwanted documents, select the Enable PIN code protection check box, and then type a four-digit PIN in the PIN code and Verify fields. To send data to a computer protected by a PIN, the LCD prompts you to type the PIN before the document can be scanned and sent to the computer. Scan Using the Scan Button on Your Dell Machine • Scan Photos and Graphics Send scanned photos or graphics directly to your computer. Dell's ControlCenter software (for Macintosh only) will launch the default graphics application on your computer and open your scanned document automatically. • Save Scanned Data to a Folder as a PDF File Scan documents and save them to a folder on your computer as PDF files. • Web Services for Scanning on Your Network (Windows Vista® SP2 or greater, Windows® 7 and Windows® 8) The Web Services protocol enables Windows Vista® (SP2 or greater), Windows® 7 and Windows® 8 users to scan using a Dell machine on the network. You must install the driver via Web Services. • Change Scan Button Settings from ControlCenter (Macintosh) Scan 97
-
 1
1 -
2
-
3
-
4
-
5
-
6
-
7
-
8
-
9
-
10
-
11
-
12
-
13
-
14
-
15
-
16
-
17
-
18
-
19
-
20
-
21
-
22
-
23
-
24
-
25
-
26
-
27
-
28
-
29
-
30
-
31
-
32
-
33
-
34
-
35
-
36
-
37
-
38
-
39
-
40
-
41
-
42
-
43
-
44
-
45
-
46
-
47
-
48
-
49
-
50
-
51
-
52
-
53
-
54
-
55
-
56
-
57
-
58
-
59
-
60
-
61
-
62
-
63
-
64
-
65
-
66
-
67
-
68
-
69
-
70
-
71
-
72
-
73
-
74
-
75
-
76
-
77
-
78
-
79
-
80
-
81
-
82
-
83
-
84
-
85
-
86
-
87
-
88
-
89
-
90
-
91
-
 92
92 -
 93
93 -
 94
94 -
 95
95 -
 96
96 -
 97
97 -
 98
98 -
 99
99 -
 100
100 -
 101
101 -
 102
102 -
103
-
104
-
105
-
106
-
107
-
108
-
109
-
110
-
111
-
112
-
113
-
114
-
115
-
116
-
117
-
118
-
119
-
120
-
121
-
122
-
123
-
124
-
125
-
126
-
127
-
128
-
129
-
130
-
131
-
132
-
133
-
134
-
135
-
136
-
137
-
138
-
139
-
140
-
141
-
142
-
143
-
144
-
145
-
146
-
147
-
148
-
149
-
150
-
151
-
152
-
153
-
154
-
155
-
156
-
157
-
158
-
159
-
160
-
161
-
162
-
163
-
164
-
165
-
166
-
167
-
168
-
169
-
170
-
171
-
172
-
173
-
174
-
175
-
176
-
177
-
178
-
179
-
180
-
181
-
182
-
183
-
184
-
185
-
186
-
187
-
188
-
189
-
190
-
191
-
192
-
193
-
194
-
195
-
196
-
197
-
198
-
199
-
200
-
201
-
202
-
203
-
204
-
205
-
206
-
207
-
208
-
209
-
210
-
211
-
212
-
213
-
214
-
215
-
216
-
217
-
218
-
219
-
220
-
221
-
222
-
223
-
224
-
225
-
226
-
227
-
228
-
229
-
230
-
231
-
232
-
233
-
234
-
235
-
236
-
237
-
238
-
239
-
240
-
241
-
242
-
243
-
244
-
245
-
246
-
247
-
248
-
249
-
250
-
251
-
252
-
253
-
254
-
255
-
256
-
257
-
258
-
259
-
260
-
261
-
262
-
263
-
264
-
265
-
266
-
267
-
268
-
269
-
270
-
271
-
272
-
273
-
274
-
275
-
276
-
277
-
278
-
279
-
280
-
281
-
282
-
283
-
284
-
285
-
286
-
287
-
288
-
289
-
290
-
291
-
292
-
293
-
294
-
295
-
296
-
297
-
298
-
299
-
300
-
301
-
302
-
303
-
304
-
305
-
306
-
307
-
308
-
309
-
310
-
311
-
312
-
313
-
314
-
315
-
316
-
317
-
318
-
319
-
320
-
321
-
322
-
323
-
324
-
325
-
326
-
327
-
328
-
329
-
330
-
331
-
332
-
333
-
334
-
335
-
336
-
337
-
338
-
339
-
340
-
341
-
342
-
343
-
344
-
345
-
346
-
347
-
348
-
349
-
350
-
351
-
352
-
353
-
354
-
355
-
356
-
357
-
358
-
359
-
360
-
361
-
362
-
363
-
364
-
365
-
366
-
367
-
368
-
369
-
370
-
371
-
372
-
373
-
374
-
375
-
376
-
377
-
378
-
379
-
380
-
381
-
382
-
383
-
384
-
385
-
386
 |
 |