Dell E515dn Dell Multifunction Printer Users Guide - Page 99
Save Scanned Data to a Folder as a PDF File
 |
View all Dell E515dn manuals
Add to My Manuals
Save this manual to your list of manuals |
Page 99 highlights
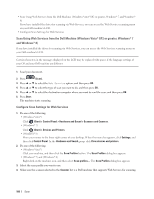
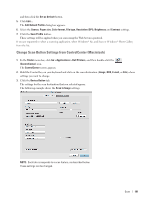
Save Scanned Data to a Folder as a PDF File Scan documents and save them to a folder on your computer as PDF files. Use the Scan button on the machine to make temporary changes to the scan settings. To make permanent changes, use Dell's ControlCenter software (for Macintosh only). 1. Load your document. 2. Press (Scan). 3. Press p or q to select the Scan to PC option, and then press OK. 4. Press p or q to select the File option, and then press OK. 5. If the machine is connected over the network, select the destination computer. 6. Press OK. NOTE: If the LCD prompts you to enter a PIN, enter the four-digit PIN for the destination computer on the LCD. 7. Do one of the following: • To change the scan settings for this document, press p or q to select Yes, and then press OK. Go to the next step. • To use the default scan settings, press p or q to select No, and then press OK. Press Start. The machine starts scanning. If you are using the machine's scanner glass, follow the LCD instructions to complete the scanning job. NOTE: In order to change scan settings, Dell's Control Center software (for Macintosh only) must be installed on a computer connected to the machine. NOTE: (For Windows) In order to change scan settings, see the FAQ in Dell Printer Hub software. 8. Select the scan settings you want to change: • Scan Type • Resolution • File Type • Scan Size • Remove Bkg. Clr (available only for the Color and Gray options.) 9. Press Start. The machine starts scanning. If you are using the machine's scanner glass, follow the LCD instructions to complete the scanning job. Web Services for Scanning on Your Network (Windows Vista® SP2 or greater, Windows® 7 and Windows® 8) The Web Services protocol enables Windows Vista® (SP2 or greater), Windows® 7 and Windows® 8 users to scan using a Dell machine on the network. You must install the driver via Web Services. Scan 99
-
 1
1 -
2
-
3
-
4
-
5
-
6
-
7
-
8
-
9
-
10
-
11
-
12
-
13
-
14
-
15
-
16
-
17
-
18
-
19
-
20
-
21
-
22
-
23
-
24
-
25
-
26
-
27
-
28
-
29
-
30
-
31
-
32
-
33
-
34
-
35
-
36
-
37
-
38
-
39
-
40
-
41
-
42
-
43
-
44
-
45
-
46
-
47
-
48
-
49
-
50
-
51
-
52
-
53
-
54
-
55
-
56
-
57
-
58
-
59
-
60
-
61
-
62
-
63
-
64
-
65
-
66
-
67
-
68
-
69
-
70
-
71
-
72
-
73
-
74
-
75
-
76
-
77
-
78
-
79
-
80
-
81
-
82
-
83
-
84
-
85
-
86
-
87
-
88
-
89
-
90
-
91
-
92
-
93
-
 94
94 -
 95
95 -
 96
96 -
 97
97 -
 98
98 -
 99
99 -
 100
100 -
 101
101 -
 102
102 -
 103
103 -
 104
104 -
105
-
106
-
107
-
108
-
109
-
110
-
111
-
112
-
113
-
114
-
115
-
116
-
117
-
118
-
119
-
120
-
121
-
122
-
123
-
124
-
125
-
126
-
127
-
128
-
129
-
130
-
131
-
132
-
133
-
134
-
135
-
136
-
137
-
138
-
139
-
140
-
141
-
142
-
143
-
144
-
145
-
146
-
147
-
148
-
149
-
150
-
151
-
152
-
153
-
154
-
155
-
156
-
157
-
158
-
159
-
160
-
161
-
162
-
163
-
164
-
165
-
166
-
167
-
168
-
169
-
170
-
171
-
172
-
173
-
174
-
175
-
176
-
177
-
178
-
179
-
180
-
181
-
182
-
183
-
184
-
185
-
186
-
187
-
188
-
189
-
190
-
191
-
192
-
193
-
194
-
195
-
196
-
197
-
198
-
199
-
200
-
201
-
202
-
203
-
204
-
205
-
206
-
207
-
208
-
209
-
210
-
211
-
212
-
213
-
214
-
215
-
216
-
217
-
218
-
219
-
220
-
221
-
222
-
223
-
224
-
225
-
226
-
227
-
228
-
229
-
230
-
231
-
232
-
233
-
234
-
235
-
236
-
237
-
238
-
239
-
240
-
241
-
242
-
243
-
244
-
245
-
246
-
247
-
248
-
249
-
250
-
251
-
252
-
253
-
254
-
255
-
256
-
257
-
258
-
259
-
260
-
261
-
262
-
263
-
264
-
265
-
266
-
267
-
268
-
269
-
270
-
271
-
272
-
273
-
274
-
275
-
276
-
277
-
278
-
279
-
280
-
281
-
282
-
283
-
284
-
285
-
286
-
287
-
288
-
289
-
290
-
291
-
292
-
293
-
294
-
295
-
296
-
297
-
298
-
299
-
300
-
301
-
302
-
303
-
304
-
305
-
306
-
307
-
308
-
309
-
310
-
311
-
312
-
313
-
314
-
315
-
316
-
317
-
318
-
319
-
320
-
321
-
322
-
323
-
324
-
325
-
326
-
327
-
328
-
329
-
330
-
331
-
332
-
333
-
334
-
335
-
336
-
337
-
338
-
339
-
340
-
341
-
342
-
343
-
344
-
345
-
346
-
347
-
348
-
349
-
350
-
351
-
352
-
353
-
354
-
355
-
356
-
357
-
358
-
359
-
360
-
361
-
362
-
363
-
364
-
365
-
366
-
367
-
368
-
369
-
370
-
371
-
372
-
373
-
374
-
375
-
376
-
377
-
378
-
379
-
380
-
381
-
382
-
383
-
384
-
385
-
386
 |
 |