Dell E515dn Dell Multifunction Printer Users Guide - Page 278
Drum End Soon, Replace, Jam 2-sided, Jam Rear, Jam Tray, Manual Feed, No Caller ID, No Paper, Start - toner replacement
 |
View all Dell E515dn manuals
Add to My Manuals
Save this manual to your list of manuals |
Page 278 highlights
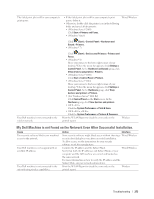
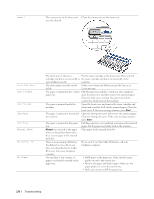
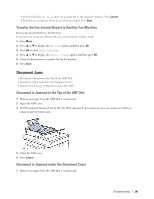
Drum ! The corona wire on the drum unit Clean the corona wire on the drum unit. must be cleaned. Drum End Soon Jam 2-sided Jam Inside Jam Rear Jam Tray Manual Feed No Caller ID No Paper The drum unit or the toner Put the toner cartridge in the drum unit. Then reinstall cartridge and drum unit assembly is the toner cartridge and drum unit assembly in the not installed correctly. machine. The drum unit is near the end of its life. Order a new drum unit before you get the Replace Drum message. The paper is jammed in the 2-sided Pull the paper tray and the 2‑sided tray out completely, paper tray. open the back cover and then remove the jammed paper. Close the back cover, and put the paper tray and the 2-sided tray firmly back in the machine. The paper is jammed inside the machine. Open the front cover and remove the toner cartridge and drum unit assembly. Pull out the jammed paper. Close the front cover. If the error message remains, press Start. The paper is jammed in the back of Open the fusing unit cover and remove the jammed paper. the machine. Close the fusing unit cover. If the error message remains, press Start. The paper is jammed in the paper Pull the paper tray out completely and remove the jammed tray. paper. Put the paper tray firmly back in the machine. Manual was selected as the paper Place paper in the manual feed slot. source in the printer driver when there was no paper in the manual feed slot. There is no incoming call history. If you want to use the Caller ID feature, call your You did not receive calls or you telephone company. have not subscribed to the Caller ID service from your telephone company. The machine is out of paper, or • Refill paper in the paper tray. Make sure the paper paper is not loaded correctly in the paper tray. guides are set to the correct size. • Remove the paper and load it again. Make sure the paper guides are set to the correct size. • Make sure not to overfill the paper tray. 278 Troubleshooting
-
 1
1 -
2
-
3
-
4
-
5
-
6
-
7
-
8
-
9
-
10
-
11
-
12
-
13
-
14
-
15
-
16
-
17
-
18
-
19
-
20
-
21
-
22
-
23
-
24
-
25
-
26
-
27
-
28
-
29
-
30
-
31
-
32
-
33
-
34
-
35
-
36
-
37
-
38
-
39
-
40
-
41
-
42
-
43
-
44
-
45
-
46
-
47
-
48
-
49
-
50
-
51
-
52
-
53
-
54
-
55
-
56
-
57
-
58
-
59
-
60
-
61
-
62
-
63
-
64
-
65
-
66
-
67
-
68
-
69
-
70
-
71
-
72
-
73
-
74
-
75
-
76
-
77
-
78
-
79
-
80
-
81
-
82
-
83
-
84
-
85
-
86
-
87
-
88
-
89
-
90
-
91
-
92
-
93
-
94
-
95
-
96
-
97
-
98
-
99
-
100
-
101
-
102
-
103
-
104
-
105
-
106
-
107
-
108
-
109
-
110
-
111
-
112
-
113
-
114
-
115
-
116
-
117
-
118
-
119
-
120
-
121
-
122
-
123
-
124
-
125
-
126
-
127
-
128
-
129
-
130
-
131
-
132
-
133
-
134
-
135
-
136
-
137
-
138
-
139
-
140
-
141
-
142
-
143
-
144
-
145
-
146
-
147
-
148
-
149
-
150
-
151
-
152
-
153
-
154
-
155
-
156
-
157
-
158
-
159
-
160
-
161
-
162
-
163
-
164
-
165
-
166
-
167
-
168
-
169
-
170
-
171
-
172
-
173
-
174
-
175
-
176
-
177
-
178
-
179
-
180
-
181
-
182
-
183
-
184
-
185
-
186
-
187
-
188
-
189
-
190
-
191
-
192
-
193
-
194
-
195
-
196
-
197
-
198
-
199
-
200
-
201
-
202
-
203
-
204
-
205
-
206
-
207
-
208
-
209
-
210
-
211
-
212
-
213
-
214
-
215
-
216
-
217
-
218
-
219
-
220
-
221
-
222
-
223
-
224
-
225
-
226
-
227
-
228
-
229
-
230
-
231
-
232
-
233
-
234
-
235
-
236
-
237
-
238
-
239
-
240
-
241
-
242
-
243
-
244
-
245
-
246
-
247
-
248
-
249
-
250
-
251
-
252
-
253
-
254
-
255
-
256
-
257
-
258
-
259
-
260
-
261
-
262
-
263
-
264
-
265
-
266
-
267
-
268
-
269
-
270
-
271
-
272
-
 273
273 -
 274
274 -
 275
275 -
 276
276 -
 277
277 -
 278
278 -
 279
279 -
 280
280 -
 281
281 -
 282
282 -
 283
283 -
284
-
285
-
286
-
287
-
288
-
289
-
290
-
291
-
292
-
293
-
294
-
295
-
296
-
297
-
298
-
299
-
300
-
301
-
302
-
303
-
304
-
305
-
306
-
307
-
308
-
309
-
310
-
311
-
312
-
313
-
314
-
315
-
316
-
317
-
318
-
319
-
320
-
321
-
322
-
323
-
324
-
325
-
326
-
327
-
328
-
329
-
330
-
331
-
332
-
333
-
334
-
335
-
336
-
337
-
338
-
339
-
340
-
341
-
342
-
343
-
344
-
345
-
346
-
347
-
348
-
349
-
350
-
351
-
352
-
353
-
354
-
355
-
356
-
357
-
358
-
359
-
360
-
361
-
362
-
363
-
364
-
365
-
366
-
367
-
368
-
369
-
370
-
371
-
372
-
373
-
374
-
375
-
376
-
377
-
378
-
379
-
380
-
381
-
382
-
383
-
384
-
385
-
386
 |
 |
