Dell Latitude C600 Service Manual - Page 12
Screw Identification, Hard Drive, Door Security, Keyboard to Bottom, Case Assembly - hard drive removal
 |
View all Dell Latitude C600 manuals
Add to My Manuals
Save this manual to your list of manuals |
Page 12 highlights
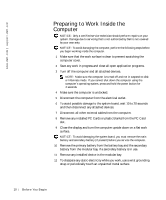
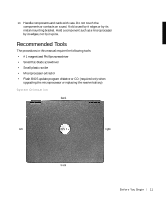
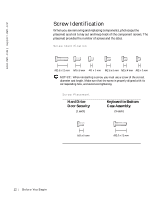
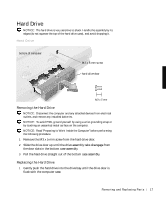
www.dell.com | support.dell.com Screw Identification When you are removing and replacing components, photocopy the placemat as a tool to lay out and keep track of the component screws. The placemat provides the number of screws and the sizes. Screw Identification NOTICE: When reinstalling a screw, you must use a screw of the correct diameter and length. Make sure that the screw is properly aligned with its corresponding hole, and avoid overtightening. Screw Placement Hard Drive Door Security: (1 each) Keyboard to Bottom Case Assembly: (5 each) 12 Be fo r e Yo u Be g in
-
 1
1 -
2
-
3
-
4
-
5
-
6
-
 7
7 -
 8
8 -
 9
9 -
 10
10 -
 11
11 -
 12
12 -
 13
13 -
 14
14 -
 15
15 -
 16
16 -
 17
17 -
18
-
19
-
20
-
21
-
22
-
23
-
24
-
25
-
26
-
27
-
28
-
29
-
30
-
31
-
32
-
33
-
34
-
35
-
36
-
37
-
38
-
39
-
40
-
41
-
42
-
43
-
44
-
45
-
46
-
47
-
48
-
49
-
50
-
51
-
52
-
53
-
54
-
55
-
56
-
57
-
58
-
59
-
60
-
61
-
62
 |
 |

12
Before You Begin
www.dell.com | support.dell.com
Screw Identification
When you are removing and replacing components, photocopy the
placemat as a tool to lay out and keep track of the component screws. The
placemat provides the number of screws and the sizes.
Screw Identification
NOTICE:
When reinstalling a screw, you must use a screw of the correct
diameter and length. Make sure that the screw is properly aligned with its
corresponding hole, and avoid overtightening.
Screw Placement
Hard Drive
Door Security:
(1 each)
Keyboard to Bottom
Case Assembly:
(5 each)