Dell Latitude C600 Service Manual - Page 53
Replacing the Speaker Assembly, System Board Assembly - cd drive
 |
View all Dell Latitude C600 manuals
Add to My Manuals
Save this manual to your list of manuals |
Page 53 highlights
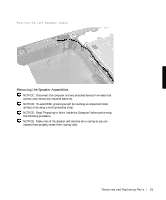
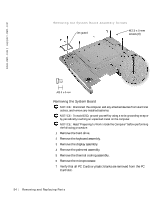
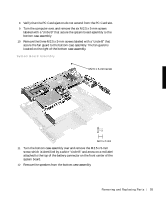
1 Remove the hard drive. 2 Remove the keyboard assembly. 3 Remove the display assembly. 4 Remove the palmrest assembly. 5 Disconnect the speaker interface cable connectors. NOTICE: Do not pull the antenna cable when removing the speaker (see "Speaker Assemblies"). 6 Remove the speaker assemblies by pulling them straight up and out of the bottom case assembly NOTICE: Handle the speaker assemblies and speakers with care to avoid damaging the speaker cones. NOTE: The left speaker has an in-line connector, and its cable is longer than the right speaker. Replacing the Speaker Assembly 1 To replace the speaker assembly, place the mounting ring over the front palmrest screw post. NOTICE: Make sure the speaker wires are under their routing clips. Route the left speaker wire properly between the battery bay and hard drive area. 2 Slide the speaker assembly down in to the bottom case assembly. NOTE: Speakers face out in the bottom case assembly holders. System Board Assembly The system board's BIOS chip contains the system's service tag number, which is also visible on a bar-code label on the bottom of the computer. The replacement kit for the system board assembly includes a CD that provides a utility for transferring the service tag number to the replacement system board assembly. Removing and Repl aci ng Part s 53
-
 1
1 -
2
-
3
-
4
-
5
-
6
-
7
-
8
-
9
-
10
-
11
-
12
-
13
-
14
-
15
-
16
-
17
-
18
-
19
-
20
-
21
-
22
-
23
-
24
-
25
-
26
-
27
-
28
-
29
-
30
-
31
-
32
-
33
-
34
-
35
-
36
-
37
-
38
-
39
-
40
-
41
-
42
-
43
-
44
-
45
-
46
-
47
-
 48
48 -
 49
49 -
 50
50 -
 51
51 -
 52
52 -
 53
53 -
 54
54 -
 55
55 -
 56
56 -
 57
57 -
 58
58 -
59
-
60
-
61
-
62
 |
 |
