Epson 585Wi Installation Guide - Ultra-Short Throw Wall Mount (ELPMB43) - Page 41
Adjusting the Image, Turn on the projector, Display the test pattern - pen calibration
 |
View all Epson 585Wi manuals
Add to My Manuals
Save this manual to your list of manuals |
Page 41 highlights
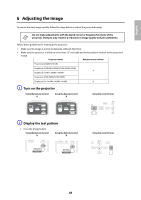
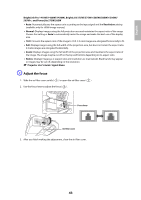
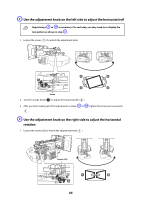
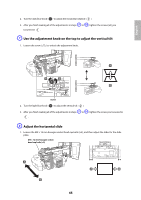
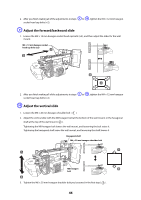
English 6 Adjusting the Image To ensure the best image quality, follow the steps below to adjust the projected image. Do not make adjustments with the Quick Corner or Keystone functions of the projector. Doing so may result in a reduction in image quality and pen calibration. Follow these guidelines for setting up the projector: • Make sure the image is evenly rectangular, without distortion. • Make sure the projector is tilted no more than ±3° vertically and horizontally in relation to the projected image. Projector model Remote control column PowerLite 470/480/570/580 BrightLink 475W/480i/485W/575Wi/585Wi/595Wi A BrightLink 575Wi+/585Wi+/595Wi+ PowerLite 475W/485W/575W/585W BrightLink Pro 1410Wi/1420Wi/1430Wi B A Turn on the projector Using the Remote Control A Using the Remote Control B Using the Control Panel B Display the test pattern 1. Press the [Help] button. Using the Remote Control A Using the Remote Control B Using the Control Panel 41
-
 1
1 -
2
-
3
-
4
-
5
-
6
-
7
-
8
-
9
-
10
-
11
-
12
-
13
-
14
-
15
-
16
-
17
-
18
-
19
-
20
-
21
-
22
-
23
-
24
-
25
-
26
-
27
-
28
-
29
-
30
-
31
-
32
-
33
-
34
-
35
-
 36
36 -
 37
37 -
 38
38 -
 39
39 -
 40
40 -
 41
41 -
 42
42 -
 43
43 -
 44
44 -
 45
45 -
 46
46 -
47
-
48
-
49
-
50
-
51
-
52
-
53
-
54
-
55
-
56
-
57
-
58
-
59
-
60
-
61
-
62
-
63
-
64
-
65
-
66
-
67
-
68
-
69
-
70
-
71
-
72
-
73
-
74
-
75
-
76
-
77
-
78
-
79
-
80
-
81
-
82
-
83
-
84
-
85
-
86
-
87
-
88
-
89
-
90
-
91
-
92
-
93
-
94
-
95
-
96
-
97
-
98
-
99
-
100
-
101
-
102
-
103
-
104
-
105
-
106
-
107
-
108
-
109
-
110
-
111
-
112
-
113
-
114
-
115
-
116
-
117
-
118
-
119
-
120
-
121
-
122
-
123
-
124
-
125
-
126
-
127
-
128
-
129
-
130
-
131
-
132
-
133
-
134
-
135
-
136
-
137
-
138
-
139
-
140
 |
 |