Epson 585Wi Installation Guide - Ultra-Short Throw Wall Mount (ELPMB43) - Page 47
Attaching the Covers, Turn off the display of the test pattern
 |
View all Epson 585Wi manuals
Add to My Manuals
Save this manual to your list of manuals |
Page 47 highlights
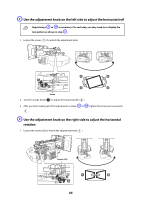
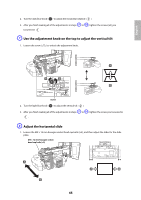
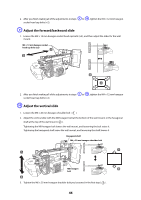
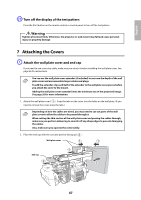
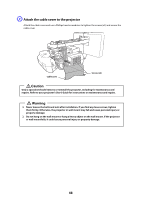
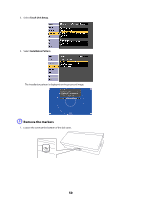
English K Turn off the display of the test pattern Press the [Esc] button on the remote control or control panel to turn off the test pattern. Warning Tighten all screws firmly. Otherwise, the projector or wall mount may fall and cause personal injury or property damage. 7 Attaching the Covers A Attach the wall plate cover and end cap If you need to use a security cable, make sure you attach it before installing the wall plate cover. See page 66 for instructions. You can use the wall plate cover extender (if included) to increase the depth of the wall plate cover and accommodate larger cables and plugs. To add the extender, clip each half of the extender to the wall plate cover pieces before you attach the cover to the mount. Adding the wall plate cover extender limits the minimum size of the projected image. See page 20 for more information. 1. Attach the wall plate cover ( ). Snap the tabs on the cover into the holes on the wall plate. (If you need to remove the cover, press the tabs.) Depending on how the cables are wired, you may need to cut out parts of the wall plate cover to allow the cables to be passed through it. When cutting the thin section of the wall plate cover and passing the cables through, make sure you perform deburring to smooth off any sharp edges to prevent damaging the cables. Also, make sure you operate the cutter safely. 2. Place the end cap with the concave portion facing up ( ). Wall plate cover End cap 47
-
 1
1 -
2
-
3
-
4
-
5
-
6
-
7
-
8
-
9
-
10
-
11
-
12
-
13
-
14
-
15
-
16
-
17
-
18
-
19
-
20
-
21
-
22
-
23
-
24
-
25
-
26
-
27
-
28
-
29
-
30
-
31
-
32
-
33
-
34
-
35
-
36
-
37
-
38
-
39
-
40
-
41
-
 42
42 -
 43
43 -
 44
44 -
 45
45 -
 46
46 -
 47
47 -
 48
48 -
 49
49 -
 50
50 -
 51
51 -
 52
52 -
53
-
54
-
55
-
56
-
57
-
58
-
59
-
60
-
61
-
62
-
63
-
64
-
65
-
66
-
67
-
68
-
69
-
70
-
71
-
72
-
73
-
74
-
75
-
76
-
77
-
78
-
79
-
80
-
81
-
82
-
83
-
84
-
85
-
86
-
87
-
88
-
89
-
90
-
91
-
92
-
93
-
94
-
95
-
96
-
97
-
98
-
99
-
100
-
101
-
102
-
103
-
104
-
105
-
106
-
107
-
108
-
109
-
110
-
111
-
112
-
113
-
114
-
115
-
116
-
117
-
118
-
119
-
120
-
121
-
122
-
123
-
124
-
125
-
126
-
127
-
128
-
129
-
130
-
131
-
132
-
133
-
134
-
135
-
136
-
137
-
138
-
139
-
140
 |
 |