Epson 585Wi Installation Guide - Ultra-Short Throw Wall Mount (ELPMB43) - Page 57
Do not place anything other than the markers near the projected image during angle
 |
View all Epson 585Wi manuals
Add to My Manuals
Save this manual to your list of manuals |
Page 57 highlights
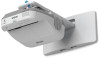
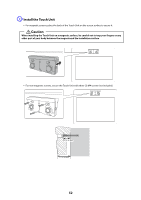
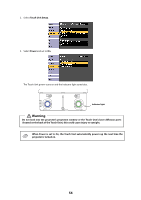
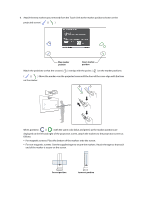
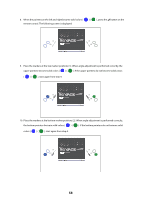
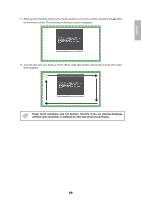
English Do not place anything other than the markers near the projected image during angle adjustment. If other objects are on the projected image, angle adjustment may not be performed correctly. 7. Turn the adjustment dials on the Touch Unit to move the pointers ( ) ( ) so that they move inside of the target ( ) ( ) of the same color (blue and green) on either side. Turning an adjustment dial clockwise moves the pointer diagonally up towards the center of the projected image. Turning an adjustment dial counterclockwise moves the pointer diagonally down away from the center of the projected image. When the pointers are inside the target, the colors become solid If a dial makes a clicking sound, the pointer will not move any further. ❏ When turning the dials, make sure shadows from your arm and body do not cover the markers. 57
-
 1
1 -
2
-
3
-
4
-
5
-
6
-
7
-
8
-
9
-
10
-
11
-
12
-
13
-
14
-
15
-
16
-
17
-
18
-
19
-
20
-
21
-
22
-
23
-
24
-
25
-
26
-
27
-
28
-
29
-
30
-
31
-
32
-
33
-
34
-
35
-
36
-
37
-
38
-
39
-
40
-
41
-
42
-
43
-
44
-
45
-
46
-
47
-
48
-
49
-
50
-
51
-
 52
52 -
 53
53 -
 54
54 -
 55
55 -
 56
56 -
 57
57 -
 58
58 -
 59
59 -
 60
60 -
 61
61 -
 62
62 -
63
-
64
-
65
-
66
-
67
-
68
-
69
-
70
-
71
-
72
-
73
-
74
-
75
-
76
-
77
-
78
-
79
-
80
-
81
-
82
-
83
-
84
-
85
-
86
-
87
-
88
-
89
-
90
-
91
-
92
-
93
-
94
-
95
-
96
-
97
-
98
-
99
-
100
-
101
-
102
-
103
-
104
-
105
-
106
-
107
-
108
-
109
-
110
-
111
-
112
-
113
-
114
-
115
-
116
-
117
-
118
-
119
-
120
-
121
-
122
-
123
-
124
-
125
-
126
-
127
-
128
-
129
-
130
-
131
-
132
-
133
-
134
-
135
-
136
-
137
-
138
-
139
-
140
 |
 |