Epson 7900p User Manual - Page 66
Using the Menu System
 |
UPC - 010343852464
View all Epson 7900p manuals
Add to My Manuals
Save this manual to your list of manuals |
Page 66 highlights
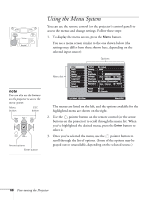
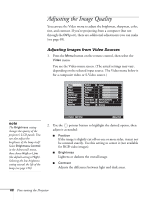
Using the Menu System You can use the remote control (or the projector's control panel) to access the menus and change settings. Follow these steps: 1. To display the menu screen, press the Menu button. You see a menu screen similar to the one shown below (the settings may differ from those shown here, depending on the selected input source): Options note You can also use the buttons on the projector to access the menu system: Menu button ESC button Arrow buttons Enter button Menu list Video Audio Effect Setting User's Logo Advanced1 Advanced2 About Reset All Position Adjust Tracking : 0000 Sync. : 0 Brightness : 0 - + Contrast : Auto Manual Adjust Sharpness : 0 - + Color Mode Select [Presentation ] Resolution : Auto Manual Select :[ ] Preset Set Reset Execute [ ]: Select [ ]: Enter [Menu]: Exit The menus are listed on the left, and the options available for the highlighted menu are shown on the right. 2. Use the pointer button on the remote control (or the arrow buttons on the projector) to scroll through the menu list. When you've highlighted the desired menu, press the Enter button to select it. 3. Once you've selected the menu, use the pointer button to scroll through the list of options. (Some of the options may be grayed out or unavailable, depending on the selected source.) 66 Fine-tuning the Projector
-
 1
1 -
2
-
3
-
4
-
5
-
6
-
7
-
8
-
9
-
10
-
11
-
12
-
13
-
14
-
15
-
16
-
17
-
18
-
19
-
20
-
21
-
22
-
23
-
24
-
25
-
26
-
27
-
28
-
29
-
30
-
31
-
32
-
33
-
34
-
35
-
36
-
37
-
38
-
39
-
40
-
41
-
42
-
43
-
44
-
45
-
46
-
47
-
48
-
49
-
50
-
51
-
52
-
53
-
54
-
55
-
56
-
57
-
58
-
59
-
60
-
 61
61 -
 62
62 -
 63
63 -
 64
64 -
 65
65 -
 66
66 -
 67
67 -
 68
68 -
 69
69 -
 70
70 -
 71
71 -
72
-
73
-
74
-
75
-
76
-
77
-
78
-
79
-
80
-
81
-
82
-
83
-
84
-
85
-
86
-
87
-
88
-
89
-
90
-
91
-
92
-
93
-
94
-
95
-
96
-
97
-
98
-
99
-
100
-
101
-
102
-
103
-
104
-
105
-
106
-
107
-
108
-
109
-
110
-
111
-
112
-
113
-
114
-
115
-
116
-
117
-
118
-
119
-
120
-
121
-
122
-
123
-
124
-
125
-
126
-
127
-
128
-
129
-
130
-
131
-
132
-
133
-
134
-
135
-
136
-
137
-
138
-
139
-
140
-
141
-
142
-
143
-
144
-
145
-
146
 |
 |
