Epson LW-700 Users Guide - Page 48
Using Label Editor for Windows, Getting Started With Label Editor, Installing Label Editor - driver
 |
View all Epson LW-700 manuals
Add to My Manuals
Save this manual to your list of manuals |
Page 48 highlights
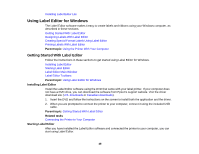
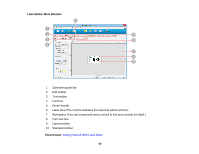
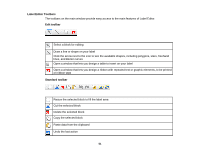
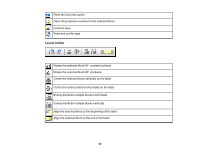
Installing Label Editor Lite Using Label Editor for Windows The Label Editor software makes it easy to create labels and ribbons using your Windows computer, as described in these sections. Getting Started With Label Editor Designing Labels With Label Editor Creating Special Format Labels Using Label Editor Printing Labels With Label Editor Parent topic: Using the Printer With Your Computer Getting Started With Label Editor Follow the instructions in these sections to get started using Label Editor for Windows. Installing Label Editor Starting Label Editor Label Editor Main Window Label Editor Toolbars Parent topic: Using Label Editor for Windows Installing Label Editor Install the Label Editor software using the DVD that came with your label printer. If your computer does not have a DVD drive, you can download the software from Epson's support website. Visit the driver download site (U.S. downloads or Canadian downloads). 1. Insert the DVD and follow the instructions on the screen to install both the application and the driver. 2. When you are prompted to connect the printer to your computer, connect it using the included USB cable. Parent topic: Getting Started With Label Editor Related tasks Connecting the Printer to Your Computer Starting Label Editor After you have installed the Label Editor software and connected the printer to your computer, you can start using Label Editor. 48
-
 1
1 -
2
-
3
-
4
-
5
-
6
-
7
-
8
-
9
-
10
-
11
-
12
-
13
-
14
-
15
-
16
-
17
-
18
-
19
-
20
-
21
-
22
-
23
-
24
-
25
-
26
-
27
-
28
-
29
-
30
-
31
-
32
-
33
-
34
-
35
-
36
-
37
-
38
-
39
-
40
-
41
-
42
-
 43
43 -
 44
44 -
 45
45 -
 46
46 -
 47
47 -
 48
48 -
 49
49 -
 50
50 -
 51
51 -
 52
52 -
 53
53 -
54
-
55
-
56
-
57
-
58
-
59
-
60
-
61
-
62
-
63
-
64
-
65
-
66
-
67
-
68
-
69
-
70
-
71
-
72
-
73
-
74
-
75
-
76
-
77
-
78
-
79
-
80
-
81
-
82
-
83
-
84
-
85
-
86
-
87
-
88
-
89
-
90
-
91
-
92
-
93
-
94
-
95
-
96
-
97
-
98
-
99
-
100
-
101
-
102
-
103
-
104
-
105
-
106
-
107
-
108
-
109
-
110
-
111
-
112
-
113
-
114
-
115
-
116
-
117
-
118
-
119
-
120
-
121
-
122
-
123
-
124
-
125
-
126
-
127
-
128
-
129
 |
 |
