Epson LW-700 Users Guide - Page 85
Creating Numbered Label Sequences in Label Editor, Creating Special Format Labels Using Label Editor
 |
View all Epson LW-700 manuals
Add to My Manuals
Save this manual to your list of manuals |
Page 85 highlights
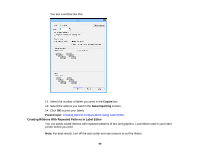
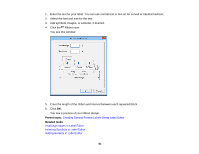
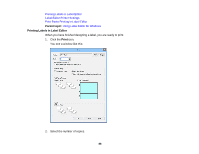
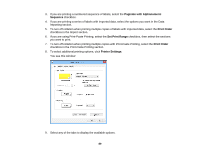
2. Select a category on the left, then scroll through the label images to select the one you want. Note: To limit your selection to the tape width you are using, click the arrow under Tape Width and select the width. 3. To edit a selected label, click Edit. You see the label on the Label Editor screen. You can use any of the available editing tools to edit the label blocks. 4. To print a selected label, click Print. 5. Select the number of copies and any other settings you want. 6. Click OK to print. Parent topic: Creating Special Format Labels Using Label Editor Related tasks Editing Text Design in Label Editor Editing Layout in Label Editor Printing Labels in Label Editor Creating Numbered Label Sequences in Label Editor You can create copies of a label that are automatically numbered in sequence using numerals or letters of the alphabet. 1. Create the text for your label. 2. Open the Insert menu and select Alphanumeric Sequence. 85
-
 1
1 -
2
-
3
-
4
-
5
-
6
-
7
-
8
-
9
-
10
-
11
-
12
-
13
-
14
-
15
-
16
-
17
-
18
-
19
-
20
-
21
-
22
-
23
-
24
-
25
-
26
-
27
-
28
-
29
-
30
-
31
-
32
-
33
-
34
-
35
-
36
-
37
-
38
-
39
-
40
-
41
-
42
-
43
-
44
-
45
-
46
-
47
-
48
-
49
-
50
-
51
-
52
-
53
-
54
-
55
-
56
-
57
-
58
-
59
-
60
-
61
-
62
-
63
-
64
-
65
-
66
-
67
-
68
-
69
-
70
-
71
-
72
-
73
-
74
-
75
-
76
-
77
-
78
-
79
-
 80
80 -
 81
81 -
 82
82 -
 83
83 -
 84
84 -
 85
85 -
 86
86 -
 87
87 -
 88
88 -
 89
89 -
 90
90 -
91
-
92
-
93
-
94
-
95
-
96
-
97
-
98
-
99
-
100
-
101
-
102
-
103
-
104
-
105
-
106
-
107
-
108
-
109
-
110
-
111
-
112
-
113
-
114
-
115
-
116
-
117
-
118
-
119
-
120
-
121
-
122
-
123
-
124
-
125
-
126
-
127
-
128
-
129
 |
 |
