Epson LW-700 Users Guide - Page 66
Inserting Tables in Label Editor
 |
View all Epson LW-700 manuals
Add to My Manuals
Save this manual to your list of manuals |
Page 66 highlights
Parent topic: Designing Labels With Label Editor Related tasks Working With Blocks in Label Editor Inserting Tables in Label Editor You can add customized tables to your labels. 1. Click the Table icon. You see this window: 2. Select the table settings you want to use and click OK. The table appears on your label. 3. To resize the table, click and drag one of the green dots to the size you want. 4. To format the table, select it and click the Properties icon. 66
-
 1
1 -
2
-
3
-
4
-
5
-
6
-
7
-
8
-
9
-
10
-
11
-
12
-
13
-
14
-
15
-
16
-
17
-
18
-
19
-
20
-
21
-
22
-
23
-
24
-
25
-
26
-
27
-
28
-
29
-
30
-
31
-
32
-
33
-
34
-
35
-
36
-
37
-
38
-
39
-
40
-
41
-
42
-
43
-
44
-
45
-
46
-
47
-
48
-
49
-
50
-
51
-
52
-
53
-
54
-
55
-
56
-
57
-
58
-
59
-
60
-
 61
61 -
 62
62 -
 63
63 -
 64
64 -
 65
65 -
 66
66 -
 67
67 -
 68
68 -
 69
69 -
 70
70 -
 71
71 -
72
-
73
-
74
-
75
-
76
-
77
-
78
-
79
-
80
-
81
-
82
-
83
-
84
-
85
-
86
-
87
-
88
-
89
-
90
-
91
-
92
-
93
-
94
-
95
-
96
-
97
-
98
-
99
-
100
-
101
-
102
-
103
-
104
-
105
-
106
-
107
-
108
-
109
-
110
-
111
-
112
-
113
-
114
-
115
-
116
-
117
-
118
-
119
-
120
-
121
-
122
-
123
-
124
-
125
-
126
-
127
-
128
-
129
 |
 |

Parent topic:
Designing Labels With Label Editor
Related tasks
Working With Blocks in Label Editor
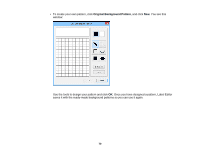
Inserting Tables in Label Editor
You can add customized tables to your labels.
1.
Click the
Table icon.
You see this window:
2.
Select the table settings you want to use and click
OK
.
The table appears on your label.
3.
To resize the table, click and drag one of the green dots to the size you want.
4.
To format the table, select it and click the
Properties icon.
66