Epson PhotoPC 750Z User Manual - Page 20
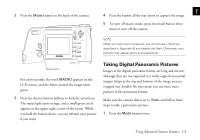
if you want., you hold the button down, you can reframe your picture
 |
View all Epson PhotoPC 750Z manuals
Add to My Manuals
Save this manual to your list of manuals |
Page 20 highlights
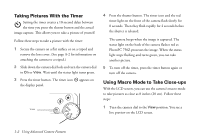
The word PANORAMA appears briefly on your screen and black margins appear at the top and bottom of the LCD screen, and you see the panorama icon at the bottom. You can use the image quality button on top of the camera to select fine, super fine, monochrome fine, or monochrome super fine image quality (all at 1280 × 480 pixels); or HyPict or monochrome HyPict (both at 1600 × 600 pixels). 2 Press the shutter button halfway to lock the auto focus. The status light turns orange, and a small green circle appears in the upper right corner of the screen. While you hold the button down, you can reframe your picture if you want. 3 Press the button all the way down to capture the image. The Panorama format remains active until you press the mode button twice or turn off the camera. NOTE You can't use panorama mode when taking pictures with continuous shooting (see page 1-7). The following examples show the same subject captured in standard, digital zoom, and digital panorama formats: standard digital zoom digital panorama 1-4 Using Advanced Camera Features
-
 1
1 -
2
-
3
-
4
-
5
-
6
-
7
-
8
-
9
-
10
-
11
-
12
-
13
-
14
-
 15
15 -
 16
16 -
 17
17 -
 18
18 -
 19
19 -
 20
20 -
 21
21 -
 22
22 -
 23
23 -
 24
24 -
 25
25 -
26
-
27
-
28
-
29
-
30
-
31
-
32
-
33
-
34
-
35
-
36
-
37
-
38
-
39
-
40
-
41
-
42
-
43
-
44
-
45
-
46
-
47
-
48
-
49
-
50
-
51
-
52
-
53
-
54
-
55
-
56
-
57
-
58
-
59
-
60
-
61
-
62
-
63
-
64
-
65
-
66
-
67
-
68
-
69
-
70
-
71
-
72
-
73
-
74
-
75
-
76
-
77
-
78
-
79
-
80
-
81
-
82
-
83
-
84
-
85
-
86
-
87
-
88
-
89
-
90
-
91
-
92
-
93
-
94
-
95
-
96
-
97
-
98
-
99
-
100
-
101
-
102
-
103
-
104
-
105
-
106
-
107
-
108
-
109
-
110
-
111
-
112
-
113
-
114
-
115
-
116
-
117
-
118
-
119
-
120
-
121
-
122
-
123
-
124
-
125
-
126
-
127
-
128
-
129
-
130
-
131
-
132
-
133
-
134
-
135
-
136
-
137
-
138
-
139
-
140
-
141
-
142
-
143
-
144
-
145
-
146
-
147
-
148
-
149
-
150
-
151
-
152
-
153
-
154
-
155
-
156
-
157
-
158
-
159
-
160
-
161
-
162
-
163
-
164
-
165
-
166
-
167
-
168
-
169
-
170
 |
 |
