Epson PhotoPC 750Z User Manual - Page 21
Taking Digital Zoom Pictures, Using the View Mode Menus
 |
View all Epson PhotoPC 750Z manuals
Add to My Manuals
Save this manual to your list of manuals |
Page 21 highlights
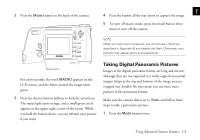
Taking Digital Zoom Pictures 1 3 Press the button all the way down to capture the image. Digital zoom pictures are magnified two times (2×). This format is like a digital version of telephoto. The automatic cropping effect makes file sizes smaller, allowing you to store more pictures in the digital zoom format. Make sure the camera dial is set to View, and follow these steps to take a digital zoom picture: The zoom format remains active until you press the Mode button again or turn off the camera. NOTE Since the digital zoom mode crops the image and magnifies it, it is best to print the image in a smaller format. 1 Press the Mode button three times. Using the View Mode Menus The word D-ZOOM appears on your LCD briefly. An orange frame appears around the previewed image, and the digital zoom icon is displayed at the bottom of the screen. You can use the view mode on the LCD screen to use advanced settings and control the display of information. Make sure your lens cover is off, then follow these steps to access the menus: 2 Press the shutter button halfway to lock the auto focus. 1 Slide down the camera dial lock and turn the camera dial to the View position. The status light turns orange, and a small green circle appears in the upper right corner of the screen. While The lens moves out and you see a preview of your A you hold the button down, you can reframe your picture picture on the LCD screen. if you want. B Using Advanced Camera Features 1-5
-
 1
1 -
2
-
3
-
4
-
5
-
6
-
7
-
8
-
9
-
10
-
11
-
12
-
13
-
14
-
15
-
 16
16 -
 17
17 -
 18
18 -
 19
19 -
 20
20 -
 21
21 -
 22
22 -
 23
23 -
 24
24 -
 25
25 -
 26
26 -
27
-
28
-
29
-
30
-
31
-
32
-
33
-
34
-
35
-
36
-
37
-
38
-
39
-
40
-
41
-
42
-
43
-
44
-
45
-
46
-
47
-
48
-
49
-
50
-
51
-
52
-
53
-
54
-
55
-
56
-
57
-
58
-
59
-
60
-
61
-
62
-
63
-
64
-
65
-
66
-
67
-
68
-
69
-
70
-
71
-
72
-
73
-
74
-
75
-
76
-
77
-
78
-
79
-
80
-
81
-
82
-
83
-
84
-
85
-
86
-
87
-
88
-
89
-
90
-
91
-
92
-
93
-
94
-
95
-
96
-
97
-
98
-
99
-
100
-
101
-
102
-
103
-
104
-
105
-
106
-
107
-
108
-
109
-
110
-
111
-
112
-
113
-
114
-
115
-
116
-
117
-
118
-
119
-
120
-
121
-
122
-
123
-
124
-
125
-
126
-
127
-
128
-
129
-
130
-
131
-
132
-
133
-
134
-
135
-
136
-
137
-
138
-
139
-
140
-
141
-
142
-
143
-
144
-
145
-
146
-
147
-
148
-
149
-
150
-
151
-
152
-
153
-
154
-
155
-
156
-
157
-
158
-
159
-
160
-
161
-
162
-
163
-
164
-
165
-
166
-
167
-
168
-
169
-
170
 |
 |
