Epson PhotoPC 750Z User Manual - Page 50
Getting Photos Into Applications and Documents, EPSON, Import, TWAIN_32, Acquire, TWAIN Acquire
 |
View all Epson PhotoPC 750Z manuals
Add to My Manuals
Save this manual to your list of manuals |
Page 50 highlights
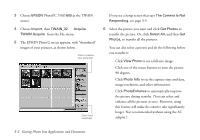
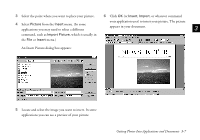
3 Choose EPSON PhotoPC 750Z-600 as the TWAIN source. 4 Choose Import, then TWAIN_32 (or Acquire, then TWAIN Acquire) from the File menu. 5 The EPSON Photo!2 screen appears, with "thumbnail" images of your pictures, as shown below. Click to transfer your picture(s) Click if you need help If you see a Setup screen that says The Camera Is Not Responding, see page 3-5. 6 Select the picture you want and click Get Photos to transfer the picture. Or, click Select All, and then Get Photos, to transfer all the pictures. You can also select a picture and do the following before you transfer it: Click View Photo to see a full-size image. Click one of the rotate buttons to turn the picture 90 degrees. Click Photo Info to see the capture time and date, image resolution, and other information. Click PhotoEnhance to automatically improve the picture during transfer. (You can select and enhance all the pictures at once. However, using this feature will make the transfer take significantly longer. Not recommended without using the AC adapter.) 3-2 Getting Photos Into Applications and Documents
-
 1
1 -
2
-
3
-
4
-
5
-
6
-
7
-
8
-
9
-
10
-
11
-
12
-
13
-
14
-
15
-
16
-
17
-
18
-
19
-
20
-
21
-
22
-
23
-
24
-
25
-
26
-
27
-
28
-
29
-
30
-
31
-
32
-
33
-
34
-
35
-
36
-
37
-
38
-
39
-
40
-
41
-
42
-
43
-
44
-
 45
45 -
 46
46 -
 47
47 -
 48
48 -
 49
49 -
 50
50 -
 51
51 -
 52
52 -
 53
53 -
 54
54 -
 55
55 -
56
-
57
-
58
-
59
-
60
-
61
-
62
-
63
-
64
-
65
-
66
-
67
-
68
-
69
-
70
-
71
-
72
-
73
-
74
-
75
-
76
-
77
-
78
-
79
-
80
-
81
-
82
-
83
-
84
-
85
-
86
-
87
-
88
-
89
-
90
-
91
-
92
-
93
-
94
-
95
-
96
-
97
-
98
-
99
-
100
-
101
-
102
-
103
-
104
-
105
-
106
-
107
-
108
-
109
-
110
-
111
-
112
-
113
-
114
-
115
-
116
-
117
-
118
-
119
-
120
-
121
-
122
-
123
-
124
-
125
-
126
-
127
-
128
-
129
-
130
-
131
-
132
-
133
-
134
-
135
-
136
-
137
-
138
-
139
-
140
-
141
-
142
-
143
-
144
-
145
-
146
-
147
-
148
-
149
-
150
-
151
-
152
-
153
-
154
-
155
-
156
-
157
-
158
-
159
-
160
-
161
-
162
-
163
-
164
-
165
-
166
-
167
-
168
-
169
-
170
 |
 |
